Sticky ads, animations and close button
PRO This page demonstrates Ad Inserter Pro sticky ads with placeholders. Displayed are ads that stick to the screen (left and right side), ads that stick to the content (left and right side), sticky ads that scroll with the page, top and bottom sticky ads, centered popup ad and few animation examples that trigger when you scroll down the page – some animations are configured to trigger only once. Make sure you test on desktop browser with display wide enough so all ads will be displayed. Top, bottom and popup ads are displayed also on mobile screens.
If you are using responsive ad code (e.g. responsive AdSense code) you need to define ad width (and height) otherwise the code can’t resize as parent container width for sticky ads is not known. You can do this by specifying ad width and height (for AdSense you can use built in code generator) or define ad block width and height using custom CSS (for example, by adding CSS code width: 160px; height: 600px;).
Sticky ads as supported by Ad Inserter Pro and described below can’t be used on AMP pages as they use CSS property position: fixed; or Javascript code which is not allowed on AMP pages. Check sticky AMP ads for details on code for sticky ads on AMP pages.
Settings for sticky ads
For each sticky ad there are many settings which are divided into three sections:
- Horizontal position
- Vertical position
- Animation
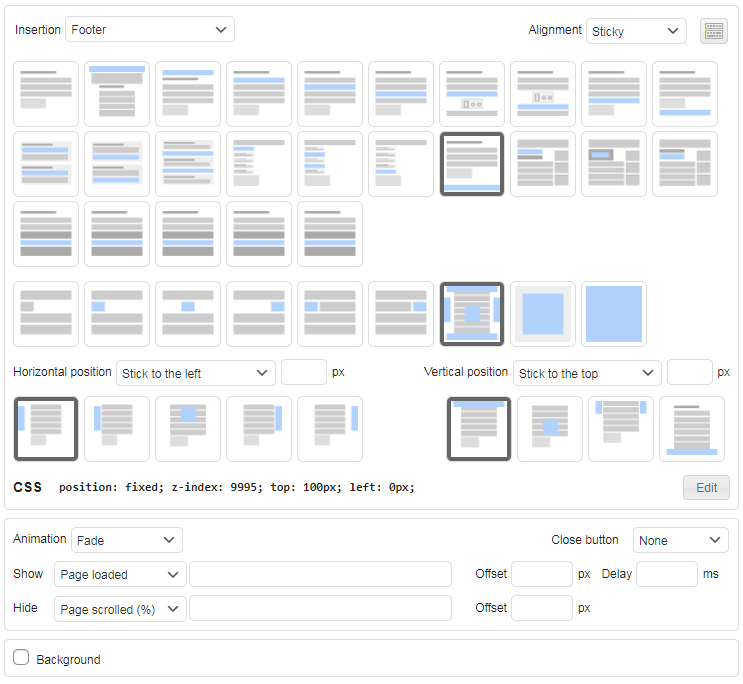
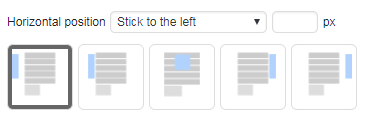
Horizontal position
Horizontal position defines how sticky ad is positioned horizontally. Available options are:
- Stick to the left
- Stick to the content left
- Center
- Stick to the content right
- Stick to the right
Stick to the content left
This alignment displays ad next to the left edge of page content (as sidebar) – it also overlaps any content there. Next to the alignment selection you can optionally enter horizontal margin in pixels. Page content width is in most cases automatically calculated and it is assumed that the content is centered horizontally. In the case the page width is not properly calculated you can manually define main content element with CSS selector or width in pixels (tab  / tab General).
Stick to the content right
This alignment displays ad next to the right edge of page content (as sidebar) – it also overlaps any content there. Next to the alignment selection you can optionally enter horizontal margin in pixels. Page content width is automatically calculated and it is assumed that the content is centered horizontally. In the case the page width is not properly calculated you can manually define main content element with CSS selector or width in pixels (tab / tab General).
Stick to the right
This alignment displays ad next to the right screen edge – it overlaps any content there. Next to the alignment selection you can optionally enter horizontal margin in pixels.
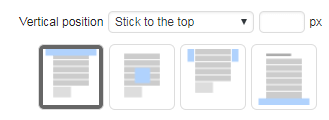
Vertical position
Vertical position defines how sticky ad is positioned vertically. Available options are:
- Stick to the top
- Center
- Scroll with the content
- Stick to the bottom
Stick to the top
This alignment displays ad next to the top screen edge – it overlaps any content there. Next to the alignment selection you can optionally enter vertical margin in pixels. The ad stays fixed there – it doesn’t move when the page is scrolled.
Center
This alignment displays ad centered vertically – it overlaps any content there.
Scroll with the content
This alignment scrolls ad with the page. It stays fixed relative to the page (you can optionally define vertical margin in pixels) and when the page is scrolled the ad is scrolled with it.
Stick to the bottom
This alignment displays ad next to the bottom screen edge – it overlaps any content there. Next to the alignment selection you can optionally enter vertical margin in pixels. The ad stays fixed there – it doesn’t move when the page is scrolled.
Stick to the content
Stick to the content horizontal position displays ads next to the left or right edge of page content (as sidebar). In most cases the plugin will automatically calculate page content width (assuming that the content is centered horizontally) and position ads automatically. However, some themes may require to define main content element manually. For this go to tab / tab General and define Main content element. You can enter either CSS selector (#id or .class) of the main (outermost) page element or content width in pixels (numerical value only).
Animation

Sticky ads can be displayed when the page is scrolled to some position, after some delay or when the page is loaded. You can also define an effect (animation) to show or hide the ad.
The following animations (effects) are available:
- Fade
- Slide
- Slide and Fade
- Turn
- Flip
- Zoom In
- Zoom out
For each horizontal and vertical alignment the plugin will select optimal animation direction. Some animations are not available with all positions. In such cases the plugin will choose the best alternative.
Each animation has the following additional parameters:
- Animation trigger
- Trigger offset
- Trigger delay
- Trigger only once
Animation trigger
The following triggers are available:
- Page loaded – The animation starts when the page is loaded.
- Page scrolled (%) – The animation starts when the page is scrolled for the defined percentage (specify only numerical value from 1 to 100).
- Page scrolled (px) – The animation starts when the page is scrolled for the defined number of pixels (specify only numerical value).
- Element visible – The animation starts when specific HTML element becomes visible. Specify CSS selector for the element (
#idor.class).
Trigger offset
This is additional offset in pixels that is taken into account when the animation is triggered (positive and negative values are possible).
Trigger delay
This value defines delay of animation (in milliseconds) after the trigger event. To simply show sticky ad with a delay set animation to Fade and define delay.
Trigger only once
Normally the sticky ad will be displayed after the trigger condition occurs and will hide when the condition is not met. Here you can define to trigger animation only once – show the ad and don’t hide it when the page is scrolled back.
Close button

Each ad can have a close button. You can choose one of the four corners where the button will be displayed. The ad will not be displayed until the page is reloaded. This setting is a mirror of the Close button setting on the Misc / Display tab. It is available also here for convenience.
Close button can be customized
Please note that Ad Inserter supports another type of sticky ad: sticky (fixed) widgets. Sticky widget is a widget that you place in the sidebar and when the page is scrolled down and sticky widget reaches top of the page, sticky widget and all the widgets below stay fixed – they don’t move when the page is scrolled down. Sticky widgets are available also in the free Ad Inserter and are not considered sticky ads as shown on this page.
Pop-up ads
With sticky ads you can also easily create a pop-up ad. Simply center it horizontally and vertically, add a close button and set animation:
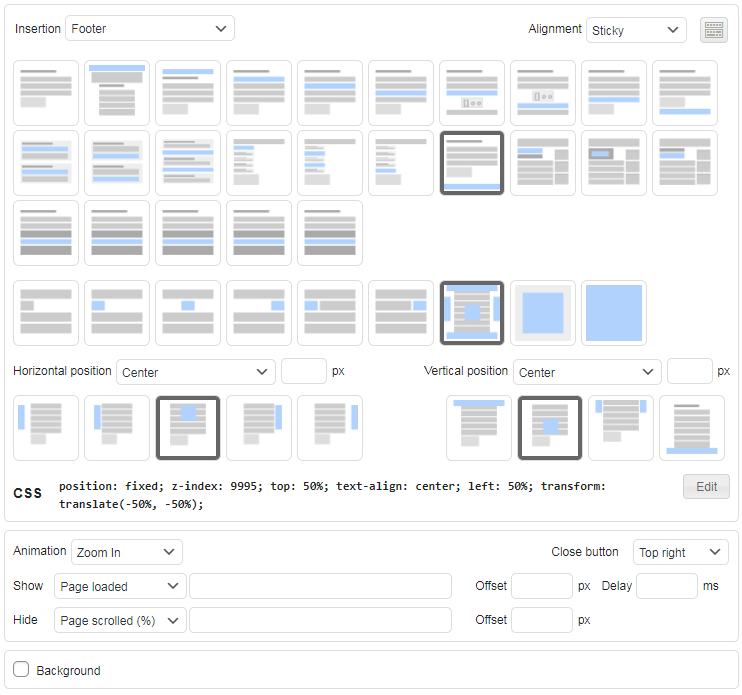
Test it in the preview window:
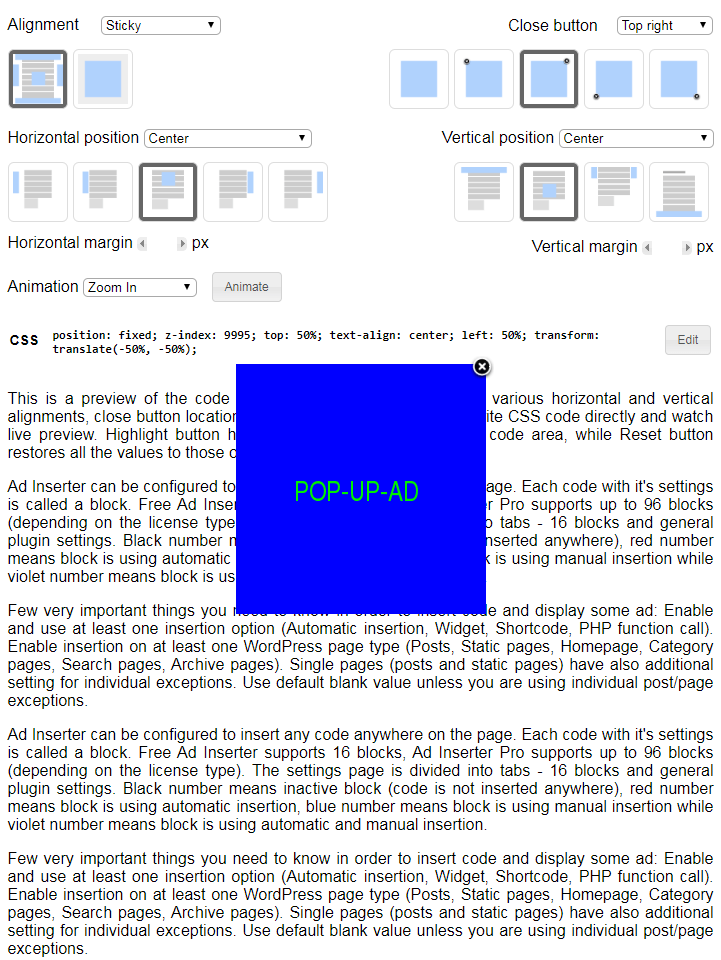
When you scroll this page down to the end you should see a pop-up ad with Flip animation.
Related Pages
Install Ad Inserter for free
Ad Inserter Pro Affiliate Program