AdSense Ads
WordPress AdSense plugin to automatically insert code for AdSense ads
- Looking for a flexible WordPress AdSense plugin?
- To optimally monetize your website?
- To insert ads where other plugins have failed?

![]()
Introduction
AdSense is a free, simple way to make money online by placing ads on your website. Google AdSense is a program run by Google that allows publishers in the Google Network of content sites to serve automatic text, image, video, or interactive media advertisements, that are targeted to site content and audience.
To show AdSense ads you need to place code for AdSense on your website – you need WordPress AdSense Plugin. Ad Inserter is a perfect tool to automatically insert code for AdSense ads on any page. AdSense integration and clearance options to make sure that your page will comply with the AdSense program policies, are just two advanced features that will help you to monetize your website with AdSense. Here we explain specific settings for the code for AdSense ads. For details please check also automatic insertion, WordPress page types and code editing.
Please note that Ad Inserter is more than just WordPress AdSense Plugin – it is a universal plugin that can insert any code or ads anywhere on the page.
To install Ad Inserter plugin log in to your WordPress dashboard, click on Plugins in the WordPress menu, click on Add New on top of the plugin page, search for ad inserter, select Ad Inserter from the results, click Install and then Activate the plugin.
Alternatively you can download it to your disk and then click on Upload Plugin, choose file you have downloaded, click on Install now and then Activate the plugin.

For plugin settings go to WordPress menu Settings > Ad Inserter.
Here we’ll explain step by step how to place AdSense ads on your website using Ad Inserter plugin. If you don’t have AdSense account yet you first need to sign up.
New to AdSense?
If you are new to AdSense you should first install the Ad Inserter plugin as described above and then jump to
Advanced AdSense Ads – Quick links:
| Ad Unit |
| Text & display ads |
| Responsive ads |
| Ad code |
| AdSense Integration |
| In-feed ads |
| In-article ads |
| Auto ads |
| AMP ads |
| Sticky AMP ads |
| AMP Auto ads |
| Ads not displayed – troubleshooting |
Ad unit
With ad units you can define type of ads for each ad space on your website. For each ad unit you get ad code which can be inserted where you would like to show ads. This way you have total control over the ads on your website.
Ad code: a snippet of HTML that when placed on any page of an approved site shows Google ads in a specific ad layout and format.
Ad unit: a set of Google ads displayed as a result of one piece of AdSense ad code.
The first step is to create ad unit. Once you are logged in to AdSense go to My Ads / Content / Ad Units and click on New ad unit. You will be asked to choose the type of ad.
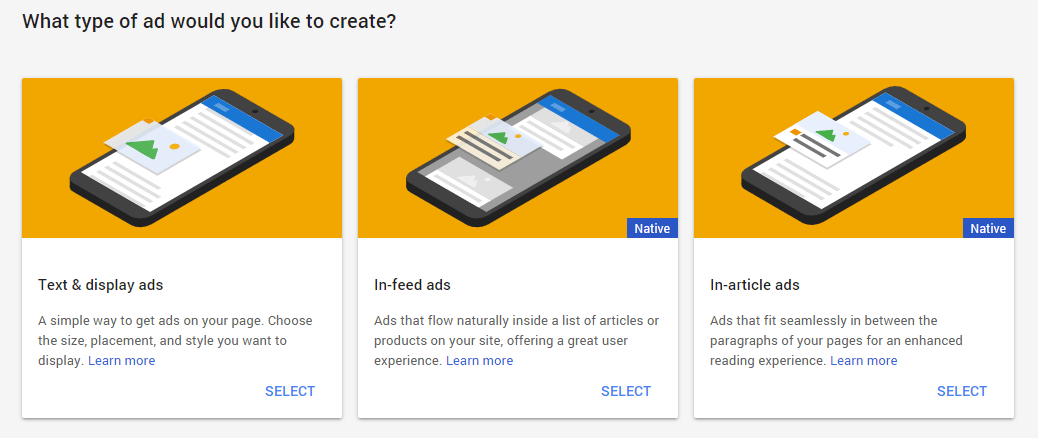
In most cases where you would like to place ads on your posts or static pages you’ll need Text & display ads. Give your ad unit a name. It’s a good idea to use a unique, descriptive name that will help you find this ad unit later.
Text & display ads
How to create a display ad unit
How to create an In-article ad unit
In the “Ad size” section, choose the size of the ads that you’d like to show:
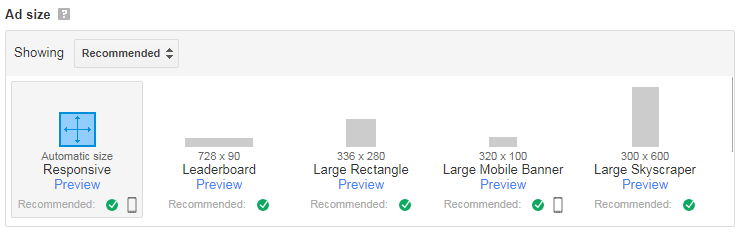
Here you can choose between responsive (automatic size) ad unit and fixed sizes. In general, wider ad units perform better. In most cases you can choose responsive ad unless you want a fixed size ad. In such case choose one of recommended ad sizes, which have shown to perform well across a variety of sites. Ad sizes that perform well on mobile are shown with a mobile icon.
Responsive ads
This ad unit will automatically adapt its size to fit your page layout. It’s intended to work with sites built with responsive design, but will work on non-responsive sites too. Responsive ad units allow you to support a wide range of devices by working with your responsive design web pages.
If you would like to use floating ads (ads wrapped with text) or sticky ads (ads that stay fixed when the page scrolls, not sticky widgets in the sidebar) you need to choose fixed size ads or define ad block width and height. You can do this by specifying ad width and height (for AdSense you can use built in code generator) or define ad block width and height using custom CSS (for example, by adding CSS code width: 160px; height: 600px;).
However, regardless of what type of Text & display ad you will choose here you will be able to change size or responsiveness in Ad Inserter code editor for AdSense.
Next you need to choose Ad type. We highly recommend that you display both text and display ads. By displaying more ad types, you can earn more revenue.
You can also choose text ad styles, define custom channels and what to display when no ad is available. When you are happy with settings click on Save and get code. Once the ad unit is created it will show in the list of ad units where you’ll be able to edit it or get the code for it. Ad unit changes may take up to two hours to appear in performance reports. Cgeck also How to customize your responsive Matched content unit.
Recently Google changed behavior of responsive ads on phones. Now they use full screen width by default and the ad code includes attribute data-full-width-responsive="true". If the attribute data-full-width-responsive is missing or set to true, the responsive ad will occupy full screen width. You need to set it to false (simply add the line if it is missing). For example:
<script async src="//pagead2.googlesyndication.com/pagead/js/adsbygoogle.js"></script> <ins class="adsbygoogle" style="display: block;" data-ad-client="ca-pub-xxxxxxxxxxxxxxx" data-ad-slot="xxxxxxxxxxx" data-ad-format="auto" data-full-width-responsive="false"></ins> <script>(adsbygoogle = window.adsbygoogle || []).push({});</script>
Ad code
Please make sure no ad blocker is active when using AdSense functions.
When ad unit is created you can get ad code for it. In the list of ad units click on Get code link below ad unit for which you need to get code. A window will pop up. You can choose between Asynchronous and Synchronous code type. In most cases you should use Asynchronous code. It will look something like this:
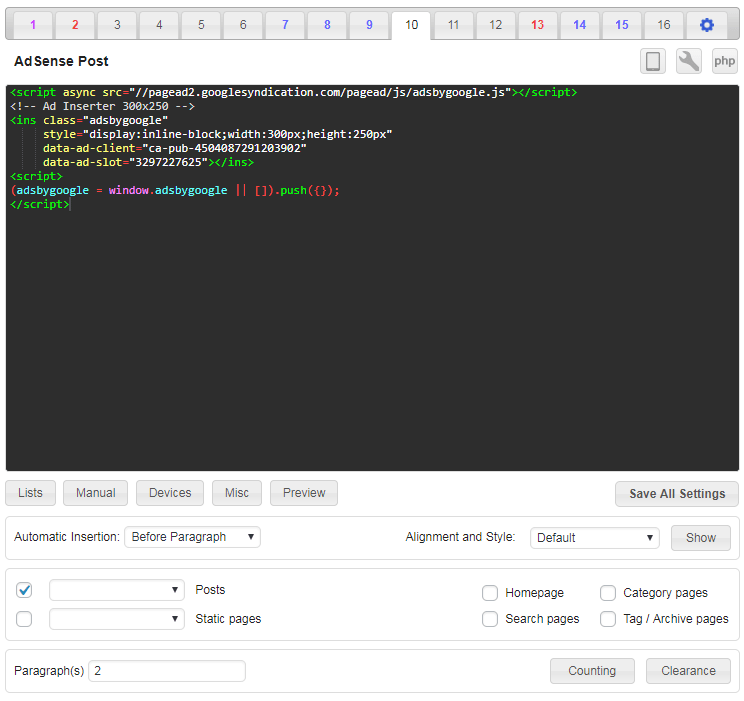
<script async src="//pagead2.googlesyndication.com/pagead/js/adsbygoogle.js"></script> <!-- Ad Inserter 300x250 --> <ins class="adsbygoogle" style="display:inline-block;width:300px;height:250px" data-ad-client="ca-pub-4504087291203902" data-ad-slot="3297227625"></ins> <script>(adsbygoogle = window.adsbygoogle || []).push({});</script>
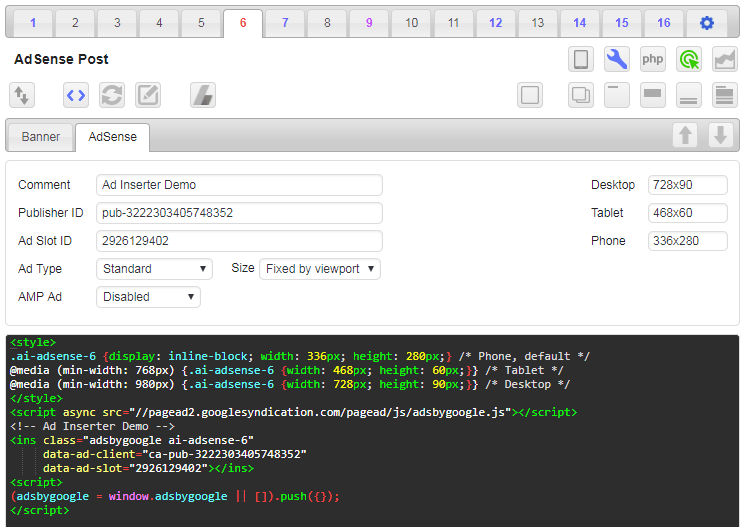
Once you have the code you can copy it to Ad Inserter. In this example we’ll create one code block for ads above second paragraph on all posts. Select one empty code block (here we’ll use code block 10), click on the name to change it to something descriptive, paste the code for ad unit into code window below and set Automatic insertion to Before paragraph, Paragraph number to 2 and leave checked only Posts page type.
Save settings and check posts. Your code should be inserted and ads displayed before second paragraph in each post. However, it may happen that you’ll only get blank ad blocks. Check Ads not displayed – troubleshooting section below.
AdSense code generator
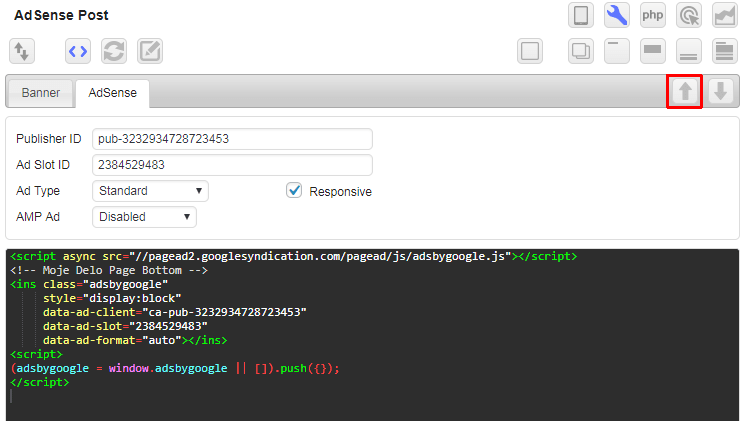
Ad Inserter has also a code generator tool for AdSense. Check Code editing for details. This tool is mainly intended to change the type of AdSense ads.
Not all conversions are possible: you can convert standard text & display ads to link ads or vice versa, fixed width ads to responsive ads and vice versa and you can enable or disable ads on AMP pages. Once you have the Publisher ID and Ad Slot ID entered (or imported) you can change ad type, ad size (fixed, fixed by viewport or responsive) and ad type for AMP pages.
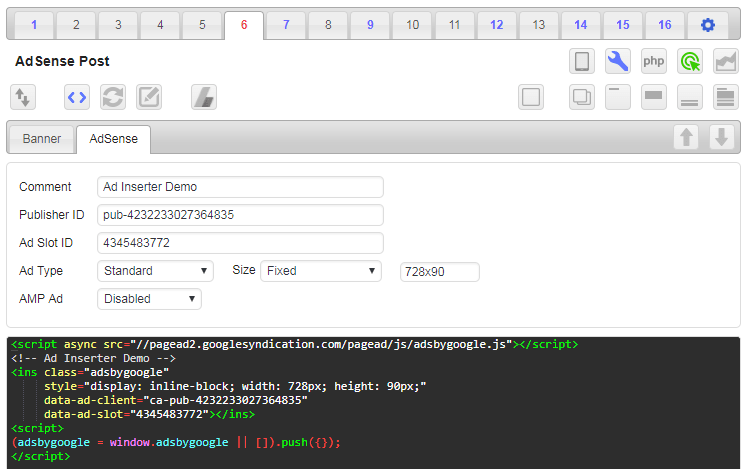
Once you are happy with the settings click on the generate button and the the plugin will generate ad code for the AdSense ad in the code window of the current block.
![]()
For standard and link ads you can choose between fixed, fixed by viewport and responsive ad sizes.
- Responsive means that the ad will resize to fill available width. Suitable for all devices, however, it will not work when available width is not known (floating or sticky ads). In such case you need to specify ad size. You can do this by specifying ad width and height (for AdSense you can use built in code generator) or define ad block width and height using custom CSS (for example, by adding CSS code
width: 160px; height: 600px;). Recently Google changed behavior of responsive ads on phones. Now they use full screen width by default and the ad code includes attributedata-full-width-responsive="true". If the attributedata-full-width-responsiveis missing or set to true, the responsive ad will occupy full screen width. You need to set it to false (simply add the line if it is missing). Check responsive AdSense code for details. - Fixed means that you define one ad size and it will be used for all insertions of this code block.
- Fixed by viewport means that you can specify fixed ad size for each viewport (device or screen size as defined in general plugin settings tab ⚙ / tab Viewports). This is the best choice for AdSense ads when there is a need to use different ad sizes on different devices. Leave size empty to disable ad for the selected viewport.
AdSense Integration
Please make sure no ad blocker is active when using AdSense functions.
AdSense integration uses AdSense Management API. If loading this library for some reason causes issues with your website you can disable it by defining PHP constant AI_NO_ADSENSE_API in the wp_config.php file:
define ('AI_NO_ADSENSE_API', true);Ad Inserter can be configured to get AdSense ad codes directly from the plugin settings page – no need to copy ad codes from the AdSense admin pages and paste them to code blocks. You can then list ad units, preview AdSense ads and get ad codes where you need them.
When access to your AdSense account is not enabled yet there will be AdSense ad units button in AdSense code generator.
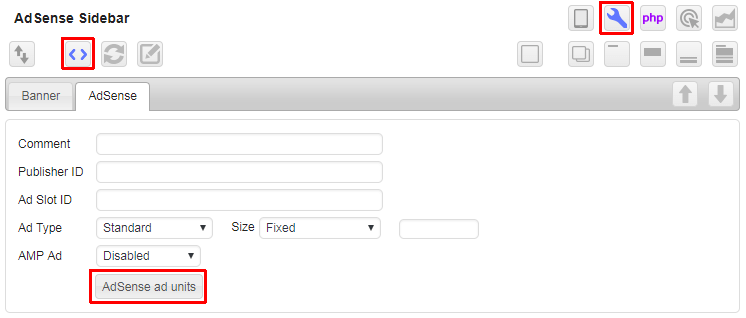
Click on this button to show AdSense Integration. You can also click on the AdSense button in general pugin settings (tab ⚙) to start AdSense integration.

Now you need to authorize Ad Inserter plugin to access your AdSense account to get ad units and ad codes. Click on Authorize to open a new page where you will be able to choose AdSense account and grant read-only access to the account.
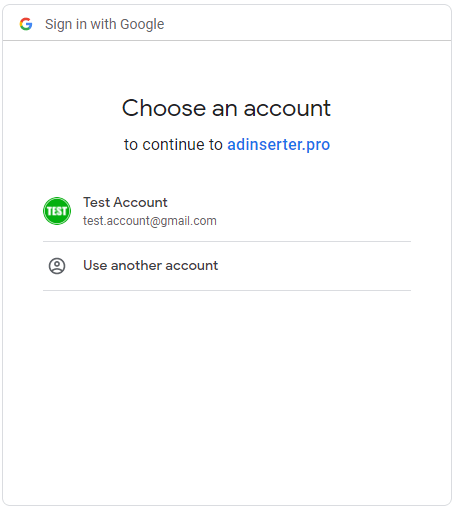
Then you’ll be asked to grant access to adinserter.pro – this website will receive and transfer the authorization to the plugin on your website. Click on Continue to grant access – you’ll be redirected back to the Ad Inserter settings page and a new button for AdSense ad units will be added to the toolbar

and to the tools toolbar.

This button toggles the list of AdSense ad units.

Above the list there is a search field where you can search for ad units. You can search using multiple keywords. This list has also a toolbar with few buttons.
Click on the AdSense button will open AdSense admin pages.

Click on Clear authorization button will remove access to your AdSense account.

Click on Reload button will reload AdSense ad units. If you create a new ad unit or make changes to existing ads you’ll need to reload the list to get access to the new ad units.

Click on Active/All ad units button will toggle between active ad units and all ad units.

Each ad unit has three small buttons left of ad unit name. Copy AdSense code button copies the ad code to the Ad Inserter clipboard. You can then paste it to any code block.

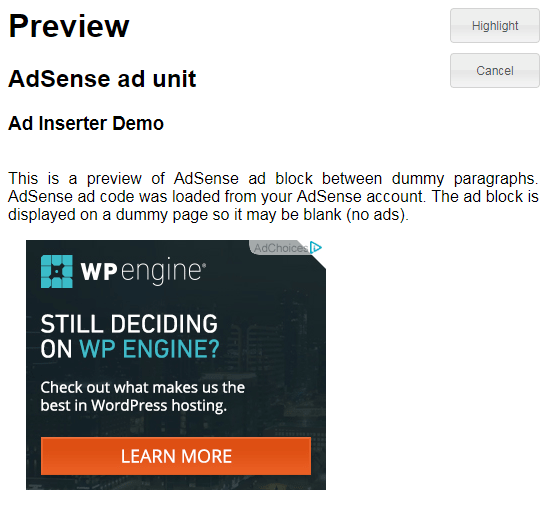
Preview AdSense ad opens a preview window and displays this ad unit between dummy paragraphs. Ad block may be blank – this is quite common when ad code has no ads to show.

Get AdSense code button copies ad code to the currently selected code block.
This is the quickest way to get AdSense ad code into code block.

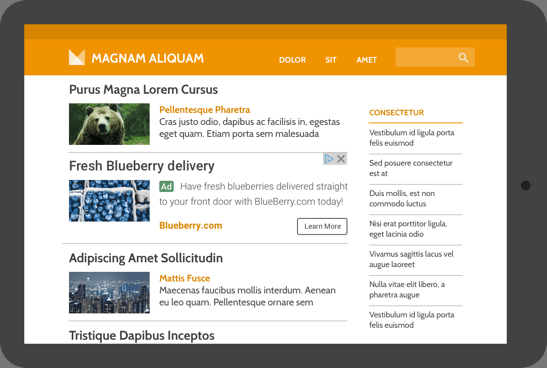
In-feed ads
What is a feed?
A feed is a stream of content that you can scroll through. The content appears in similar-looking blocks that repeat one after the other. For example a feed can be editorial (e.g., a list of articles or news) or listings (e.g., a list of products, services, etc.). Feeds can appear anywhere on the page.
For the purposes of In-feed ads (or infeed ads), a feed does not refer to a web syndication feed such as RSS.
Some examples of feeds on WordPress pages include:
- The list of latest posts on a homepage (showing excerpts or full posts)
- The list of latest posts on a category page (showing excerpts or full posts)
- The list of latest posts on an archive page (showing excerpts or full posts)
- Comments below posts
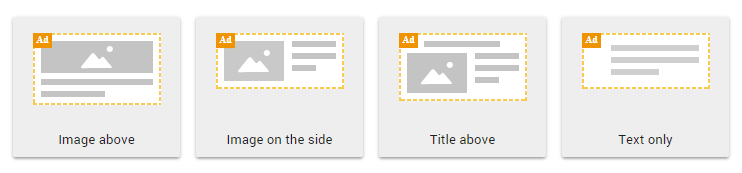
Ad Inserter supports functions to insert in-feed ads. Generate Ad unit as described above – select in-feed ads. In most cases you should select Create ad style manually and choose a style that matches your WordPress theme.
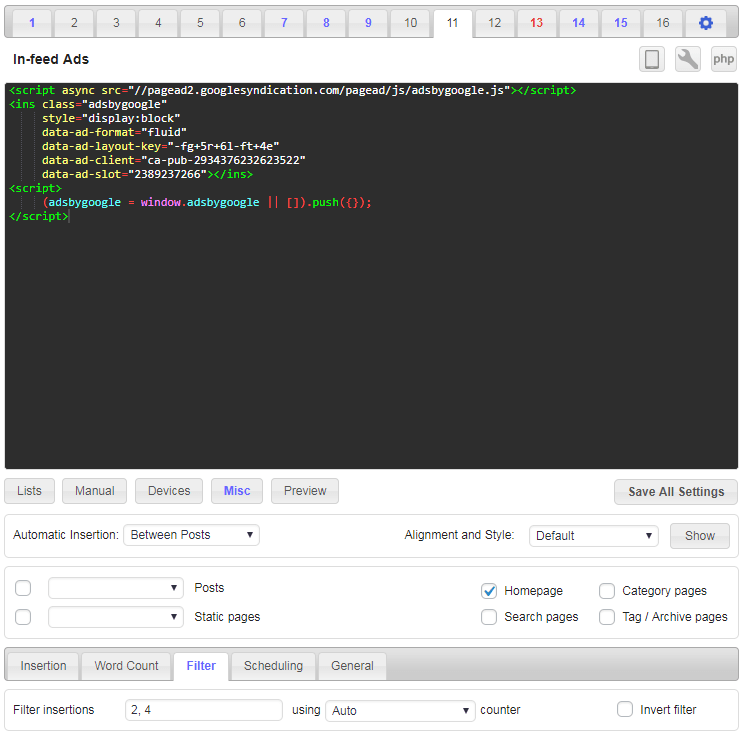
Set additional options, save ad unit and get the code for it. Once you have the code for in-feed ads you can configure Ad Inserter.
In our case we will insert in-feed ads after 2nd and 4th paragraph on homepage. Set Automatic insertion to Between posts, check only Homepage page type and set Filter (button Misc) to 2, 4.
Save settings and check homepage. Your code should be inserted and ads displayed between posts. However, it may happen that you’ll only get blank ad blocks. Check Ads not displayed – troubleshooting section below.
Automatic insertion between posts works only if your theme is using homepage with standard WordPress hooks that are used by plugins to insert ads. If your theme uses custom homepage you may not be able to insert ads this way.
In-article ads
How to create an In-article ad unit
In-article ads fit seamlessly in between the paragraphs of your pages for an enhanced reading experience. Use settings to insert ads between paragraphs as described for Text & display ads above.

Auto ads
AdSense Auto ads (known also as Page Level Ads) is a code that you insert on every page once and it will automatically display AdSense ads on positions chosen by the code. Auto ads use Google’s machine learning to pick the best placements on your pages to show ads. You only need to add one piece of code to all your pages, and let Google take care of the rest.
Before you start using Auto ads you need to Set up Auto ads on your AdSense admin page.
Please note: Auto ads now work through any ad code. If you’ve turned on Auto ads for a site or a portion of your site, even pages that only contain regular ad units will start showing Auto ads on that page automatically.
You can use Ad Inserter plugin to automatically insert code (usually in the <head> section – described below) for Auto ads on every page. However, the exact placement of ads will be done by the ad code, not Ad Inserter! When you enable debugging function Label blocks, AdSense Auto ads will be labeled with a colored bar on the top with a text informing you that the ad was automatically placed by AdSense Auto ads code.

Auto ads may not be suitable for some WordPress themes or layouts. In such cases it is easier to place ads at wanted locations by using normal AdSense code and specifying exact locations where the code should be inserted.
Google has developed a new version of Auto ads that gives you greater ability to customize the Auto ads experience for your users. You ned to log in to your AdSense account and configure Auto ads there.
Auto ads now work through any ad code. If you’ve turned on Auto ads for a site or a portion of your site, even pages that only contain regular ad units will start showing Auto ads on that page automatically.
If there are specific pages you don’t want Auto ads on, you can add those URLs to your Page exclusions. For example, you can turn off Auto ads on your home page or entire sections of your site.
Ads > Overview shows you a summary of your Auto ads settings for each of your sites.
Ad settings preview shows you how Auto ads will look on your site before they go live. When you make changes to your Auto ads settings, it can take up to an hour to apply on your site.
Placement exclusions allow you to delete specific ad placements inside the preview using the “delete” icon. Auto ads will immediately generate a placement in a new location for you to review.
Ad formats help you specify the types of ads that Auto ads places on your site.
Matched content allows content recommendations from your site combined with ads to be shown to your users.
Auto ads dynamically adjusts the number of ads in proportion to the length of each page. Ad load helps you control the number of ads you’d like to show on your pages.
Google has updated reporting so that you can see Auto ads and manual ad unit performance side by side for each of your sites.
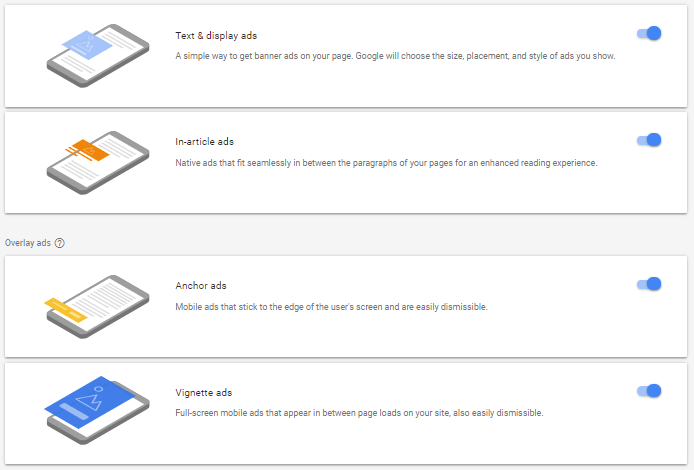
To get code for Auto ads log in to your AdSense account and navigate to My Ads > Auto ads. Auto Ads can be enabled globally for all sites in your account or only for some of them using the group option. Once you choose Auto ads you choose which ad formats you’d like to show across your entire site. These will be your “global preferences” for Auto ads. You can select from a range of ad formats.
Click on Set up Auto ads to get the code.
You need to copy the code and paste it to Ad Inserter. The code will look like this (of course, publisher ID will be yours):
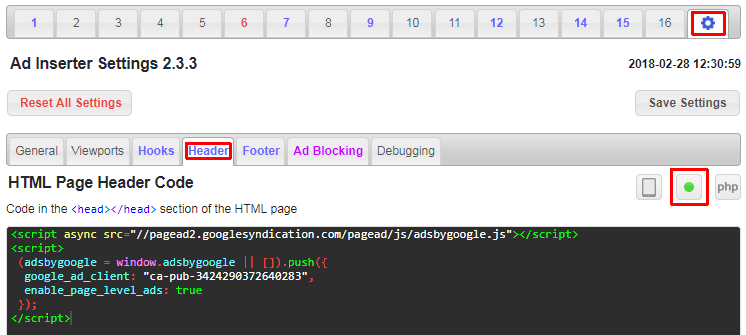
<script async src="//pagead2.googlesyndication.com/pagead/js/adsbygoogle.js"></script> <script>(adsbygoogle = window.adsbygoogle || []).push({ google_ad_client: "ca-pub-3424290372640283", enable_page_level_ads: true });</script>
This code needs to be inserted once on every page where you want to automatically show AdSense ads. The easiest way to do this is to insert the code in the <head></head> section – go to tab ⚙ / tab Header and paste the code there – make sure header code is enabled (green button top right). This will automatically insert code for Auto ads on all pages. If you need to insert Auto ads only on some pages (or you need to exclude Auto ads on some pages) configure page-specific header code.
Step-by-step instructions for Auto ads on all pages:
- Click on the last tab (gear icon ⚙ – general plugin settings)
- Click on the tab Header (for code in the
<head></head>section) - Paste AdSense code for Auto ads into the code window
- Click on the Enable button above code window to enable header code (green light must be on)
- Click on the Save Settings button to save settings
This code will now automatically display AdSense ads on positions chosen by the code. Auto ads use Google’s machine learning to pick the best placements on your pages to show ads. You only need to add this piece of code to all your pages, and let Google take care of the rest.
After the code is inserted Google may need some time (usually hours) to check the pages before it starts to serve ads. If you believe you have followed the instructions above, the code is properly installed and you still don’t see ads after some time (or the ad blocks are blank) check Ads not displayed section for possible solutions. Please note that the exact placement of ads will be done by the ad code, not Ad Inserter!
If you don’t want to show ads on every page you can either define custom groups for Auto ads or insert the code only on specific pages. In such case use any code block, set Automatic insertion to Before Header or Before Post, set Alignment and Style to No Wrapping and define rules where the code should be inserted. Check also Header and Footer code section for details on header code.
If you want to have control over the ad types and positions where the ads will be displayed, you can use code for AdSense ad units. For each ad unit you get ad code which can be inserted where you would like to show AdSense ads.
AdSense ads on AMP pages
AMP pages need different code for ads. Each Ad Inserter code block can be easily configured to insert different codes on AMP pages – you can use use built-in AdSense code generator to generate code for AMP AdSense ads (check also AdSense guide to creating AMP-compatible ad code). Of course, to create AMP pages you also need AMP plugin. The following plugins have been tested with Ad Inserter:
- AMP for WP – Accelerated Mobile Pages (free, please check the warning below)
- AMP (free, you may need to set Plugin priority to 10 in order to be able to isnert into post/paeg content
- WP AMP Ninja (free)
- Better AMP – WordPress Complete AMP (free)
- WP AMP – Accelerated Mobile Pages for WordPress (paid – you need to uncheck Remove third-party the_content hooks for better compatibility)
- PenCi Soledad AMP plugin (paid, together with Soledad WordPress Theme)
AMP for WP – Accelerated Mobile Pages
Ad Inserter can insert ads also on AMP pages. However, if you configure the plugin to insert wrong codes that are not designed for AMP pages, such codes may cause AMP validation errors. To prevent such errors AMP for WP – Accelerated Mobile Pages plugin provides extension AMPforWP Plugin Manager which can disable specific WordPress plugins on AMP pages in order to prevent validation errors. However, for Ad Inserter this is not required as you only need to configure it properly so on AMP pages only valid AMP code will be inserted. Please read this page and make sure you are inserting only valid AMP codes on AMP pages.
When you see warning notice AMPforWP Plugin Manager disabled Ad Inserter on AMP pages this only means that on AMP pages Ad Inserter will not be called to insert codes. You need to make sure that Ad Inserter is configured to insert only AMP codes on AMP pages and then you can go to AMPforWP Plugin Manager settings, uncheck Ad Inserter and click on Save Changes.
Ads on AMP pages
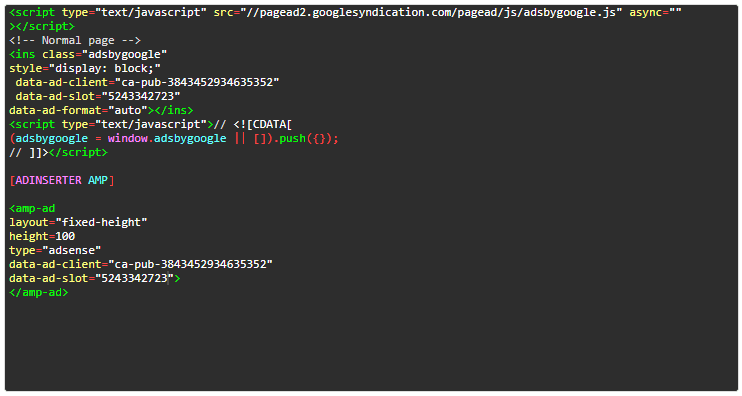
Normally the code configured in code window will not be inserted on AMP pages. There is a setting under Misc/Insertion to enable insertion also on AMP pages. However, this would insert the same code also on AMP pages which may work for image banners but not for AdSense which needs different code. The solution is to separate the codes with [ADINSERTER AMP] separator – the code above the separator will be inserted on normal pages, the code below the separator will be inserted on AMP pages. This separator can be used also for Header and Footer code.
Example for AdSense ads on AMP pages:
Generating AdSense code for AMP pages
Ad Inserter has a simple code generator for AdSense ads which can be used also to generate AdSense code for AMP pages. Paste normal AdSense code into the code window, click on Code tools button, then on Code generator button and then click on the Import code button to import the AdSense data from it.
Once you have the Publisher ID and Ad Slot ID imported select ad type for AMP pages. Then click on the generate button and the plugin will generate code in the code window of the current block.

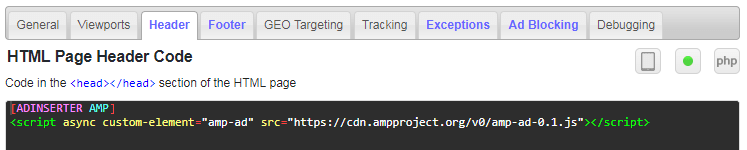
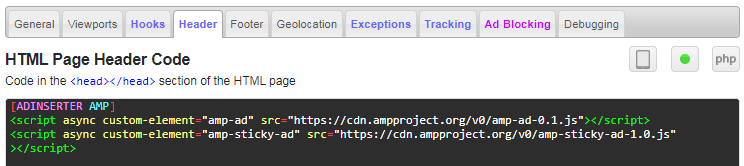
AdSense ads need also a script in the header
<script async custom-element="amp-ad" src="https://cdn.ampproject.org/v0/amp-ad-0.1.js"></script>Put AMP head script in the Header code block, use [ADINSERTER AMP] separator (the code above the separator will be inserted on normal pages, the code below the separator will be inserted on AMP pages), and enable header code (button with green dot next to PHP button).
Make sure this script is inserted only once – AMP plugins may also insert this script.
Sticky AMP Ads
Normal code for sticky ads can’t be used on AMP pages as they use CSS property position: fixed; or Javascript code which is not allowed on AMP pages. However, there is a way to fix an ad to the bottom of an AMP page. You need to put additional script in the Header and use code for sticky AMP ad.
Required script for sticky AMP ad:
<script async custom-element="amp-sticky-ad" src="https://cdn.ampproject.org/v0/amp-sticky-ad-1.0.js"></script>Example of header code with scripts for sticky AMP ads:
Ad code for sticky AdSense AMP ad:
<amp-sticky-ad layout="nodisplay">
  <amp-ad
    width="320"
    height="50"
    type="adsense"
    data-ad-client="ca-pub-xxxxxxxxxxxxxxxxxx"
    data-slot="xxxxxxxx">
  </amp-ad>
</amp-sticky-ad>
Example of ad code for AdSense sticky ad on AMP pages – use [ADINSERTER AMP] separator – the code above the separator will be inserted on normal pages (in this example no such code), the code below the separator will be inserted on AMP pages:
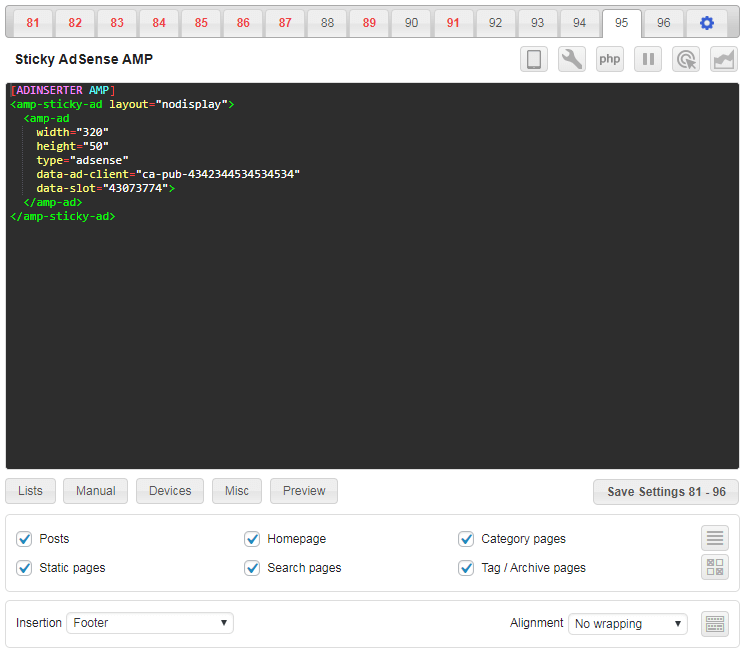
- Use your own IDs for data-ad-client and data-slot
- Use insertion position Footer – if Footer is not available on your AMP pages you can use any other insertion position inside
<body>– the sticky ad will always stick to the bottom of the page - Use No wrapping alignment
You can use the same code for sticky ads also for other ad networks – you only need to use appropriate IDs.
AdSense code for Auto ads on AMP pages
In order to display Auto ads on AMP pages you need to turn on text & display ad formats for AMP Auto ads. To do this log in to your AdSense account and navigate to My Ads > Auto ads > Auto Ads for AMP and turn on text & display ad formats. Ads usually appear 20 minutes after you’ve turned on Auto ads for AMP and added the script and code described below.
Then add the following script to in the Header code block:
<script async custom-element="amp-auto-ads" src="https://cdn.ampproject.org/v0/amp-auto-ads-0.1.js"></script>Use [ADINSERTER AMP] separator (the code above the separator will be inserted on normal pages, the code below the separator will be inserted on AMP pages), and enable header code (button with green dot next to PHP button).
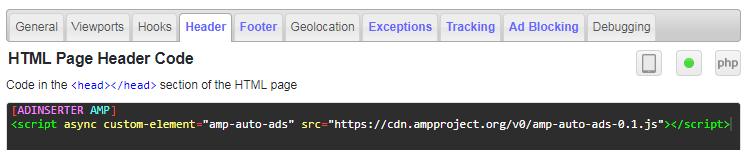
If you are using also Auto ads on normal pages you need to insert also the code for normal Auto ads ABOVE the separator.
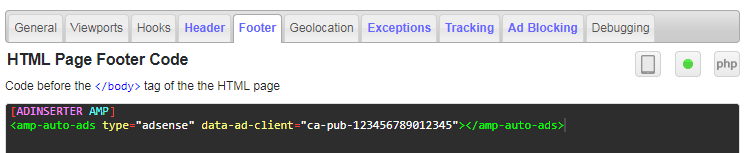
Finally you need to insert the following code into the body of your AMP HTML (make sure you use your Publisher ID – get your code on the AdSense admin page for Auto Ads for AMP):
<amp-auto-ads type="adsense" data-ad-client="ca-pub-xxxxxxxxxxxxxxxx"></amp-auto-ads>The placement of the ad code does not reflect the position of the ads therefore you can use any suitable automatic insertion for all pages. Here we’ll put code into page Footer. Add the following script in the Footer code block, use [ADINSERTER AMP] separator (the code above the separator will be inserted on normal pages, the code below the separator will be inserted on AMP pages), and enable footer code (button with green dot next to PHP button).
It usually takes 20 minutes for ads to appear on the page.
Additional ads displayed – troubleshooting
In the case you see AdSense ads not configured via Ad Inserter you need to be aware of the following:
Auto ads now work through any ad code. If you’ve turned on Auto ads for a site or a portion of your site, even pages that only contain regular ad units will start showing Auto ads on that page automatically.
If there are specific pages you don’t want Auto ads on, you can add those URLs to your Page exclusions. For example, you can turn off Auto ads on your home page or entire sections of your site.
Ads > Overview shows you a summary of your Auto ads settings for each of your sites.
Ad settings preview shows you how Auto ads will look on your site before they go live. When you make changes to your Auto ads settings, it can take up to an hour to apply on your site.
Placement exclusions allow you to delete specific ad placements inside the preview using the “delete” icon. Auto ads will immediately generate a placement in a new location for you to review.
Ad formats help you specify the types of ads that Auto ads places on your site.
Matched content allows content recommendations from your site combined with ads to be shown to your users.
Auto ads dynamically adjusts the number of ads in proportion to the length of each page. Ad load helps you control the number of ads you’d like to show on your pages.
Google has updated reporting so that you can see Auto ads and manual ad unit performance side by side for each of your sites.
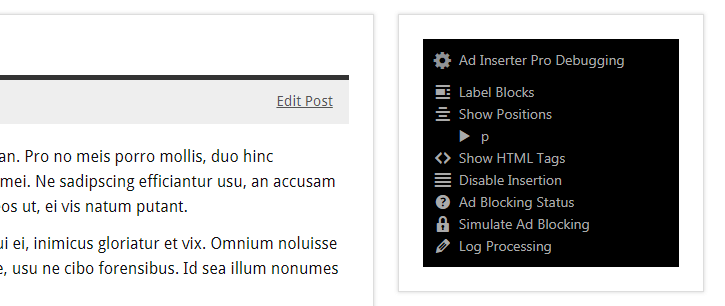
You can easily check whether the code for the ad is inserted by Ad Inserter or not. When you are logged in as administrator you’ll see admin toolbar above every post or page and there should be Ad Inserter menu item with debugging functions to diagnose common issues. Go to any post where you see additional ads and click on Ad Inserter / Label Blocks in admin toolbar.

It may happen that your theme does not not support the toolbar or it is not displayed for some other reason. In such case you can use Ad Inserter Debugging Tools widget which has the same menu items. Simply drag Ad Inserter widget into the sidebar and select Debugging Tools. Of course, you still need to be logged in as administrator to see the widget.
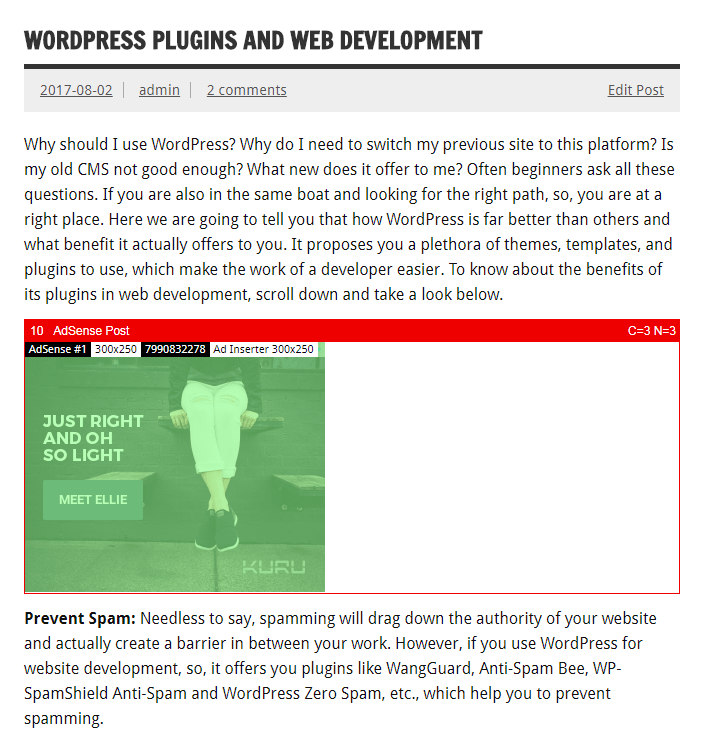
Ad codes (or blocks) inserted by Ad Inserter will be labelled with a red border and bar showing block number and name – this indicates that the ad is there because you have configured Ad Inserter to insert block with ad code there:
Ads inserted by AdSense Auto ads code will be labelled with a pink border and bar showing text Automatically placed by AdSense Auto ads code – this indicates that the ad is there because you have AdSense code on the page and Auto ads are enabled in your AdSense admin interface. This does not indicate that the AdSense code is inserted by Ad Inserter – any AdSense code on the page may display Auto ads if they are enabled.
Ads not inserted by Ad Inserter will NOT BE LABELLED with a bar and border – this indicates that the ad is there because it is inserted by some other plugin, the ad code is hardcoded in the theme PHP files, ad codes are configured in the theme settings or you maybe see cached pages – flush all the caches to regenerate pages.
Ads are still displayed when the plugin is disabled
When you disable Ad Inserter you may still see some ads. Very likely you see old (cached) pages from when the plugin was active. Flush all the caches after you disable the plugin. There are also other possible reasons for the ads still displayed: maybe they are inserted by some other plugin, the ad code is hardcoded in the theme PHP files or ad codes are configured in the theme settings.
Ads not displayed – troubleshooting
WARNING: Please make sure no ad blocker is active when using AdSense functions.
If you are using responsive ad code (e.g. responsive AdSense code) and sticky ads or floating alignment (ads wrapped with text) you need to define ad width (and height) otherwise the code can’t resize as parent container width for sticky ads or floating alignment is not known. You can do this by specifying ad width and height (for AdSense you can use built in code generator) or define ad block width and height using custom CSS (for example, by adding CSS code width: 160px; height: 600px;).
There are many reasons why you don’t see ads (read also how ads are displayed). In order to help you to diagnose the problem Ad Inserter has many debugging functions that can help you to figure out why the ads are not where you expect them. Here we show example for AdSense ads but the same approach can be used also for other ads. This is how blank ad block looks like – empty space:

When you don’t see AdSense ads there few basic possible reasons:
- Code for AdSense ads is not inserted where you expect it
- Code for AdSense ads is inserted but it is not displaying ads – blank ad block like on the screenshot above
- You don’t see ads because you are using ad blocker – disable it to see ads.
Let’s first check whether the code is inserted where we expect it. When you are logged in as administrator you’ll see admin toolbar above every post or page and there should be Ad Inserter menu item with debugging functions to diagnose common issues. Go to any post where the ads should be displayed and click on Ad Inserter / Label Blocks in admin toolbar.
It may happen that your theme does not not support the toolbar or it is not displayed for some other reason. In such case you can use Ad Inserter Debugging Tools widget which has the same menu items. Simply drag Ad Inserter widget into the sidebar and select Debugging Tools. Of course, you still need to be logged in as administrator to see the widget.
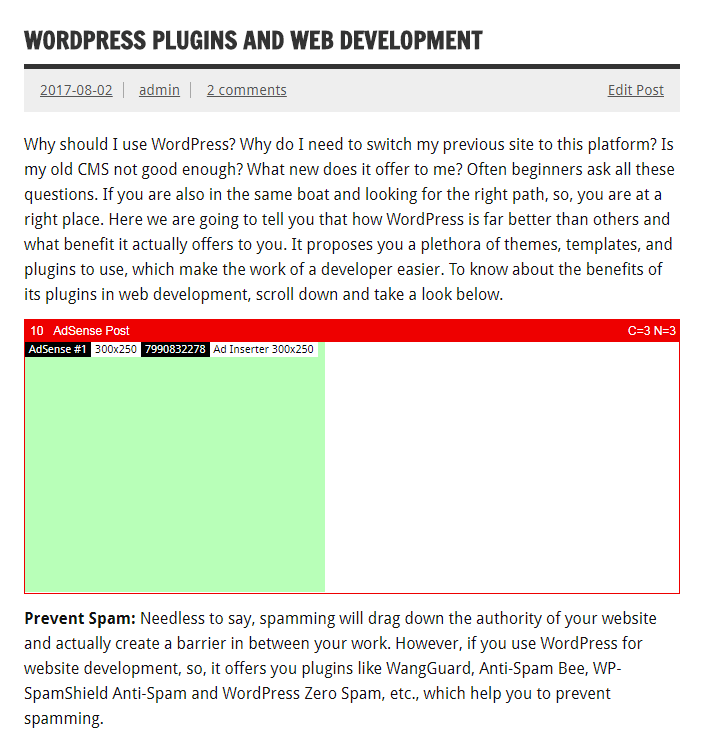
In this example we’ll check insertion of AdSense ad before the second paragraph. When function Label Blocks is enabled Ad Inserter will put a red frame around each code block so you will see it even if the ad code doesn’t display anything. In our case we see that the code block 10 (AdSense Post) is inserted properly (before paragraph 2), however the code doesn’t show anything. Label Blocks function will also mark AdSense ad blocks with green transparent overlay and ad block information: AdSense ad index, ad format, ad slot ID and if AdSense integration is enabled also ad unit name. This confirms two things:
- Code block is properly inserted before paragraph 2 (red bar with red border around ad block)
- AdSense code is running – it has generated ad block (marked with green overlay)
In most cases on normal (non-AMP) pages Ad Inserter will be able to detect blank AdSense block and will indicate this by showing NO AD SERVED label:
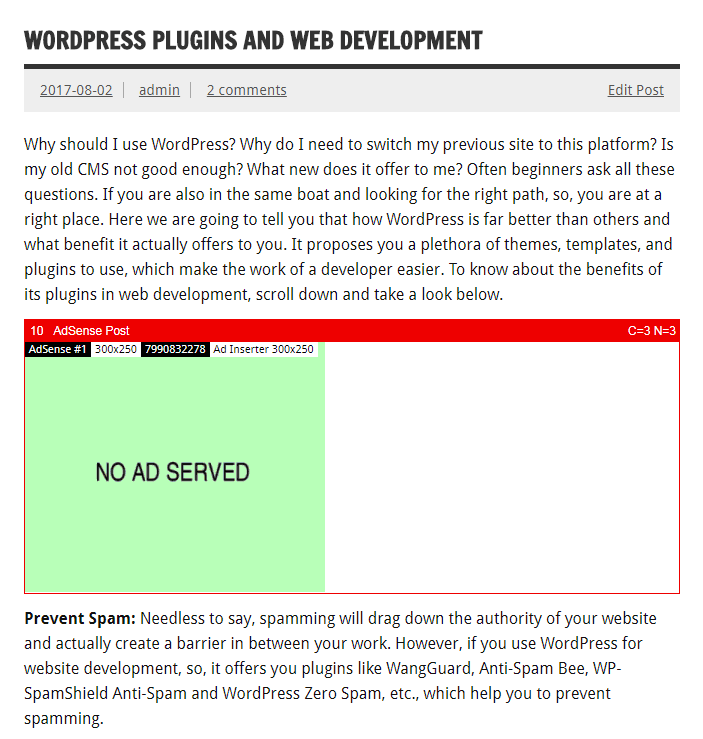
Blank AdSense ad block means that the code is inserted properly and running, only the ad code doesn’t display anything – Google AdSense is not serving ads. Typical reasons for this are the following:
- After the ad code is inserted Google needs some time (hours) to check the pages before it starts to serve ads.
- AdSense account is not fully approved yet – if your account is new you need to wait until Google checks ad codes on your website and and confirms your account. Usually this takes few days.
- Your website or page is not approved yet – you need to wait until Google web crawlers check your pages.
- Your website or page was not approved for AdSense ads
- Invalid traffic – Google is continually investing in measures to protect and improve the experience for advertisers, publishers, and users. As Google launches improvements to their systems and defenses, sites with invalid traffic may experience limited ad-serving. Additionally, if Google is unable to verify the quality of your traffic, they may limit or disable your ad serving.
- Your AdSense account is banned
- No ads available for your website or for some particular page
- Wrong AdSense publisher ID or slot ID – check or regenerate ad code
- Errors in ad code – check or regenerate ad code
- You are using ad blocker
In any case Google which runs AdSense ad network decides what ads to show, where and when.
AdSense code collapses only ad units when they are not going to cause page reflow, meaning only ad units outside of the viewport are collapsed (hidden). For all other unfilled ad units, AdSense retains the ad unit size, and instead shows a blank space.
You can replace or hide blank AdSense blocks
In case you don’t see the red frame with code block number and name (as shown below) this means that the code is not inserted there (before the second paragraph) and you need to check settings. If you are unable to figure out the reason for not inserting the code block you can use debugging function Log Processing which will append the insertion log at the end of each page – switch to page source and at the end of page there should be a log as HTML comment showing settings used, the status of each code block and the reason why it is not inserted. Check Debugging for more.
When everything is in place you should see AdSense ad before the second paragraph:
Please note: you can use Ad Inserter plugin to automatically insert code (usually in the <head> section – as described above) for Auto ads on every page. However, the exact placement of ads will be done by the ad code, not Ad Inserter! When you enable debugging function Label blocks, AdSense Auto ads (placed by the ad code) will be labeled with a colored bar on the top with a text informing you that the ad was automatically placed by AdSense Auto ads code.
Removing yellow ad background
Some themes may display yellow background behind AdSense ads. This is because they apply yellow color to the ins elements which are used by AdSense ad codes. Simply add the following code into the header to make the background white:
<style>ins { background: #fff; }</style>
Replacing blank AdSense blocks
When AdSense ad units are blank (unfilled), AdSense code tries to either collapse the ad unit or show a blank space. AdSense code only collapses ad units when they are not going to cause page reflow, meaning only ad units outside of the viewport are collapsed. For all other unfilled ad units, AdSense retains the ad unit size, and instead shows a blank space.
In most cases (on normal non-AMP pages) Ad Inserter can detect blank AdSense blocks. In such case you can provide an alternative ad to be displayed instead of a blank ad block. Use FALLBACK shortcode separator to separate AdSense and alternative ad code:
<script async src="//pagead2.googlesyndication.com/pagead/js/adsbygoogle.js"></script> <ins class="adsbygoogle" style="display: block;" data-ad-client="ca-pub-5138625027177448" data-ad-slot="2332581038" data-ad-format="auto" data-full-width-responsive="true"></ins> <script>(adsbygoogle = window.adsbygoogle || []).push({});</script> [ADINSERTER FALLBACK="adsense" code="insert"] <img src="https://via.placeholder.com/300x250/cccccd/961197.png?text=ADSENSE%20REPLACEMENT">
The code attribute can be either show (default, use CSS to show the alternative ad) or insert (use Javascipt to insert the alternative ad code).
To prevent layout shift when a blank ad block will is replaced, use alternative ad with the same size as the AdSense ad (this works best when using fixed AdSense ad sizes).
Hiding blank AdSense blocks
You can easily hide individual blank AdSense block by replacing it with no code – empty fallback code:
<script async src="//pagead2.googlesyndication.com/pagead/js/adsbygoogle.js"></script> <ins class="adsbygoogle" style="display: block;" data-ad-client="ca-pub-5138625027177448" data-ad-slot="2332581038" data-ad-format="auto" data-full-width-responsive="true"></ins> <script>(adsbygoogle = window.adsbygoogle || []).push({});</script> [ADINSERTER FALLBACK="adsense"]
You can also easily hide all blank AdSense blocks by applying display: none !important; style to the blank AdSense block elements. Add the following code into the header:
<style>ins.adsbygoogle[data-ad-status="unfilled"] { display: none !important; }</style>
Related Pages
Install Ad Inserter for free
Ad Inserter Pro Affiliate Program
