Ad Impression and Click Tracking
PRO Ad Inserter Pro supports ad impression and click tracking. This enables you to monitor how many times each ad was displayed and how many times it was clicked. In the case you are displaying two or more ad options (A/B testing) you can easily determine which ad option has the highest CTR (Click-Through Rate). Freelancer and higher license types support also generation of public web reports and reports in PDF format.
To use ad tracking you need to enable it globally (at the level of plugin, tab ⚙ / tab Tracking), select click detection method (if available for your license type) and then enable tracking for individual code blocks (ads). When enabled, Ad Inserter Pro adds tracking code to each page where ads are inserted. Let’s first clarify some terms.
For tracking to work, code block must have a wrapping div (No wrapping style can’t be used) and page must be error-free i.e. no Javascript errors.
If you are using CloudFlare then make sure Rocket Loader is not enabled. It may prevent inline tracking scripts from running properly.
Ad tracking can’t be used on AMP pages as custom JavaScript code is not allowed.
Impressions
Impression is an event when the block (ad code) is inserted. This is detected client-side in the browser with Javascript code after the page is loaded (assuming the Javascript is enabled in the browser). Therefore, impression tracking works also when the page is cached, but it doesn’t work when Javascript is not enabled, Javascript is not running due to some error or the page was not loaded properly.
When the block (ad code) is inserted, the ad may not be visible if it is off the viewport (screen). To count impressions only when the ad is actually visible enable lazy loading for the block.
Clicks
Click is an event when somebody clicks on the code block (ad). This is detected client-side in the browser with Javascript code (assuming the Javascript is enabled in the browser). Therefore, click tracking works also when the page is cached, but it doesn’t work when Javascript is not enabled, Javascript is not running due to some error or the page was not loaded properly.
However, ads come in various forms and not all forms support reliable click tracking. In general, there are two types of ads: simple banners with link and Javascript based ads. Javascript based ads (e.g. AdSense) create <iframe> HTML element which is isolated from the main page and doesn’t support click detection. However, with some advanced code it is possible to quite reliably “guess” when the user has clicked inside iframe ad. Therefore, Ad Inserter Pro (not all license types) supports two methods for click detection.
Standard Click Detection
This method can detect clicks on simple HTML banners with links (using <a> tags) and is available in all versions of Ad Inserter Pro. An example of banner code where clicks can be reliably detected with standard click detection:
<a href="https://wordpress.org/plugins/ad-inserter/" target="_blank">
  <img src="https://ps.w.org/ad-inserter/assets/icon-256x256.jpg" />
</a>
Advanced Click Detection
This method can detect clicks on on simple HTML banners with links (using <a> tags) and <iframe> ad codes (including AdSense) on desktop devices but is not available in all versions of Ad Inserter Pro. Please note that impressions and clicks detected by Ad Inserter Pro might be different from statistics of ad networks. This is mainly because the way how impressions and clicks are counted differs for each ad network and ad networks may not count some events (e.g. invalid clicks for AdSense). However, the method is reliable enough to get CTR in A/B tests in order to determine which ad gets more clicks.
Clicks on iframes normally can’t be detected as it’s impossible to read iframe content from the parent page due to the same origin policy. Therefore Advanced click detection is based on the blur event associated to a page/iframe boundary monitoring system telling over which iframe is the mouse cursor at any time. This means that it can’t work on mobile devices such as smartphones and tablets, because this hardware uses a touchscreen instead of a mouse as click input. This design makes the boundary monitoring trick ineffective.
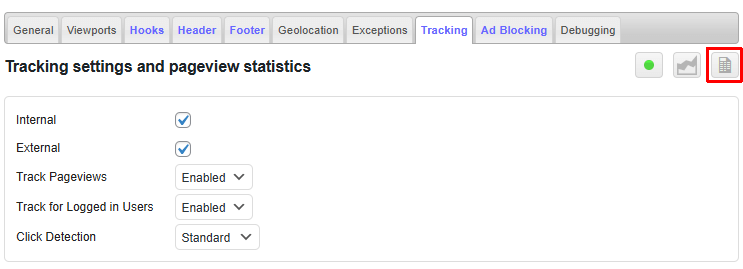
Tracking Settings
Tracking settings are available on the plugin settings tab (⚙).
![]()
To globally enable tracking click on the top right button (icon is green when enabled) and save settings.
You will also have to enable tracking for every block you would like to track:
![]()
There are two independent tracking modes: Internal and External (you need to enable at least one):
- Internal tracking (default) means using internal plugin statistics. Each event (impression or click) is sent to to the plugin (via Ajax request) and you can use internal statistics described below to analyze impressions, clicks, CTR, A/B tests. This may introduce additional load to the database on websites with very high traffic which may consequently slow down the web server. If you are using internal tracking make sure your web server can handle it.
- External tracking means using tracking via Google Analytics or Matomo (formerly Piwik) events. Each event (impression, click or ad blocking) is sent to the external tracking service where you can analyze them. Make sure you have Google Analytics (the plugin can send events to Google Universal Analytics, Global Site Tag, Google Universal Analytics by MonsterInsights and Google Legacy Analytics code) or Matomo tracking code installed. You can place the tracking code into Header code (tab ⚙ / tab Header). To analyze events go to your tracking service (Google Analytics or Matomo) admin pages and look for events with category Ad Inserter Pro.
For external tracking you can define event data on the plugin settings tab (tab ⚙ / tab Tracking):
![]()
The following shortcodes are available:
[EVENT] – event type: click, impression or ad blocking
[BLOCK_NUMBER] – block number
[BLOCK_NAME] – block name
[BLOCK_COUNTER] – block insertion counter
[VERSION_NUMBER] – version number
[VERSION_NAME] – version name
[BLOCK_VERSION_NUMBER] – block and version number
[BLOCK_VERSION_NAME] – block and version name
To track events with unsupported web analytics or to pass additional tracking data to existing analytics service you can define custom Javascript function.
You can also track all pageviews (with internal tracking) and ad blocking statistics by device (internal and external tracking is supported). Check below for details. If you would like to test tracking and check statistics while you are logged in set Track Logged In Users to Enabled. Choose (if available) Click Detection method according to the explanation above:
- Standard click detection can detect clicks only on banners with links and is available in all versions of Ad Inserter Pro.
- Advanced click detection can detect clicks on any ad code (including Javascript
<iframe>ads) on desktop devices but is not available for all license types of Ad Inserter Pro.
If you are using only banners then choose Standard click detection as it is the most reliable method to detect clicks. Use Advanced method only if you need to detect clicks on AdSense, Amazon, Media Net or other Javascript based ads, for example, to run A/B test with AdSense and affiliate banner ad to determine which ad has the highest CTR.
Here you can also enable Click fraud protection. Check Ad impression and click limits for details.
Clear All Statistics Data clears all impression and click data for all code blocks. Use it only when you need to delete all statistics.
Disabling tracking code on specific pages
In some cases you may want to disable tracking code on some pages. To do this put shortcode [adinserter tracking="disabled"] into the page to prevent tracking code on that page.
Reports for clients
Freelancer and higher license types support also generation of public web reports and reports in PDF or CSV format. The report is identical to the report you see on the settings page – it includes all the charts and labels. In addition to this Ad Inserter Pro Corporate license type supports creating custom reports for clients – a collection of block and individual rotation option statistics.
For the report you can define image and text in the header and footer – report settings are available on the plugin settings tab (tab ⚙ / tab Tracking):
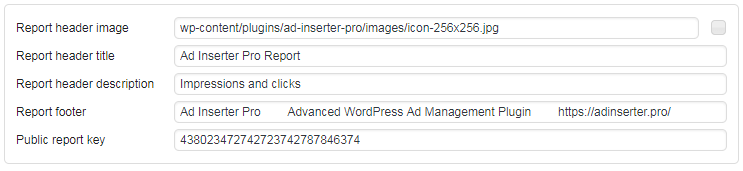
If Report header image starts with / then this is absolute path to the image. Otherwise this should be relative (to the WP root) path to the image or logo for the report. To select image click on the small button right of the field. In this case the relative path to the image will be automatically created when the settings will be saved. To not use any image in the report header use space for this field. Clear the filed and save settings to restore header image to the default Ad Inserter Pro image.
Report header title and Report header description are texts displayed next to the image, while Report footer is displayed in the footer of the report. To reset text to the default value clear the field and save settings. For date format WordPress settings are used.
Public report key is a string used to generate a key to verify public report urls. Normally you send urls for public reports to your clients. However, you may come into situation when you would like to prevent access via those urls for your old clients. In such case you can simply change this key and all (old) public urls will become invalid. To reset to the default value clear this field and save settings.
To see impression and click statistics for a block click on the statistics button.
![]()
PDF reports
Click on the button for PDF report opens it in a new tab.

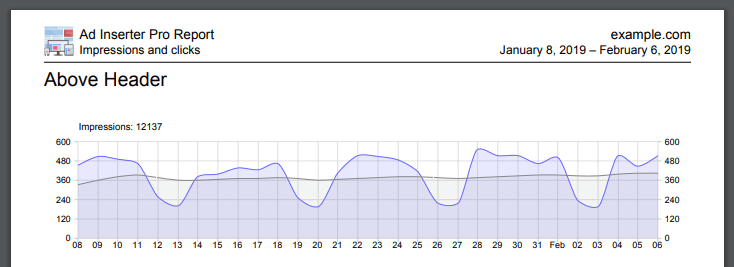
Check also example of Ad Inserter Pro report in PDF format.
CSV reports
Click on the button for CSV report starts download for the CSV file. The file contains all the data shown in the charts for the specified date range.

Public reports
Click on the button for public web report and it will open in a new tab.

Normally the report is “read only” – it is not possible to change date range. If you would like to give your clients controls to generate report for any date range doubleclick on the gear icon left of the bottom toolbar to enable controls in public report:
![]()
If you now click on the button for public web report it will have also controls to select the date range.
Please note that if you have selected one of the predefined reports even when the report does not have controls, the report will still show the charts for the selected period. For example, if you have created a public report for the last 30 days, the dates of the report will change every day to show charts for the last 30 days. Only when you create a report with custom dates they will not change.
Public report urls
Normally the plugin upon activation creates rewrite rule to have public reports with nice short urls with report ID, for example:
https://example.com/ai-statistics-report-d31e24f1eaMjAxOS0dMy0xNTIweTktMDttMTMeMTAwbDAzMAswHowever, if you have installed and activated the plugin before this feature was available or the plugin can’t change your .htaccess file for some reason, public urls will have the following format:
https://example.com/wp-admin/admin-ajax.php?action=ai_ajax&ai-report=d31e24f1eaMjAxOS0dMy0xNTIweTktMDttMTMeMTAwbDAzMAswYou can try to deactivate/activate the plugin to see if the rewrite rule will be added to your .htaccess file. Go to statistics of any block and open public report. If you still see the long url version then your website can’t change .htaccess file to add new rewrite rule. Usually this happens if you have multisite installation or WordPress is not installed in the root folder. In such case you can still try to manually edit .htaccess file. In the example below the following line is added:
RewriteRule ^ai-statistics-report\-([0-9A-Za-z\.\_\-]+) /wp-admin/admin-ajax.php?action=ai_ajax&ai-report=$1 [QSA,L]# BEGIN WordPress
<IfModule mod_rewrite.c>
RewriteEngine On
RewriteBase /
RewriteRule ^index\.php$ - [L]
RewriteRule ^ai-statistics-report\-([0-9A-Za-z\.\_\-]+) /wp-admin/admin-ajax.php?action=ai_ajax&ai-report=$1 [QSA,L]
RewriteCond %{REQUEST_FILENAME} !-f
RewriteCond %{REQUEST_FILENAME} !-d
RewriteRule . /index.php [L]
</IfModule>
# END WordPressCustom reports
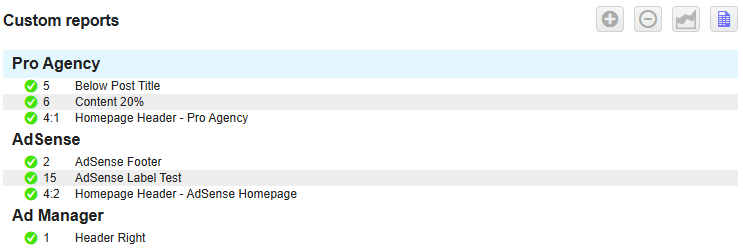
Ad Inserter Pro Corporate license type supports creating custom reports for clients – a collection of block and individual rotation option statistics. This way you can easily create a complete report for all the ads that are configured for a specific client that is advertising on your website. The report can be exported as a PDF document or viewed as a public web report like any other report for block statistics.
To configure or view custom reports go to the Tracking settings tab (tab ⚙ / tab Tracking) and click on the Toggle custom reports button. The tab will switch to Custom reports view – click the button again to return to Tracking settings and pageview statistics.
Now you can create, edit, view or delete custom reports. Click on the report name (or chart) to select it.
All the changes you make here are automatically saved!
To create a custom report click on the Add report button – the report will be created below the selected report.
![]()
To rename the report double-click on the report name, change the name and press enter or click outside of report name to save it.
To delete a report select it and click on the Delete report button.
![]()
To add block or rotation option charts to the report enable showing the list of blocks (if not already displayed):

enable showing of all blocks (if not already enabled):

This view shows also all rotation options for each block if [ADINSERTER ROTATE] is the top-level shortcode separator in the block code, for example:

Now you can add wanted charts to the report. Click on the + button left of the block or option name. The chart will be added below the selected chart (or as the first chart if report name is selected).
You can disable showing specific chart in the report by clicking on the check icon left of the chart:
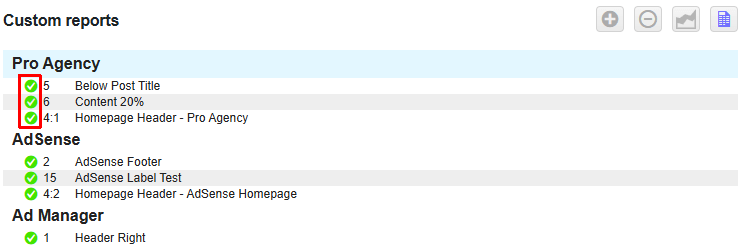
Next to the icon for enabling/disabling the chart there is a label showing block:option numbers followed by the block name (and option name if option chart was selected).
All the changes you make here are automatically saved!
To display custom report statistics (charts) click on the report name (or on the individual chart of the report) and click on the Statistics button:
![]()
The report will show all the enabled charts for this report. You can now export the report to a PDF file or share it via public web link as explained above for the standard block charts.
You can pin block list. When the list is pinned it is always visible on the right side of the plugin settings:

Pageview Tracking
When enabled, Ad Inserter tracks each pageview (page load). To see the (internal) statistics click on the Statistics button.
![]()
Statistics show pageviews by device and, if ad blocking detection is enabled, also events where ad blocking was detected and ad blocking share for each device. Devices are detected based on Viewports settings.
![]()
Ad Tracking
To track individual code block (or ad) you need to enable tracking for this code block. Click on the tracking button and save settings.
![]()
Once the tracking for the code block is enabled, Ad Inserter Pro will insert tracking code on the page where this ad is inserted and will track impressions and clicks on this ad.
If you are using caching you need to clear cache before tracking can be used.
Make sure tracking is globally enabled (tab ⚙ / tab Tracking / button top right).
![]()
Tracking Statistics
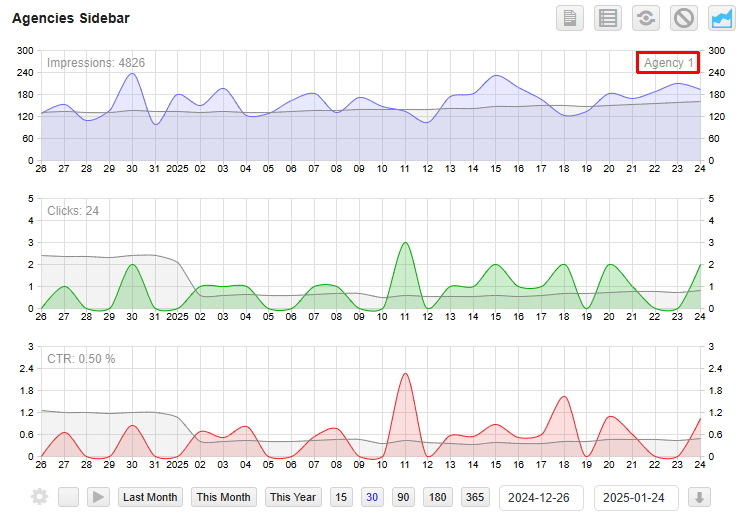
To see impression and click statistics for this block click on the statistics button.
![]()
This button toggles code editor and statistics display.
![]()
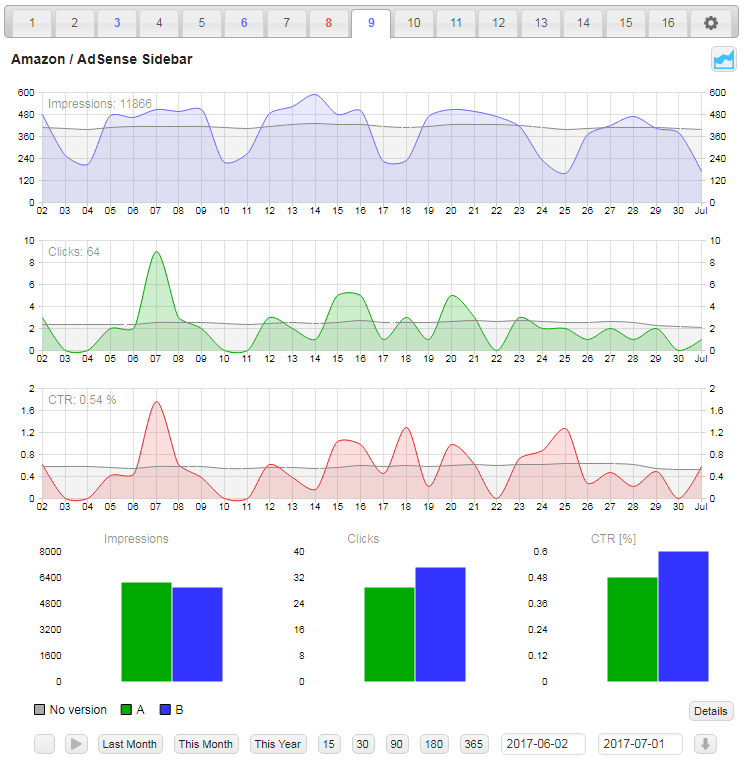
Tracking statistics shows imperessions, clicks and CTR for the selected range including average value for the last 30 days. You can select one of the predefined ranges (last month, this month, this year, last 15, last 30, last 90 last 180 or last 365 days) or select custom date range. The statistics data is kept for one year. When you select a predefined range the data is loaded automatically, for custom data range you need to click on the load button to load statistics data for this range.
![]()
Sometimes you might get error message when trying to load data. This is usually due to expired security token (the page has been loaded for a while). In such case simply reload Ad Inserter Pro settings page.

Ad Inserter Pro supports also live tracking – you can watch in real time how impressions, clicks and CTR change when visitors visit your website. For this you need to enable Auto Refresh function.
![]()
When this function is enabled Ad Inserter Pro will reload data every 60 seconds.
Sometimes you may want to clear statistics data for some date range. To do this select wanted date range and click on the clear button. All the statistics data for this block will be deleted and the charts will show no data for this date range.
![]()
If both date fields are empty, all the statistics for the displayed block will be cleared.
When tracking is globally or just for this block disabled, you may still analyze stored statistics data. In such case there will be a small yellow sign indicating disabled tracking.
![]()
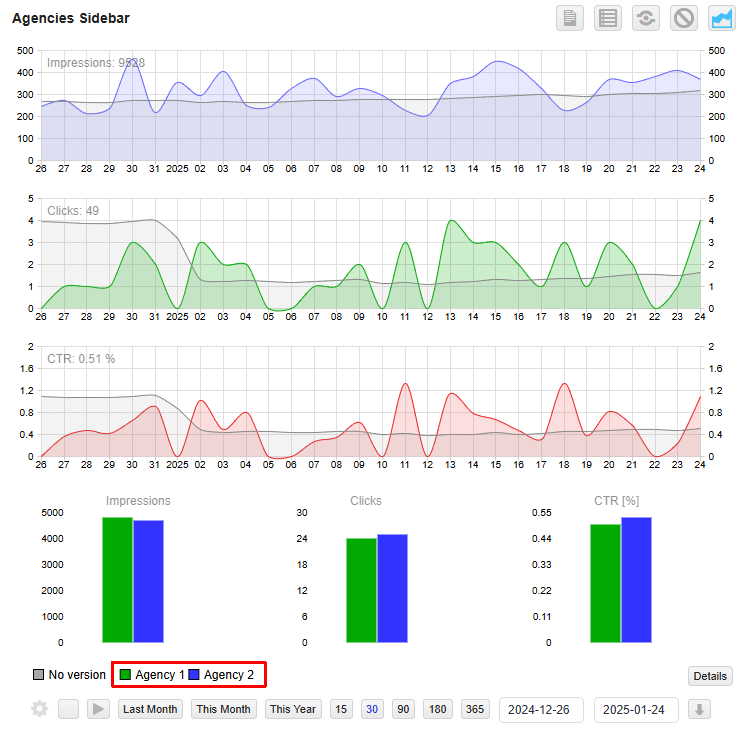
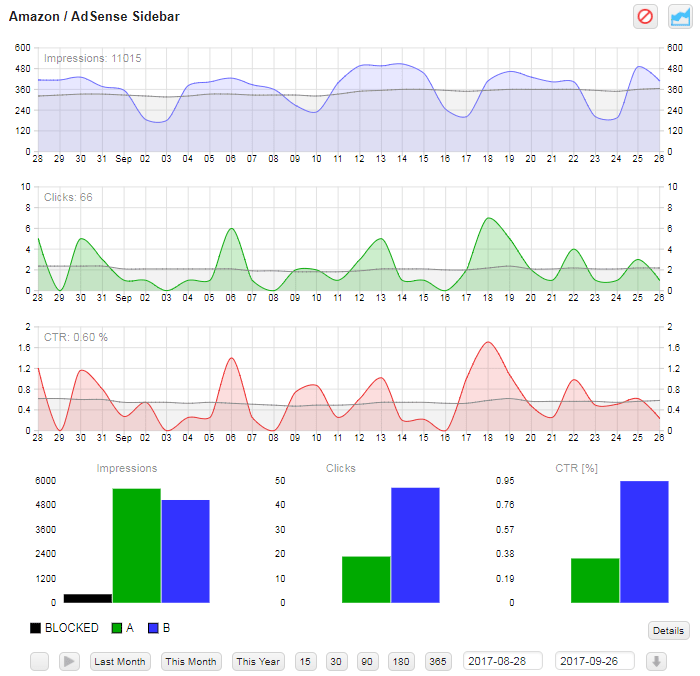
A/B testing
When code block (or ad) has two or more versions or rotation options (using [ADINSERTER ROTATE] function), tracking statistics will show total data (impressions, clicks and CTR) for the block and data for each version. This way you can easily determine which version gets more clicks.
Please note that there might be some slight imbalance between version impressions. The [ADINSERTER ROTATE] function randomly selects one ad on each page load so on long run you’ll get almost equal number of impressions for each ad version. However, the CTR will always be accurate as it is the ratio of actual clicks and impressions.
No version label simply means that there are also impressions or clicks where there was only one ad version or version was not detected (due to some error on the page). If you have defined names for the rotation options (in the rotation editor or directly in the rotation separators) they will be shown here in the legend.
Click and impression tracking can be enabled also for CHECK options. Add statistics value to the CHECK attribute. For example: [ADINSERTER CHECK="statistics" country="US" name="USA" index="5"]
You can also get impression, click and CTR charts for individual ad versions. Click on Details button to toggle version charts.
You can can also display separate statistics for individual version or rotation option – click on the name of the option below the chars:
To return to the default display for block statistics click on the option name in the corner of the impressions chart:
Ad Inserter Pro Corporate license type supports creating custom reports for clients – a collection of block and individual rotation option statistics.
Counting and naming options
By default ROTATE options are counted from 1 upward and named with letters starting from A. For easier identification of the options you can name them with the name attribute.
When you remove or add an option the remaining options will be renumbered. This will cause shift also in the statistics reports. To prevent this you can manually add index attribute to each option to have a defined position (index) regardless of deleted or inserted options. Index can be any number betwwen 1 and 99. For example:
[ADINSERTER ROTATE name="Default banner" index="1"]
Reports for clients
Freelancer and higher license types support also generation of public web reports and reports in PDF or CSV format. The PDF report is identical to the report you see on the settings page – it includes all the charts and labels.
For the report you can define image and text in the header. Check documentation above and example of Ad Inserter Pro report in PDF format.
You can also generate report in CSV format. The file contains all the data shown in the charts:
Click on the button for public web report opens it in a new tab:
Check documentation above for the settings for reports.
Ad Blocking Statistics
Ad Inserter supports ad blocking detection. When enabled, Ad Inserter Pro can track also ad blocking events. To see ad blocking statistics for individual code block click on the Ad Blocking Statistics button (on the tracking statistics toolbar).

- When ad blocking detection is not enabled (tab ⚙ / tab Ad Blocking) all impressions are normally counted regardless whether the ad was blocked or not.
- When ad blocking detection is enabled, default statistics show only impressions where the ad was not blocked. To count ad as blocked, ad blocking must be detected and ad height must be 0.
- When ad blocking detection is enabled, statistics with ad blocking (Ad Blocking Statistics enabled) show all impressions and share of ad blocking events. In the case of ad rotation, ad blocking events are represented as one version (blocked impression).
Disabling individual tracking actions
You can disable individual tracking actions by defining the following Javascript variables in the header:
<script>ai_internal_tracking_no_impressions = true; ai_external_tracking_no_impressions = true; ai_internal_tracking_no_clicks = true; ai_external_tracking_no_clicks = true;</script>
Preventing iframes from losing focus
If your page contains iframes (other than iframes in ad blocks) and you are using Advanced click detection which can detect clicks on iframes, you may experience issues when navigating to and from iframes – iframes may lose focus. To prevent this you should declare iframe ids or classes to be excluded from click detection. Two global Javascript array variables can list iframe ids (ai_ignore_iframe_ids) or/and iframe classes (ai_ignore_iframe_classes). Wildcards are supported (for example, *partial-name*).
For example, to exclude click detection in Disqus iframes you should use
<script>ai_ignore_iframe_ids = ['dsq-*'];</script>
Custom actions
Ad Inserter Pro supports custom actions that are triggered when the visitor clicks an ad. Enable tracking for the block and use the following code (for example, in the header):
<script>function ai_click_action (block) { console.log ('AI CLICK', block); // Example of action when a click is detected }</script>
When the plugin detects click it calls Javascript function ai_click_action with block number as parameter.
ai_external_tracking_event (event_data, category, action, label, non_interaction);
Custom filters
Custom ad blocking detection scripts path
ai_adb_scripts_path ($default)
When ad blocking detection is set to Advanced, Ad Inserter Pro moves scripts for ad blocking detection to a folder with random name. By default the scripts are moved into /wp-content/uploads.
This filter hook is called on init action hook just before the scripts used for ad blocking detection are moved. With this filter you can define a custom folder according to your needs. In any case Ad Inserter Pro will either in the default or in the specified folder create subfolders ad-inserter/random-name/ where the scripts will be placed.
The custom folder returned by this filter hook must already exist.
You need to add filter hook before it is used in the init action, for example on action after_setup_theme. Check WP Plugin API Action Reference for the order of WP action hooks.
function adb_scripts_path ($path) {
  return '/wp-content/static';
}

add_filter ('ai_adb_scripts_path', 'adb_scripts_path', 10, 1);
Install Ad Inserter for free
Ad Inserter Pro Affiliate Program
