Plugin Settings
Plugin settings are located on the last tab ⚙. This tab contains sub-tabs depending on the plugin type (free or Pro).
![]()

- General
- Viewports
- Hooks
- Header
- Footer
- Ad Blocking
- Debugging
- PRO Geolocation
- PRO Tracking
- PRO Multisite
General
Tab General contains general plugin settings and additional settings for insertion. It is divided into tabs Administration, Frontend, Constants and reCAPTCHA (if supported by the license type).
Administration
PRO License key
Here you need to enter license key for Ad Inserter Pro you got in the email.
![]()

When the license key is entered there will be a key icon next to it. Click on this icon will open the license page in a new tab. On this page you can check the license type, expiration date. On this page you can also extend or upgrade the license (during the license period a discount will be applied).
When the license expires you will still be able to use the plugin according to the license type, however, you will not be able to get support and updates. Having the WordPress, theme and plugins updated is mandatory to have stable and secure website!
Without a valid license key the plugin can not be used.
The License key field is available only on the main site of a multisite installation!
Hiding license key
If your license type supports installation on client sites (Freelancer and higher license types) you can also hide license key on client sites. Double click on the License Key text (left of the field) and you’ll get check box Hide Key:

Check it and save settings and the license key line will not be shown. To disable hiding license key add &ai-key=xxxxxxxxxxxxxxxxxxxxxxxxxxxxxxx to the url of the settings page (replace xxxx with your license key). For example:
/wp-admin/options-general.php?page=ad-inserter.php&ai-key=xxxxxxxxxxxxxxxxxxxxx
This will enable license key row when it is hidden. On the license (download) page you can see the list of all websites where the license is used.
License key we send to you is unique and must be kept secret. In case you don’t trust the developers who have admin access to your website (and you have at least Freelancer license), you should hide the license key.
Syntax highlighting theme
You can choose between many syntax highlighting themes (light and dark).
Menu for link
Here you can select location of the link to Ad Inserter settings page in the WordPress sidebar menu: Settings submenu (default) or Top menu.
Max list selection items
This defines the number of items that are loaded for each list selection. For websites where there are many posts, tags or taxonomies this setting prevents possible issues when loading the settings page. If you are missing some Post IDs, tags or taxonomies you can try to increase this setting.
Tab setup delay
Each tab on the Ad Inserter settings page contains settings for one block. After the page is loaded Javascript code need to run for each tab to configure elements on the tab. This is done transparently to the user and in most cases it will not be noticed. Whenever you switch to a tab it will be displayed instantly. Tab setup delay defines delay in ms before each tab is configured (after the settings page is loaded). Default value is 100 ms. In some cases this may be undesired so you can prevent configuring not displayed tabs by setting Tab setup delay to 0. In such case only the current tab will be configured. Other tabs will be configured when you switch to them for the first time.
Minimum user role for individual exceptions editing
By default Ad Inserter individual exceptions on posts/static pages are enabled only for administrators. You can define minimum user role for page/post Ad Inserter individual exceptions editing in Posts/pages editor.
Disable caching for logged in administrators
Ad Inserter normally tries to disable caching for logged in administrators so you can immediately see the changes you make to the plugin. With this option you can disable this behavior. Enabled means that logged in administrators will see non-cached (live) pages (applies to WP Super Cache, W3 Total Cache and WP Rocket plugins).
Please note that when you set this option to Disable the pages may still not be cached as there may be other settings that will prevent caching. Many caching plugins have option to disable caching for logged in users.
FREE Ad InserterPlugin usage tracking
When enabled, the information regarding WordPress environment and Ad Inserter usage will be collected and sent to plugin developers (once per month and on events like plugin activation/deactivation). This is completely optional and can be disabled at any time. So if you have opted in (by clicking Allow when asked for permission) and now you would like to disable tracking, you should go to tab ⚙ / tab General, select Disable for Plugin usage tracking and save settings.
![]()
This applies only to free Ad Inserter as Ad Inserter Pro connects to the license server anyway.
If this setting is not available then you have not selected any option yet – tracking is disabled unless explicitly enabled by clicking Allow when asked for permission (or when this setting is set to Enable).
What data is collected: Ad Inserter version, activation status, number of active blocks, date of installation, date of last saved settings, status of review notice and remote debugging, block class name, location, website url and name, WordPress version, language, text direction, charset, number of posts, active theme and version, list of installed plugins, PHP version, server name, IP address (used to determine country), site count for multisite installations, deactivation reasons and details (if provided).
Ad Inserter is only a plugin for WordPress content management software. It works together with WordPress, other installed plugins and selected theme.
This data provides information to make the plugin to be compatible with as many environments as possible, to test the plugin with commonly used plugins and themes, to understand why users deativate (and uninstall) the plugin and to get ideas to make improvements to the plugin.
If you are not happy to reveal this information and you have opted in, simply disable usage tracking as described above.
Your decision will be respected.
Frontend
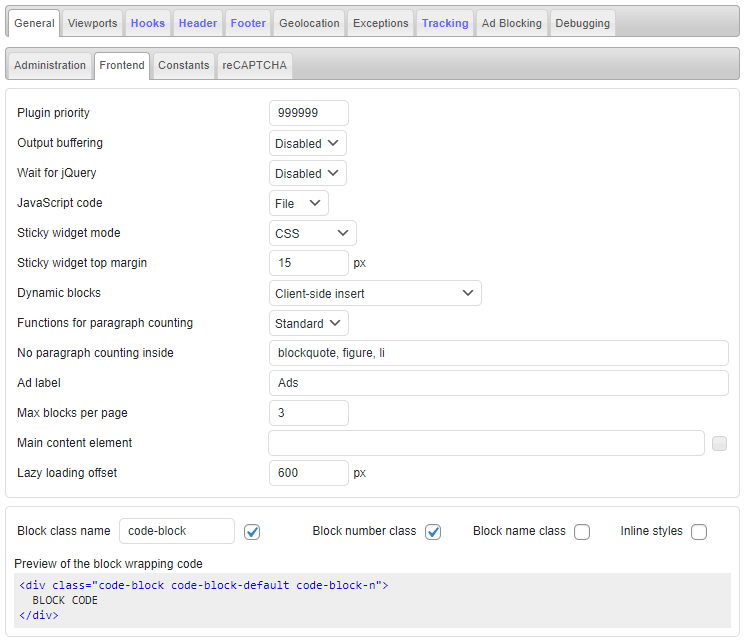
Plugin priority
Default Ad Inserter plugin priority (processing order) is 99999. It is used to specify the order in which the plugin functions are executed. Lower numbers correspond with earlier execution. You can change this value if you have problems with the processing order of other plugins.
Output buffering
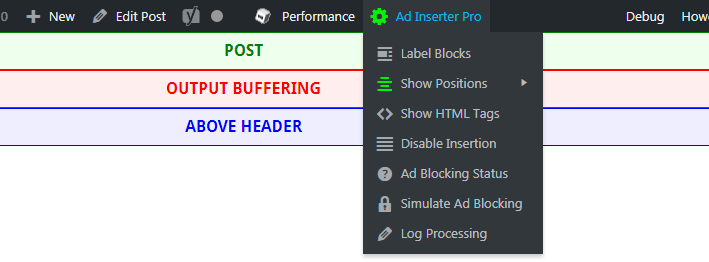
Insertion position Above header and server-side insertion Before/Inside/After HTML element need special code processing and are available only when you enable Output buffering, however, this may not work with all themes. Output buffering means that the code generated by the WordPress (including your theme and plugins) is buffered (saved) and then processed.
To check if your theme supports output buffering enable it here, then go to homepage and enable Show positions debugging function (Ad Inserter menu in top admin bar). If you see OUTPUT BUFFERING (and ABOVE HEADER) bar then output buffering works as expected.
Wait for jQuery
Ad Inserter supports many client-side functions – functions that run in the browser of the visitor when the page is loaded. These functions use JavaScript code. Previously Ad Inserter was using JavaScript code which relied on jQuery library which is normally loaded by WordPress. Now the client-side functions use plain JavaScript code which does not use jQuery anymore. So you can leave this setting to Disabled. Ad Inserter will load plain JavaScript code which does not depend on any library. It should work fine in most modern browsers.
In the future this setting will be removed.
jQuery is an open source JavaScript library which is designed to provide easy client side scripting for HTML. It works on all major browsers. jQuery is still widely used to perform various tasks on the client’s browser. Normally jQuery is loaded from the <head> section and should be ready for any JavaScript code that will need it.
However, some caching or optimizing plugins (like Autoptimize) may move it to the page footer or mark it with defer attribute so the browser will not wait for it to be loaded. This may cause JavaScript errors as some code may not find jQuery bacause it is not loaded yet. To solve this problem Ad Inserter can add additional code that will wait for jQuery to be loaded and to be ready before it will run own JavaScript code for client-side functions. By default this option is disabled.
When Wait for jQuery option is enabled, the plugin will load JavaScript code which uses jQuery library. This setting can be used when you still need to support very old browsers. For this purpose the code includes many polyfills. When Wait for jQuery option is disabled, the plugin will load plain JavaScript code which does not depend on any library. It should work fine in most modern browsers.
JavaScript code
By default the client-side JavaScript code will be inserted Inline – in the page footer. This is best for reliable ad blocking detection, however, it slightly increases page size. Ad Inserter supports also loading JavaScript code for client-side functions from an external plugin File. This js file may be cached which can slightly reduce loading times.
This option is enabled only when Wait for jQuery option is disabled.
Code for ad blocking detection is always included inline.
Sticky widget mode
There are three modes for sticky widgets (or sticky sidebars) available as Sticky widget mode. CSS or CSS Push modes are the best approach but may not work with all themes. Use JavaScript mode only when CSS mode does not work. Check Widgets for more.
- CSS mode: when the page is scrolled and there is space in the sidebar below the last widget, this mode will stick the widget to the top of the page. Consequently, it makes sense to enable Sticky option only for one widget in the sidebar.
- CSS Push mode: this mode will create some space below a sticky widget. When the page is scrolled, this mode will stick the widget to the top of the page while there is space in the sidebar below the widget. After that the widget will be pushed up as other widgets.
- JavaScript mode: it works the same as CSS mode. When the page is scrolled and there is space in the sidebar below the last widget, this mode will stick the widget to the top of the page. This mode requires jQuery.
If you experience issues with the page layout when using sticky widget with CSS mode, try to put this code into the Header:
<script>ai_no_sticky_sidebar_height = true;</script>
Sticky widget top margin
Here you can define sticky widget top margin to precisely define top position where the sticky widget will stop.
Dynamic blocks
Ad Inserter supports server-side and client-side dynamic blocks (blocks that change like ad rotation, scheduled blocks and blocks that are black or white-listed by IP address, cookie, client, referrer or country). If you are using caching you should use client-side mode (or server-side using W3 Total Cache if you are using this caching plugin) but you need to be aware of how it works. Please check section Caching for details.
When you set Dynamic blocks to client-side the plugin will generate code that will be executed in the visitor’s browser. Ad Inserter supports two client-side methods for dynamic blocks: Client-side show and Client-side insert. Both generate client-side code to run in the browser. Client-side show uses CSS to hide unwanted code while Client-side insert uses Javascript to insert code when needed or enabled.
Client-side show is fine with banners as they are all loaded and only shown when needed but some adverts (like AdSense) might not work properly or can’t be used this way and you might violate their Terms of Service – use Client-side insert mode in such case. On the other hand, Client-side insert can’t work with some ad codes that use old JavaScript method document.write which can’t be used asynchronously (after the page is loaded and created).
Functions for paragraph counting
Standard PHP functions for paragraph counting are faster and work in most cases, use Multibyte functions only if paragraphs are not counted properly on non-english pages.
Multibyte PHP functions for paragraph counting are much slower than standard ones. Use them only when insertion between paragraphs does not work properly on non-english pages.
No paragraph counting inside
Here you can define tags inside which paragraphs (in posts on pages) will not be counted when using Before/After paragraph automatic insertion.
Ad label
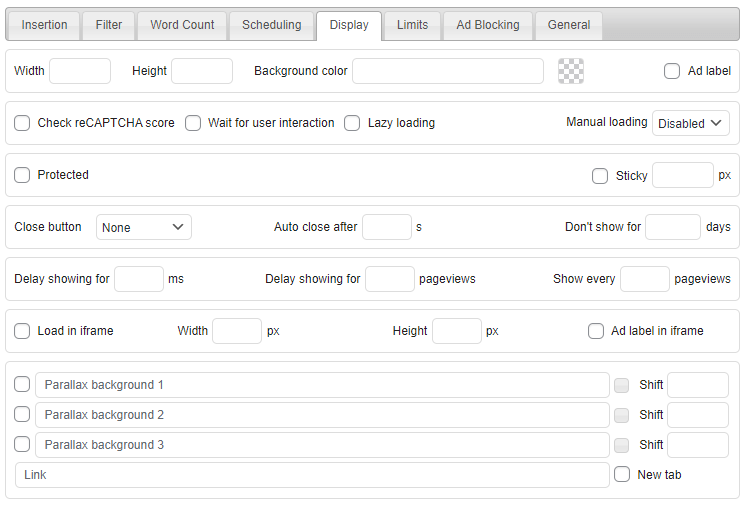
Ad label defines text (or HTML code) which can be displayed above ads. To enable ad label above the ad go to block for this ad, click on the Misc button and then on the Display tab check Ad label.
If you configured only text for Ad label then the following code will be added above ad code:
<div class="code-block-label">AD_LABEL_TEXT</div>
Optionally you can define style for labels (assuming block class name is code-block):
<style>.code-block-label { font-size: 12px; }</style>
You can put this style code into your theme’s style.css file or in the Header section. Instead of defining only label text you can also define HTML code for ad label, for example: <div style="font-size: 12px;">Advertisement</div>
Max blocks per page
Here you can limit maximum number of blocks per page. If you want some block to count for maximum blocks per page enable Max blocks per page for that block (button Misc / tab Insertion).
Some themes call the_content hook more than once. This hook is used for insertions into post/page content. In such case the blocks might be inserted (from the plugin perspective) more than configured – usually only the last call is the wanted call for insertion. To have accurate counter for block insertions in such cases you need to eliminate insertion in unwanted calls of the_content hook. Try one of the following options:
- check Insert only in the loop (button Misc / tab Insertion)
- set Filter for Content processing to the wanted call of
the_contenthook (button Misc / tab Filter)
PRO Main content element
Stick to the content horizontal position displays sticky ads next to the left or right edge of page content (as sidebar). In most cases the plugin will automatically calculate page content width (assuming that the content is centered horizontally) and position ads automatically. However, some themes may require to define Main content element manually. Here you can enter either CSS selector (#id or .class) of the main (outermost) page element or content width in pixels (numerical value only). To get right CSS selector you can use web inspector in the browser or built-in HTML Element Selection tool. Click on the small button after the field to open HTML element selection.
PRO Lazy loading offset
This offset defies how close to the viewport (in pixels) lazy loading ad must be in order to be loaded. Lazy loading can be enabled on tab Display (button Misc).
Block class name
Block class name defines class that is used in wrapping divs. Wrapping divs for code blocks have the following classes which can be used for custom styles:
code-blockGeneral Ad Inserter block class that can be renamedcode-block-nClass for block using its numbercode-block-nameClass for block using its name (using lowercase letters, numbers, – and _, spaces are converted to -)
Each of the classes can be disabled if needed. If you are using client-side device detection (CSS media queries) then the wrapping div for the code block will have also some of the following classes: ai-viewport-1, ai-viewport-2,… ai-viewport-n.
<div class="code-block code-block-n" style="margin: 8px 0; clear: both;">
  BLOCK CODE
</div>
By default each code block uses inline styles for alignment. You can disable them to use alignment classes instead.
Some client-side functions need the wrapping div with block classes so the plugin can locate the blocks. Therefore, in such cases the classes will be inserted regardless of this setting.
Some ad blockers might hide elements with the default class name code-block used for the wrapping div for blocks inserted by Ad Inserter. Even if you are not using ad blocking detection it is strongly advised to set some unique class name for the website – anything that will not match existing classes. For example: cool-block, blk-data, wp-spot, wp-ai-element, plg-inserted,…
Constants
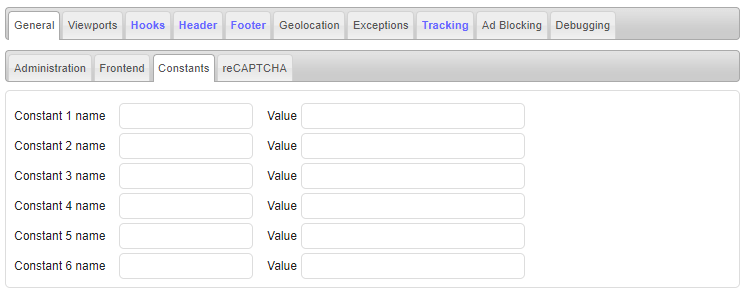
Constants provide a centralized way to define some data (e.g. IDs) that is used in code blocks. For each constant you need to define its name and value. The constant can then be used as Ad Inserter shortcode. For example:
[adinserter data="constant-name"]
reCAPTCHA
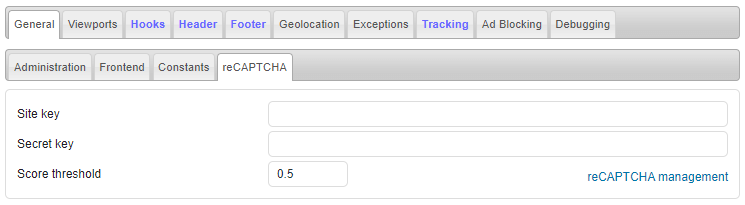
PRO reCAPTCHA v3
Ad Inserter Pro Business and higher license types support checking the reCAPTCHA v3 score to detect invalid traffic. reCAPTCHA is a free service that protects your site from spam and abuse. It uses advanced risk analysis techniques to tell humans and bots apart. reCAPTCHA v3 helps you detect abusive traffic on your website without user interaction. Instead of showing a CAPTCHA challenge, reCAPTCHA v3 returns a score so you can define a threshold when the ads can be displayed.
When this option is enabled for a block (button Misc / tab Display), the block (ad code) will not be inserted if the reCAPTCHA score is below the predefined value (default value 0.5). reCAPTCHA v3 returns a score between 0 and 1 for each request (page load). The score is based on interactions with your site and enables detecting various bots and can be used to prevent inserting ad codes for requests which are considered as invalid traffic: 0.0 is very likely a bot while 1.0 is very likely a good interaction.
To use reCAPTCHA score check you need to register your website rith reCAPTCHA and enter Site key and Secret key and then enable Check reCAPTCHA score option for each block you would like to protect (button Misc / tab Display).
Viewports
Viewport settings are located on the last tab ⚙
![]()
Viewports are used for client-side device detection and for responsive AdSense ads – ad sizes fixed by viewport.
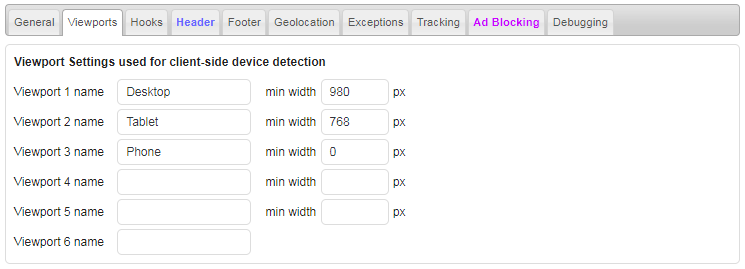
Up to 6 viewport names and widths can be defined. Default values are:
- Desktop: 980 pixels or more
- Tablet: from 768 pixels to 979 pixels
- Phone: less than 768 pixels
Hooks
Custom hook settings are located on the last tab ⚙
![]()
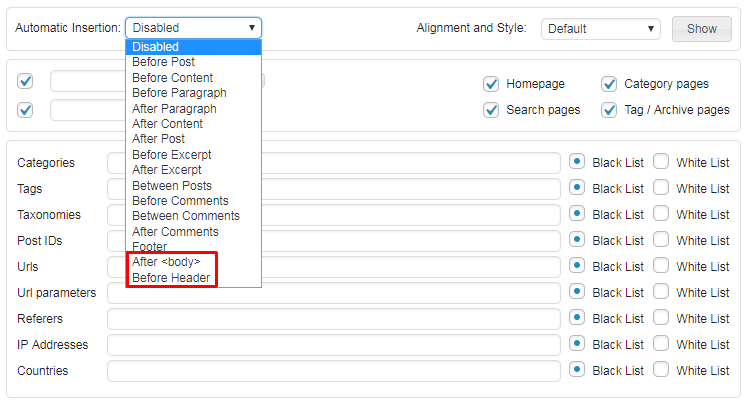
Ad Inserter supports also automatic insertion at custom positions where hooks are used using the do_action () WordPress function.
Custom hooks can be used to insert on custom pages of plugins like Elementor, BuddyPress or bbPress which provide WP hooks for insertions at typical positions on their pages.
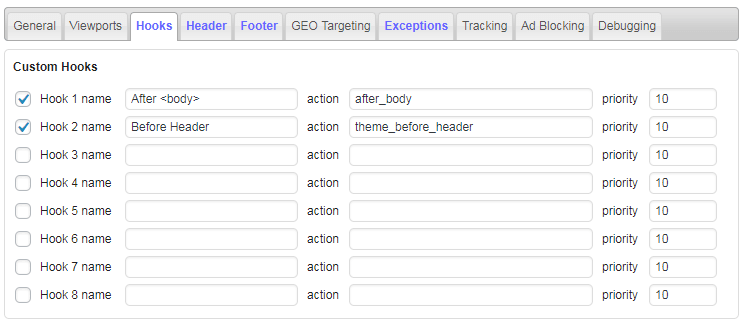
Hook name is a name that is used in the Automatic insertion selection, action is the name that is used in the do_action () WordPress function used in the theme and priority is the hook priority (lower number means earlier processing). You can use ANY hook that is implemented by your theme or added by plugins. Of course you can create a child theme and implement your own hooks. After you save settings you get new positions for automatic insertion.
Header and Footer
Header and Footer code settings are located on the last tab ⚙
![]()
Ad Inserter can insert:
- Header code (code in the
<head>section) - Footer code (code before the
</body>tag)
Check Header and Footer code page for details.
PRO Geolocation
Geolocation settings are located on the last tab ⚙
![]()
Geolocation (or GEO targeting) means determining visitor’s country and display targeted ads. Country is determined from the IP address of the website visitor. All license types support internal lightweight database for IP address to country mapping (IP Geolocation by DB-IP). Business and higher license types provide also an interface for MaxMind databses.
If you have Business or Corporate Pro license you can choose between internal (default) and MaxMind geolocation database (Ad Inserter Pro will download and use GeoLite2 data created by MaxMind).

Default internal database is lightweight (around 5 MB) but slightly less accurate than MaxMind. If you select MaxMind database and enable automatic updates Ad Inserter Pro will download and use GeoLite2 database (around 60 MB, data created by MaxMind). If you are using MaxMind GeoLite2 database, the plugin can (when enabled) update the database automatically each month.
Ad Inserter Pro supports also CloudFlare geolocation.
Ad Inserter Pro supports also a filter hook to add support for any other IP address/country database or service you would like to use.
When you select MaxMind for geolocation database (Business or Corporate Pro license) and save settings, Ad Inserter Pro will show additional options and display a warning message because the database file will not be found. Default database location is in the uploads folder but you can define any location on the server. If you use absolute path it must start with a slash:
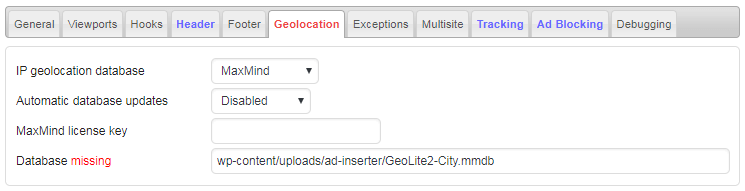
Now you can either manually download and extract the file (useful if you use commercial MaxMind database) or set Automatic database updates to Enabled. When you enable Automatic database updates you need to provide also the MaxMind license key so Ad Inserter Pro can automatically download GeoLite2 database.
To get the key you need to sign up with MaxMind. Once you are registered log in and go to My License Key and click on Generate new license key button. For License key description enter Ad Inserter Pro, select No for Will this key be used for GeoIP Update and then click on Confirm. MaxMaind will now generate your licence key. Save it to a safe place and enter it into appropriate filed in Ad Inserter Pro Geolocation settings. In some cases MaxMind may limit downloading and you may get error message when the plugin tries to download the file. In such case you can manually download the file.
If you decide or need to manually download the file go to Download Files on your MaxMind account page and download GeoLite2-City database (click on GZIP link):
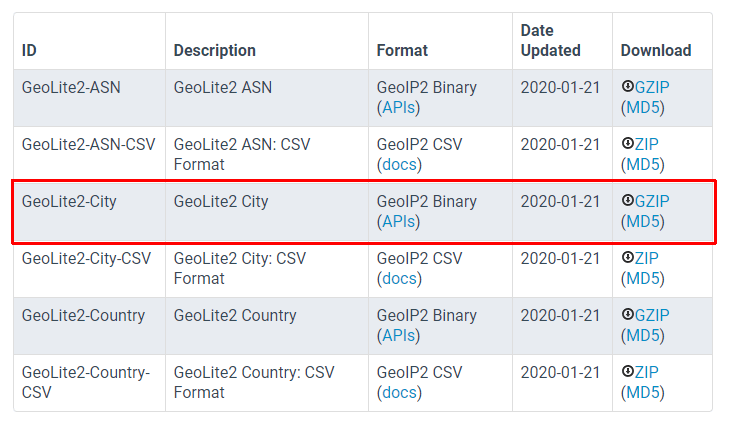
When the file ends with .tar.gz (default file format) Ad Inserter Pro will try to decompress it and extract the database file. So you only need to place the file in the configured folder.
You can download and use also Country database. This may be useful when you are using paid plan and country only database might be cheaper. Of course, in such case you will not be able to get information about cities and other country subdivisions.
Custom gelolocation
Ad Inserter Pro supports also custom geolocation services. To use custom geolocation lookups add a WP filter hook with name ai_ip_to_country and then implement your lookup in a function, for example:
add_filter ('ai_ip_to_country', 'custom_ip_to_country', 10, 3);
function custom_ip_to_country ($default, $ip, $details) {
// $default: default return value (false, means not found and configured Ad Inserter Pro lookup will be used)
// $ip: IP address of the client
// $details: true when country subdivision data is required (ignore it if your database contains only country data)
// DB lookup
return 'XX'; // Uppercase country ISO code
// for country subdivisions
// return array ($isoCode, $subdivision, $city); // Complete data
// when not found
// return false; // false means not found and configured Ad Inserter Pro lookup will be used
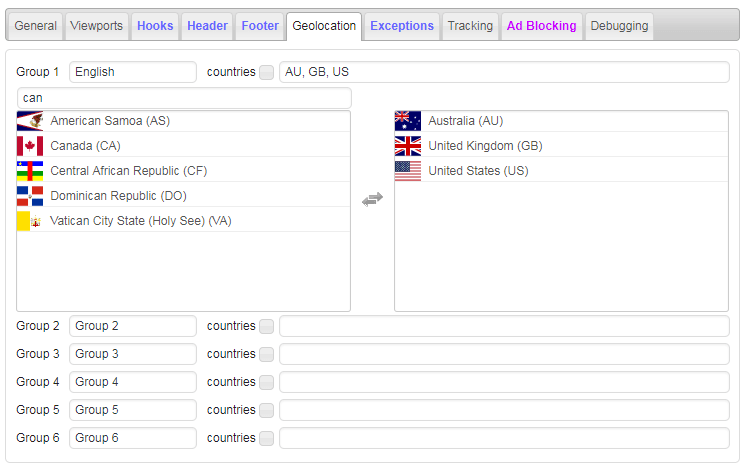
}GEO targeting groups
You can define up to 6 country groups for easier GEO targeting of individual code blocks.
PRO Exceptions
Exceptions settings are located on the last tab ⚙
![]()
Here you can open page with exceptions, open editor to edit exceptions, clear exceptions for specific block, clear exceptions for specific post/page or clear all exceptions (click on the cross in the top right corner).
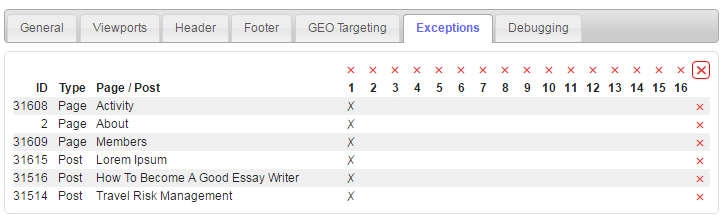
Because of space limitations the list shows only the first 100 posts/pages with exceptions. When you clear the exceptions (all or only for a specific block) only the listed exceptions will be cleared. In the case there are more exceptions you’ll get a warning notice and the next 100 exceptions will be listed. To clear all the exceptions simply repeat the process.
PRO Tracking
Tracking settings are located on the last tab ⚙. To globally enable tracking click on the button with green icon and save settings.
![]()
You need to enable tracking also for each block you would like to track:
![]()
There are two independent tracking modes: Internal and External.
- Internal tracking means using internal plugin statistics. Each event (impression or click) is sent to the plugin (Ajax request) and you can use internal statistics described below to analyze impressions, clicks, CTR, A/B tests. This may introduce additional load to your database on websites with high traffic.
- External tracking means using tracking via Google Analytics or Matomo (formerly Piwik) events. Each event (impression, click or ad blocking) is sent to the external tracking service where you can analyze them. Make sure you have Google Analytics or Matomo tracking code installed. You can place the tracking code into Header code (tab
 / tab Header). To analyze events go to your tracking service (Google Analytics or Matomo) admin pages and look for events with category Ad Inserter Pro.
For external tracking you can define event data:
![]()
The following shortcodes are available:
[EVENT] – event type: click, impression or ad blocking
[BLOCK_NUMBER] – block number
[BLOCK_NAME] – block name
[VERSION_NUMBER] – version number
[VERSION_NAME] – version name
[BLOCK_VERSION_NUMBER] – block and version number
[BLOCK_VERSION_NAME] – block and version name
You can also track all pageviews (with internal tracking) and ad blocking statistics by device (internal and external tracking are supported). Check below for details. If you would like to test tracking and check statistics while you are logged in set Track Logged In Users to Enabled. Choose (if available) Click Detection method according to the explanation above:
- Standard click detection can detect clicks only on banners with links and is available in all versions of Ad Inserter Pro.
- Advanced click detection can detect clicks on any ad code (including Javascript
<iframe>ads) but is not available in all versions of Ad Inserter Pro.
If you are using only banners then choose Standard click detection as it is the most reliable method to detect clicks. Use Advanced method only if you need to detect clicks on AdSense, Amazon, Media Net or other Javascript based ads, for example, to run A/B test with AdSense and affiliate banner ad to determine which ad has the highest CTR.
Reports for clients
If Report header image starts with / then this is absolute path to the image. Otherwise this should be relative (to the WP root) path to the image or logo for the report. To select image click on the small button right of the field. In this case the relative path to the image will be automatically created when the settings will be saved. To not use any image in the report header use space for this field. Clear the filed and save settings to restore header image to the default Ad Inserter Pro image.
Report header title and Report header description are texts displayed next to the image, while Report footer is displayed in the footer of the report. To reset text to the default value clear the field and save settings. For date format WordPress settings are used.
Public report key is a string used to generate a key to verify public report urls. Normally you send urls for public reports to your clients. However, you may come into situation when you would like to prevent access via those urls for your old clients. In such case you can simply change this key and all (old) public urls will become invalid. To reset to the default value clear this field and save settings.
Clear All Statistics Data clears all impression and click data for all code blocks. Use it only when you need to delete all statistics.
Ad Blocking
Ad blocking detection settings are located on the last tab ⚙
![]()
Ad blocking detection needs to be enabled for any ad blocking action to work. To enable Ad blocking detection click on the right button to turn it green.
Ad blocking detection needs to be enabled even if you will not use general actions available here (popup message or page redirection) but you will only replace ads or protect content.
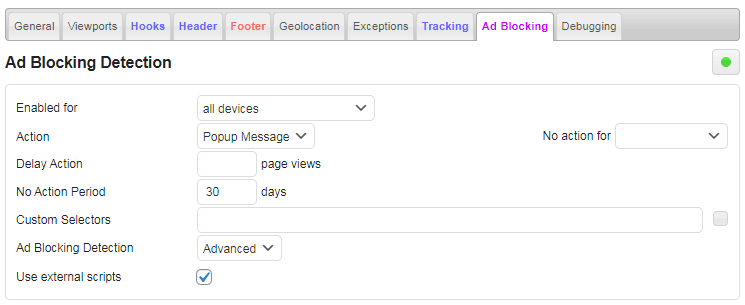
Ad blocking detection has some additional parameters that you may need. Action here is a general action that is fired immediately when ad blocking is detected. Possible actions are None, Popup message and Page redirection.
With No action for you can select administrators or logged in users for which no action will be taken when ad bloking is detected.
When the user using ad blocker comes to your website you can delay action until few pages are visited. Delay action is the number of pages that the visitor must visit before the action triggers. Leave empty for immediate action.
When the action is triggered and the visitor for example closes the popup message the action will not trigger again during the No Action Period. This is a period in days (saved in cookie) when the user can browse the website without any warning or redirection. Leave empty to always trigger action every time the page is visited.
Delay action and No Action Period affect only actions set here. Ad replacement and content protection are not affected by these settings.
In order to improve or customize ad blocking detection Ad Inserter supports custom CSS selectors that are checked in order to detect ad blocking. This is an advanced feature and must be used with care – you need to know some HTML and CSS basics in order to use it.
CSS selector can be any class name or id that can identify your ad that may be blocked. Blocking is detected by checking ad height. If it is 0 it means that ad blocking prevented the ad from showing. For example, you have the following ad:
<div id="header-ad">
  <a href="http://example.com/"><img src="http://example.com/assets/banner_300x250.jpg" /></a>
</div>
To use this banner for ad blocking detection use #header-adfor custom CSS selector.
Ad Inserter Pro has additional ad blocking detection algorithms. In case there are problems with ad blocking detection you can switch to Standard mode.
Popup Message
Popup message is a typical action when you want to inform visitor that ad blocking was detected and he needs to do something. Message is normally displayed over semi-transparent overlay which covers the page. You can configure the message text (including HTML), message CSS and overlay CSS.
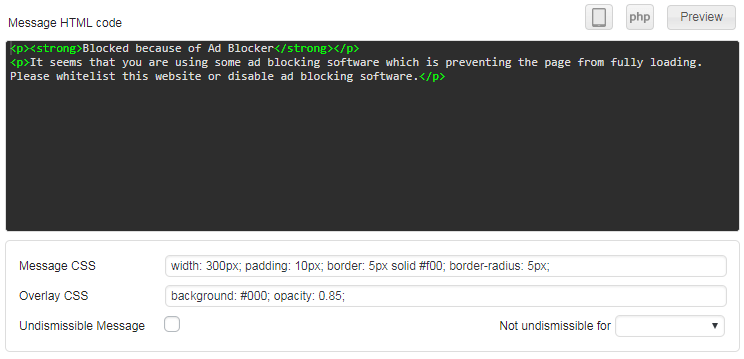
Check Undismissible message to prevent the visitor from closing the popup window.
With Not undismissable for you can select administrators or logged in users for which the message will still be dismissable.
This is very annoying and should be used with care! You are preventing the user from visiting your website!
To test the message click on the Preview button. A preview window will open. Here you can change text and CSS and watch live preview of the message.
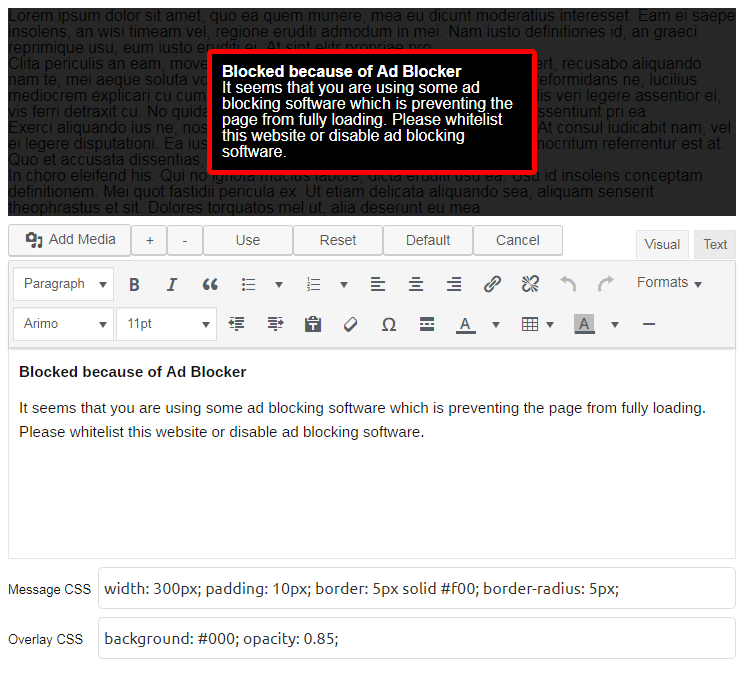
To undo changes click on the Reset button to revert back to the saved code. To get default settings for message click on the Default button. Use + – buttons to increase or decrease the number of dummy paragraphs under message.
Once you are happy with the message click on Use to copy the settings to the Ad Inserter page. Click on Save settings to save them.
Redirection
When ad blocking is detected you can redirect visitor to any existing static page or custom url. Custom url can be absolute or relative.

Popup message and redirection
In some cases you may want to show popup message with a link to some page explaining the problem. It is not enough to include a link to the page in the popup message because when the visitor will click on the link he will be redirected to that page but popup message will again appear. To prevent this put shortcode [adinserter adb="no-action"] into the page to prevent ad blocking actions on that page.
PRO Multisite
Multisite settings are located on the last tab ⚙
![]()
Tab Multisite is available only on the main site of multisite installation!
Ad Inserter supports multisite WordPress installations. Normally, the plugin is available with settings and widgets to all the sites on the network. Ad Inserter Pro supports options to disable Ad Inserter Pro settings page, widgets and post/page exceptions for sites (except for the main one).
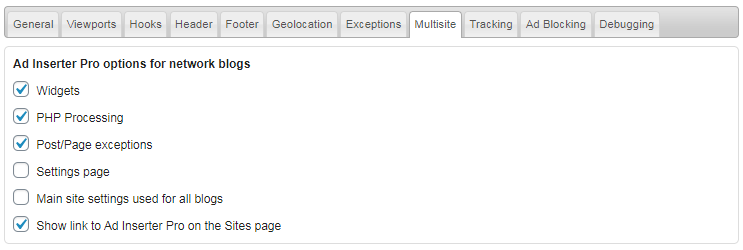
It is also possible to use settings for the main site (blog) on all network blogs – in such case the Settings Page option is disabled.
Show link to Ad Inserter Pro on the Sites page adds link to Ad Inserter Pro settings page to existing links for each site (Edit, Dashboard, Deactivate, Archive, Spam, Delete, Visit) on the network Sites page. You can access the settings page without having to log in to that site. Therefore, the link to Ad Inserter Pro settings on the Sites page will expire in 30 minutes, then you’ll have to reload the Sites page to get fresh links.
Debugging
Debugging settings are located on the last tab ⚙
![]()
Ad Inserter has many debugging functions that can help you to diagnose the problem when you don’t see your ads at expected positions. When you are logged in as administrator each post or page has a WordPress admin toolbar on the top with Ad Inserter menu item. Check Debugging documentation for details.
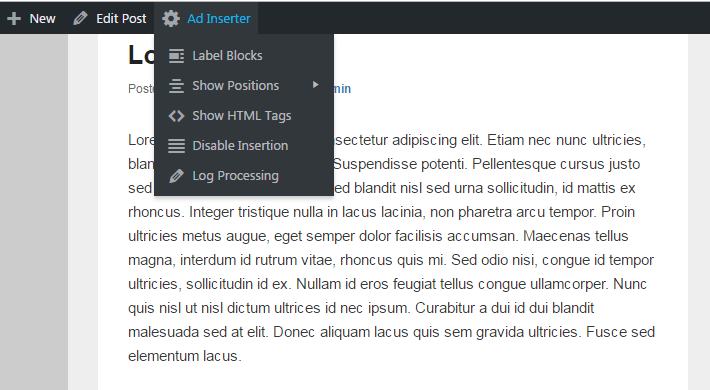
If you don’t see admin toolbar on the top go to WordPress Users > Your profile and make sure Show Toolbar when viewing site is checked. If you don’t see admin toolbar you can try to enable Force showing admin toolbar when viewing site.
Make sure Debugging functions in admin toolbar is checked (there is a separate settings Debugging functions on mobile screens for admin toolbar on mobile screens). This option will add Ad Inserter debugging menu with debugging functions.
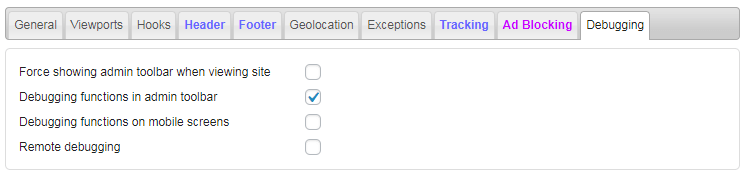
Remote debugging enables other people using url parameters to see your pages with debugging data: debugger widget, labeled blocks, positions for automatic insertion, labeled tags and processing log. For logged in administrators debugging is always enabled.
Enable this option to allow other people to see debugging data in order to help you to diagnose issues with Ad Inserter.
Install Ad Inserter for free
Ad Inserter Pro Affiliate Program
