Additional Block Settings
Button Misc below the code editor opens tabs for additional block settings.
![]()
Setting are divided into tabs.
Insertion
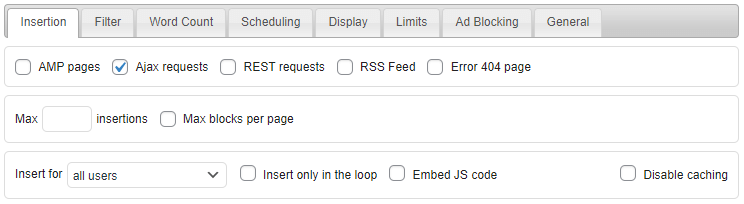
By default blocks will not be inserted on AMP pages. Most standard ad codes can’t be used on AMP pages as Javascript ads and Javascript analytics are not allowed on AMP pages. However, for AdSense ads you can generate AdSense AMP code using the built-in code generator. In most cases you should leave AMP pages on this tab unchecked! Use [ADINSERTER AMP] separator to insert special AMP code on AMP pages.
Use AMP validator to check if your AMP pages are valid.
Similarly, by default blocks will not be inserted on Error 404 page (Page Not Found) and into RSS feeds. Check Error 404 Page or RSS Feed checkbox to enable insertion there. Ajax requests (e.g. for infinite scroll) are by default enabled, but you can uncheck option to disable insertion on Ajax calls. The plugin can also process REST requests (including JSON feeds) and insert blocks into the content – it uses the_content () WP filter hook to insert before/after content or paragraphs.
For each block you can limit how many times on the page the block (or ad) will be inserted. There are two settings for this. Max N insertions: this is a simple limit for the first N insertions for the block. You can also limit maximum number of blocks per page. This limit is defined on the general plugin settings page (tab ⚙ / tab General). If you want this block to count for maximum blocks per page check Max blocks per page.
Max insertions and Max blocks per page are server-side functions – they work only for blocks inserted server-side (when the page is created).
Make sure the theme calls the_content filter to process content sent via Ajax calls. Otherwise the plugin will not be able to insert anything into content for infinite scroll.
Each block can be inserted for:
- All users (default)
- Logged in users
- Not logged in users
- Administrators (useful for testing / debugging)
For more complex user rules (for example, to enable ads for not logged in users and administrators) use taxonomies list.
If you are using caching user check may not work as expected. The check works only when the page is generated and Ad Inserter is called. Make sure you set caching plugin to not cache pages for known (logged in users) or disable caching for this block when you are using this setting. Check Caching section for details.
Many themes and plugins that process posts call the_content hook (to process post or page content) more than once. Usually only the last call is actually used to insert ads into post or page. Additional call may be used to process other content the theme displays on the page. In such cases all calls to the_content hook except the last one cause increased plugin processing time and also increase block insertion counters. Ad Inserter already tries to automatically prevent content processing for subsequent calls which may cause duplicate insertions. However, In order to have accurate block insertion counters and to optimize plugin processing time you can enable setting Insert only in the loop. Insert only in the loop inserts the block only when WordPress function in_the_loop () returns true – the WordPress loop is currently active.
When Embed JS code is enabled, Javascript code (if needed for the blok) will be inserted next to the block HTML code. Otherwise, the Javascript code will be inserted in the page footer. Plugin Javascript functions will still be inserted in the footer. This option might be needed when normal pages are loaded via Ajax request (for example, for infinite scroll). Normal WP Ajax requests have Javascript code always embedded in the HTML code.
Another approach to limit insertions when the_content hook is called more than once is by setting Filter to the wanted call.
Use debugging function Log processing to see how many times the content hook is called and how many times the blocks are inserted. You can also see content and block counter when the blocks are labeled. In the following example Block 1 was configured to insert before paragraphs 2 and 4. However, because the content hook was called 3 times (C=3) the actual inserted blocks have block counters N=5 and N=6.
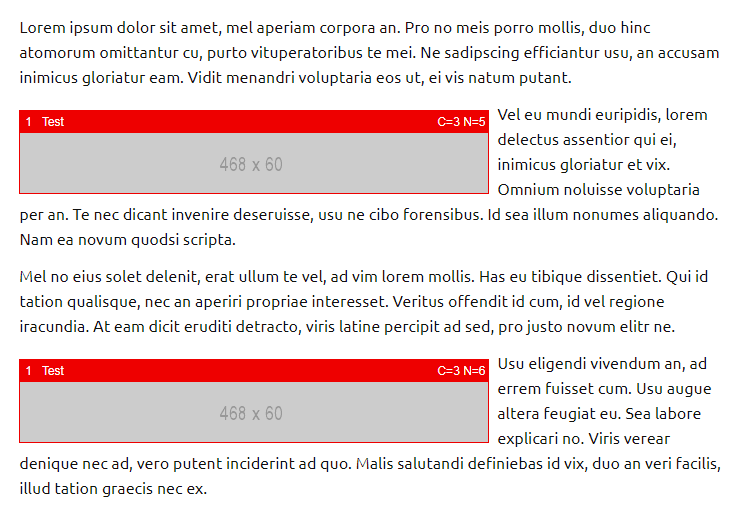
Enabling Insert only in the loop would keep block counters to 1 and 2 despite the content hook is called 3 times. Of course, this assumes that only the last call was in the loop. Otherwise you would need to use Filter to limit insertions.
The same effect can be achieved with Filter set to 3 and filter counter set to Content processing. Please note that the content processing counters may change when you change theme.
There is also an option to disable caching on specific pages. This option will prevent caching of pages where blocks with this option enabled are inserted. This option works with WP Super Cache, W3 Total Cache, WP Rocket, LiteSpeed Cache and WP Fastest Cache caching plugins. After you enable this option make sure you flush the cache.
Filter
Filter is a very powerful tool to define precisely where the block should be inserted. In case the block is (because of other settings) inserted more than once on the page you can limit wanted insertions by specifying the number or comma separated list of numbers of wanted insertions.
For example, when using Between posts automatic insertion, Filter set to 2, 4, 6 means insertion after posts 2, 4, and 6.
Alternatively you can leave Filter field empty (means all insertions) and define maximum number of insertions (tab Insertion) which is equivalent to Filter 1, 2, 3, …, N.

Filter insertions – define which insertions are enabled – single number or %N which means every N-th insertion. You can also specify comma separated list of numbers. %N@S means every N-th insertion starting from S.
This is useful in many cases where you can’t remove unwanted insertions of the code with other settings. For example:
- If you need to insert ad before the first, third and fifth excerpt on the homepage you simply specify 1, 3, 5 for the filter.
- If you need to insert an ad between the second and third comment and between the fourth and fifth comment on posts you set 2, 4 for the filter.
- If you need to insert an ad every fifth comment on posts you set %5 for the filter.
- In some WP themes hooks (that call Ad Inserter insertion functions) are called more than once. In such case you might get unwanted insertions. Simply set the filter to the number of the wanted call(s). Use debugging function Show positions on post or page to show available positions for automatic insertion with counters.
- If you need to insert block only on subpages but not on the first or main page then set Filter to 1, filter counter to Subpages and check Invert filter
Filter also works for paragraph counting. Leave Paragraph number(s) empty, set filter to Paragraphs and define comma separated list of paragraph numbers where the code should be inserted (%N can also be used).
You can also leave Filter empty (means all insertions) and define maximum number of insertions (tab Insertion).
Filter counter defines the counter that should be used for counting. Default Auto counter selects the counter based on the context and should work in most cases. Other filter counters are:
- Auto – counter based on the context
- PHP function calls – counts
adinserter ()PHP function calls - Content processing – counts
the_contenthook calls - Excerpt processing – counts
the_excerpthooks calls - Before post processing – counts
loop_starthook calls - After post processing – counts
loop_endhook calls - Widget drawing – counts drawing (insertion) of widget for each block
- Subpages – counts subpages – when the page is divided with the
<!--nextpage-->tag - Posts – counts
the_posthook calls - Paragraphs – counts post paragraphs according to paragraph counting settings
- Comments – counts post comments
Invert Filter inverts insertion – listed insertions are disabled.
With some themes blocks seem to be inserted more than what is seen on the post or page. Check Insert only in the loop setting above.
Word Count

For post and static pages you can define minimum and maximum number of words. Empty value means no limit.
This works only on single pages.
Scheduling

You can define when the block will be inserted:
- Insert immediately: no scheduling
- Delay insertion for N days after publishing: waits for N days after the time when the post was published. Available only for insertion in posts. Use decimal number for shorter periods (for example, 0.042 for one hour). Make sure caching is flushed periodically if you use short periods.
- Insert only for N days after publishing: inserts only for N days after the time when the post was published. Available only for insertion in posts. Use decimal number for shorter periods (for example, 0.042 for one hour). Make sure caching is flushed periodically if you use short periods.
- PRO Insert between dates START DATE (with optional START TIME) and END DATE (with optional END TIME): inserts code only between START DATE (including) and END DATE (excluding) – on START DATE it starts inserting, on END DATE it ends inserting. You can also define fallback block to be inserted when the scheduled block expires. If time is not specified it means
00:00:00. You can also omit dates – it means everyday according to hours and days in week. Scheduling works also with caching – set dynamic blocks to client-side (or server-side with W3TC when you use this caching plugin). Optionally you can also define wanted days in week. Leave all days enabled if you don’t need this option. - PRO Insert outside dates START DATE (with optional START TIME) and END DATE (with optional END TIME): inserts code only outside START DATE (excluding) and END DATE (including) – on START DATE it stops inserting, on END DATE it starts inserting again. You can also define fallback block to be inserted when the scheduled block is not inserted. If time is not specified it means
00:00:00. You can also omit dates – it means everyday according to hours and days in week. Scheduling works also with caching – set dynamic blocks to client-side (or server-side with W3TC when you use this caching plugin). Optionally you can also define (un)wanted days in week. Leave all days enabled if you don’t need this option. - PRO Insert for posts published between dates START-DATE and END-DATE: inserts code only for posts published between START_DATE (including) and END_DATE (excluding) – on publishing date START-DATE it starts inserting, on publishing date END-DATE it ends inserting. You can also define fallback block to be inserted when the scheduled block is not inserted. Available only for insertion in posts.
- PRO Insert for posts published outside dates START-DATE and END-DATE: inserts code only for posts published before START-DATE (excluding) or after END-DATE (including) – on publishing date START-DATE it stops inserting, on publishing date END-DATE it starts inserting again. You can also define fallback block to be inserted when the scheduled block is not inserted. Available only for insertion in posts.
Scheduling between dates and outside dates works with caching – you can define start and end time with second-precision. Just make sure you are using client-side dynamic blocks.
When using Insert between/outsite dates the Scheduling tab title will be colored red when the scheduling is not active.
Display – Block size and background, Ad label, Lazy loading, Close button, Delay, iframe, Parallax backgrounds
Button Misc below the code editor opens tabs for additional block settings – block display settings are located on the tab Display.
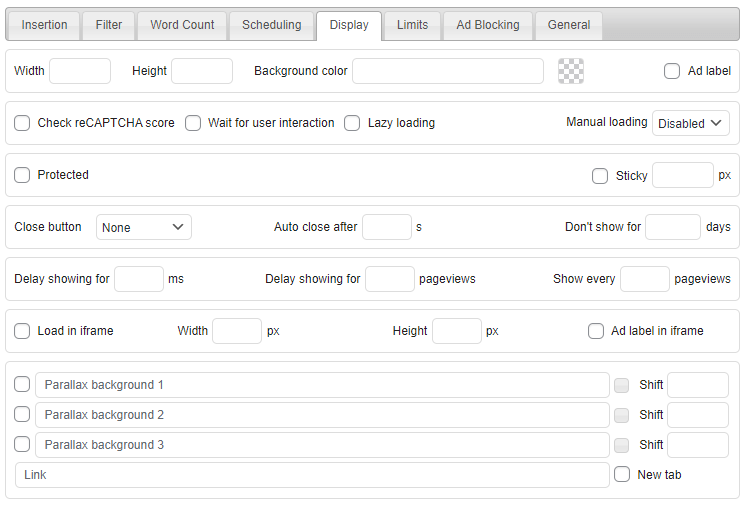
Ad block size
Here you can (optionally) define block (ad) size. The size will be defined as additional width and height properties in the wrapping div style. Defining ad size is mandatory when you are using responsive code with sticky or floating alignments. Defining ad height can also minimize layout shift.
Block background
Here you can define the color of the block background. Click on the background color input field or color squre next to it opens a small pop-up window where you can select background color with optional transparency. The color is saved as a CSS function rgba(R, G, B, alpha).
Please note that in most cases the block background will be covered with the ad and it will not be visible. However, in the case the ad is smaller than the block (e.g. due to padding), the background will be visible.
Block width, height and background color will be applied as CSS properties of the wrapping div.
Ad label
Here you also can enable Ad label (usually Advertisements) above the ad as it is defined under general plugin options (tab ⚙ / tab General / Ad label). You can define only label text or complete HTML code for the label.
If you configured only text for Ad label then the following code will be added above ad code:
<div class="code-block-label">AD_LABEL_TEXT</div>Optionally you can define style for labels (assuming block class name is code-block):
<style>.code-block-label { font-size: 12px; }</style>
You can put this style code into your theme’s style.css file or in the Header section.
Instead of defining only label text you can also define HTML code for ad label, for example: <div style="font-size: 12px;">Advertisement</div>
PRO Check reCAPTCA score
reCAPTCHA is a free service that protects your site from spam and abuse. It uses advanced risk analysis techniques to tell humans and bots apart. reCAPTCHA v3 helps you detect abusive traffic on your website without user interaction. Instead of showing a CAPTCHA challenge, reCAPTCHA v3 returns a score so you can define a threshold when the ads can be displayed.
When this option is enabled (you need at least Business license type), the block (ad code) will not be inserted if the reCAPTCHA score is below the predefined value (defined in the general plugin settings, tab ⚙ / tab General). reCAPTCHA v3 returns a score for each request (page load). The score is based on interactions with your site and enables you to detect various bots and prevent inserting ad codes for requests which are considered as invalid traffic.
No visual element will be inserted on the page, only the recaptcha script with your site key which will return the score for the visit.
PRO Wait for user interaction
When this option is enabled the block will not be inserted until the user interacts with the website. The following actions are considered as interaction: mouse move, key press, screen touch. When there is no interaction for 4000 ms the block will be inserted anyway. The default timeout of 4000 ms can be changed by defining ai_interaction_timeout JavaScript variable (time in ms). 0 means no timeout (blocks will not be inserted until there is some user interaction). You can put this JavaScript code in the Header, for example:
<script>ai_interaction_timeout = 0;</script>
PRO Lazy loading
Lazy loading (or lazyload) means that the block (ad) code is not inserted until it is visible in the viewport (or it is close to becoming visible). This may decrease impressions for that block as the impression is not counted until the ad is actually loaded and it is not loaded until the page is scrolled to make this ad visible.
How close to the viewport (in pixels) the ad must be in order to be loaded can be defined on the general plugin settings (tab ⚙ / tab General / Lazy loading offset).
Please make sure you have defined block class name and checked Block class (tab ⚙ / tab General / Block class name). Each block with lazy loading needs to have class defined.
To prevent Cumulative Layout Shift (it measures how much website content jumps while a website is loading) you can reserve ad space so the content is not shifted when the ad is loaded. For this you only need to define ad height using Display settings or custom CSS. For example, the CSS code for the default alignment with ad height 300px would look like this:
margin: 8px 0; clear: both; height: 300px;
If you are using own banners (images with a link) you can enable lazy loading for the image with the built-in code generator for banners. This is available also in the free Ad Inserter. The code generator will add loading="lazy" attribute to the img tag.
PRO Protected
Protected block is encoded – to insert the code few Javascript functions are called. The same approach is used with dynamic blocks set to client-side insert or client-side device detection with insert method. Protected blocks can be used when you would like to hide some content from users using ad blocking. Ad Inserter Pro already provides few functions to mark content to be protected. However, those functions to work as intended need working Javacript code. Some ad blockers may abort Javascript code as soon as ad blocking detection is detected. In such case you can put content you would like to protect (for example some PHP code from the theme file) in a block, check Protected and then insert this block in the post via automatic insertion, shortcode or with PHP function call in the theme file. If the Javascript code will be aborted the protected block will not be inserted.
PRO Sticky
Block can be made sticky. When this option is enabled, it will add an additional container with some space below the block – you can define the height of this space. When the page is scrolled, sticky block will stick to the top of the page while there is space below the block. After that the block will move up as other content. This works like CSS Push mode for sticky widgets.
Please note that sticky feature as described here depends on the styles used by the theme. If it sets overflow CSS propery on some parent element or otherwise prevents sticky position then sticky feature will not work. Sticky block works by changing the block container CSS to position: sticky. This works in most themes but not all. If the block is not sticking the first thing to check are the rules applied to the block parent containers. Specifically, look for any overflow property set on the parent. You can’t use: overflow: hidden, overflow: scroll or overflow: auto on the parent of a sticky block. If your theme is not using overflow and still having problems it’s worth checking if a height is set on the parent. This may constrain the sticky positioning, stopping it from occurring. Remove the height and see if that fixes the problem.
PRO Manual loading
Manual loading means that the block (ad) is not loaded (inserted) until you call a Javascript function to load it. The following options are available:
- Disabled – this is the default option. The block is inserted and loaded according to the settings.
- Auto – the block is processed according to the settings. If Dynamic blocks are set to Client-side and the Cookies list fails, the block is marked for manual loading. To check again for cookies and load the block if the conditions are met, the Javascript function
ai_load_blocks (block)needs to be called. The block number parameter is optional, if it is not provided all blocks enabled for manual loading (and not loaded yet) will be loaded. This option is useful when you would like to load the ads as soon as the conset is given. In such case the consent plugin must support custom action where you can callai_load_blocksfunction. - Always – the block is processed according to the settings but it is not loaded until Javascript function
ai_load_blocks (block)is called. The block number parameter is optional, if it is not provided all blocks enabled for manual loading will be loaded.
Of course, the code for the ads needs to support asynchronous loading (loading after the page is created), otherwise manual loading (or any other client-side loading) can’t be used.
PRO Delay showing ads – time
You can define the delay in ms to wait before the block is inserted (and ads shown).
PRO Delay showing ads – pageviews
You can define the number of pageviews to delay showing ads so they do not appear immediately after the visitor loads the first page. Once the visitor visits the specified number of pages with this ad (block), the ad will be shown. You can also define to show ad only after every few pageviews to additionally limit showing ads. The settings are stored in a cookie.
PRO Close button
Blocks (ads) can have close button. Useful mainly for sticky ads, however you can also use close button for any other ad for which you would like to offer visitors an option to hide it for some time. The folllowing settings are available:
- Position of the close button – the button can be placed on any corner of the ad. This setting is also available on the sticky ad animation settings.
- Time period in seconds to automatically close the ad after the page is loaded. Once closed it will behave like it was manually closed. If you are showing ad with delay, you need to add delay time to the time to close the button.
- Time period in days to keep ad closed. If this time is not set, the closed ad will appear again when the page is loaded. You can also use decimal values with decimal point for shorter periods (for example, 0.5 means 12 hours). This value is stored in a cookie.
- You can customize the button
Normally the button is displayed only if block height is greater than 0. In some cases it might be helpful to not show the button for blocks below some height. For this purpose you can define for each block the minimal height (in pixels) to show the close button. Example for blocks 2 (30px) and 3 (40px):
<script>ai_close_min_block_height = new Array (); ai_close_min_block_height [2] = 30; ai_close_min_block_height [3] = 40;</script>
PRO iframes
Ad Inserter Pro support loading of ads (blocks) in iframes. This might be useful if you need to place ads on non-WordPress based pages or you don’t want the content of your ads (blocks) will be seen and indexed by web crawlers. The plugin can insert any block on any WordPress page, however, it can not insert on pages that are not created by WordPress. In such cases you can enable option Load in iframe and the plugin will generate iframe and load block in this iframe. Insertion and alignment settings are only used when you insert this block (actually iframe code for it) on WP page. When you copy iframe code on another page you need to take care for alignment on that page. You also should not use iframes when you need client-side features that need to interact with the page where the iframe is placed (cookies, sticky settings, etc.).
Optionally you can also define width and height of iframe element. Empty field for width means 100% width of the parent container while empty field for height means that the code will try to adjust iframe height to the height of the page (Ad Inserter Pro block) loaded in iframe. However, it is best to define width and height of iframe so its size is predictable.
When you are using ad labels you can choose where it will be inserted. If you check Ad label in iframe then the label will be inserted inside iframe – visible wherever the iframe code will be present, otherwise the label will be inserted above iframe code on the WordPress page where iframe code is present. Of course, when copying iframe code you can copy also HTML and CSS code for ad labels.
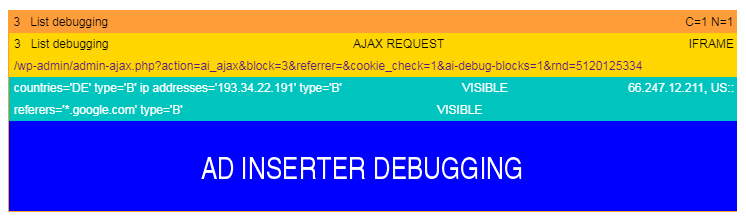
When you enable Label blocks debugging function you’ll see also debug bar for Ajax request showing url for the iframe (src attribute). iframe code will look something like this:
<div class="code-block code-block-default code-block-3">
<iframe style="width: 100%; height: 90px; visibility: visible;" src="https://example.com/wp-admin/admin-ajax.php?action=ai_ajax&block=3&referrer=example.com&cookie_check=1&rnd=2644678765" marginheight="0" marginwidth="0" frameborder="0" scrolling="no" onload="ai_resize_iframe (this);"></iframe>
</div>
When you copy iframe code to another non-WP based page you need to take care for the following:
- Alignment of iframe block on destination page – you can copy Ad Inserter alignment classes
- If you want iframe to resize its height to the height of loaded page you need to copy also
ai_resize_iframe ()Javascript function - If you are using client-side detection for cookies there will be url parameter
cookie_check=1 - If you are using client-side detection for referrers you need to provide url parameter
referrerwith domain name of the actual referrer for the page where iframe code is located - Url parameter
rndis set to some random number in order to prevent caching of iframe content
Do not use iframes if you need client-side features that use cookie settings (for example, ad impression and click limiting, closed block timeouts, etc.).
PRO Parallax backgrounds
Parallax is a beautiful, immersive display format designed for mobile web. It leverages a layered, parallax animation effect to capture attention in an interesting and non-intrusive way. The format creates a unique perception that different image layers of the ad have different depths. As the viewer scrolls through content on their phone, the ad is fully revealed.
Button Misc below the code editor opens tabs for additional block settings – parallax settings are located on the tab Display.
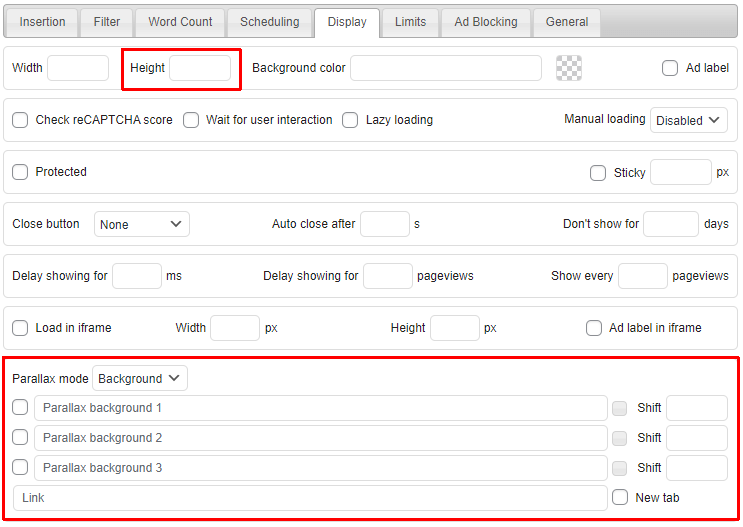
Here you can define background(s) for parallax ads. Each background image needs to be individually enabled – checkbox left of the background field. To open image selection window click on the small button next to the background image field.
You should leave block code empty as only the background(s) should be displayed, therefore, you need to define block height.
There are two modes for parallax effect: Block and Background. In most cases you’ll use the Background mode where the images fills the screen behind the page (full screen width). In Block mode the images fills block background – this mode make sense only where there are at least two images with different shifts defined.
Parallax scrolling or Parallax advertising leverages a multi-layered effect to capture the attention of the audience in an interactive way without making it feel intrusive. The technique makes use of multiple layers of images placed in the background that moves at a slower speed than the foreground as the user scrolls through the page content, creating a 3D effect. This adds a subtle element of depth, making the ad stand out. To achieve parallax effect you need to define Shift for each background image. This is the shift of the background image in pixels when the user scrolls the window in the browser. It should be small (e.g. 80) for the fist (bottom) background and then greater for the next one (e.g. 160 for the second one).
When the shift is empty (meaning no shift), the background will not shift when the user scrolls the window – the block will show part of the static background image depending on the scroll position.
You also need to define a link (page address of the destination page) when the user clicks the block (parallax) background. When New tab is checked the link will open page in a new tab in the browser.
Each background image will be centered horizontally, however, use images that are high enough so the whole screen will be covered
Make sure at least one backgroud is enabled, otherwise the block will not be considered as a parallax ad – the block will not be inserted as the code window is empty.
Check a demo of parallax ads
PRO Limits
Ad Inserter Pro supports frequency capping to limit the maximum number of impressions/views a visitor can see a specific ad within a period of time. You can also limit clicks – the maximum number of times a visitor can click on a specific ad within a period of time.
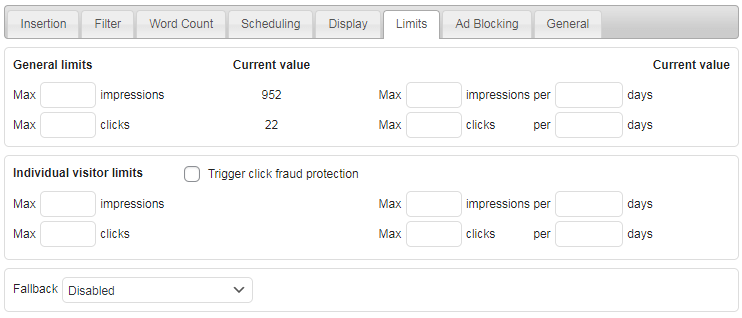
This feature uses cookies to remember the impression and click count. There are also general ad limits for each block which do not use cookie as the check is done server-side. Check Ad Impression and Click Limiting page for details.
PRO Ad Blocking
In addition to popup messages and page redirection you can replace ads that were blocked with some that may not be blocked. You can also hide or show some ads (or whatever is in the block) when ad blocking is detected.
Ad Blocking detection needs to be enabled for ad replacement to work (tab ⚙ / tab Ad Blocking). You also can’t use No Wrapping style as wrapping div has to be used in order to mark blocks which need to be replaced/shown/hidden.
Do nothing

This is the default setting for block. When ad blocking is detected it does nothing.
Replace

When ad blocking is detected the code block will be replaced with replacement code block (ad). Replacing means that the replacement block is normally inserted but hidden (using CSS). When ad blocking is detected the original ad is hidden (regardless whether it was blocked or not) and the replacement ad is shown.
Choose replacement ads wisely. Do not name images with standard names (ad, ads, banner) or with ad dimensions (300×250). Use some neutral name that will not alert ad blockers.
Show
The block is normally inserted but hidden (using CSS). When ad blocking is detected the ad (or any code) is shown. Please note that this setting makes sense only for code that will not be blocked by ad blocking, e.g. some text, self-hosted image or anything that ad blocking code will not identify as an ad.
Hide
The block is normally inserted and visible. When ad blocking is detected the ad (or any code) is hidden.
General

General tag is the text that is used for [adinserter data='tag'] and [adinserter data='smart-tag'] shortcodes when the post has no tags – useful for contextual ads.
It works only inside posts and static pages!
Install Ad Inserter for free
Ad Inserter Pro Affiliate Program
