How Ad Inserter works
In order to understand how ads are displayed, to know about the limitations of the plugin and to be able to quickly diagnose various problems you may encounter it is very helpful to understand how Ad Inserter works.
Ad Inserter is a WordPress plugin. Plugins are ways to extend and add to the functionality that already exists in WordPress. The core of WordPress is designed to be lean and lightweight, to maximize flexibility and minimize code bloat. Plugins offer custom functions and features so that each user can tailor their site to their specific needs.
Therefore, Ad Inserter as any other WordPress plugin is not a standalone software and can not work on its own. It must be called from WordPress (the content management system that powers your website), used theme or from some other installed and activated plugin. Only then it will be able to do what you expect from it – insert codes at configured positions.
Ad Inserter provides functions that, when properly called, can process your posts and pages and insert codes. Inserted codes can be checked anytime by examining page source code (Ctrl U in Chrome and Firefox). You can also use debugging functions to mark inserted code blocks. Check also How to optimize plugin settings.
For each insertion type we’ll describe how it works and what is needed to work as expected.
General
Inserting the code
This is basically what Ad Inserter does – in inserts codes into pages of your website. It takes pages generated by WordPress (installed on your web server), your theme and other plugins you may be using and processes that content in order to insert ad codes (blocks) according to the settings. For example, let’s use block 11 which is configured with AdSense responsive code to be inserted before the content on posts and static pages. Red rectangle marks the code that will be inserted:
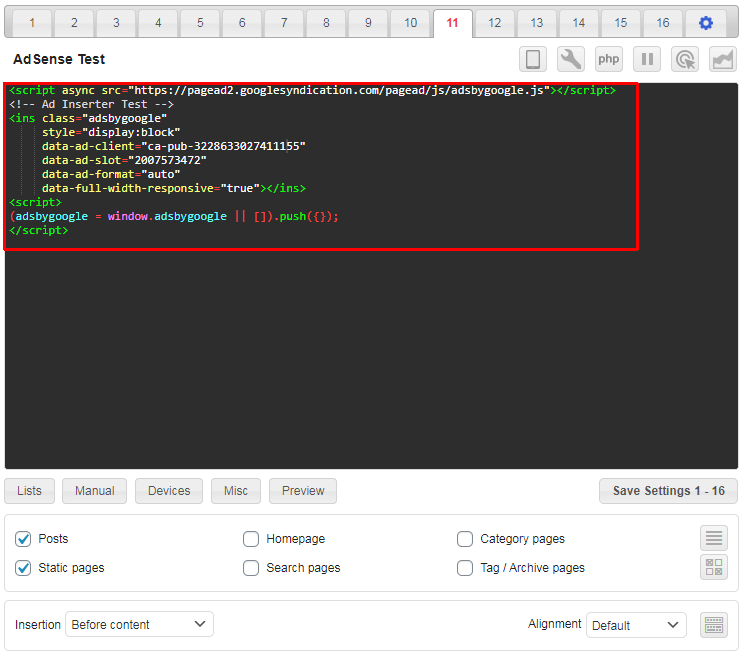
When the page is generated and Ad Inserter plugin is called, it will insert the AdSense code (block 11) at the configured insertion position – before the content. To check what was inserted you need to examine page source code (Ctrl-U in Chrome and Firefox). Search for “pub-” (Ctrl F) to locate the code:
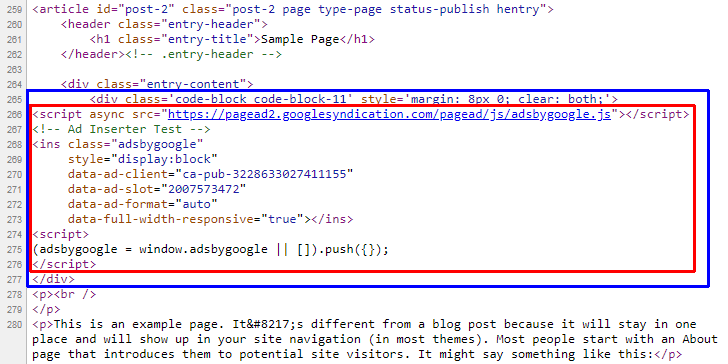
Red rectangle marks the code from block 11 that was inserted into the page – before the content. Blue rectangle shows the actual block code which includes a wrapping div used for the block alignment.
This is what Ad Inserter does. In only inserts the codes you configure. Therefore, to check if the codes were inserted, you need to examine the source code of the page or use debugging function Label blocks to mark inserted blocks.
This code itself has no visible elements, you will not see it unless you check the source code of the page. When the ad code is inserted into the page and the page is loaded in the browser, the ad scripts in the ad code will run, load ads (served by the ad network, in this case Google AdSense) and display them – in our example before the content:

Displaying ads means loading the actual code with the images of ads – this is done by the scripts in the AdSense ad code you inserted into the page. Sometimes the ad network (in this case Google AdSense) does not serve ads so there will be either a blank ad block or nothing displayed (depending on the position on the page).
Normally, the ads will be displayed where the code is inserted, but for AdSense auto ads and sticky ads this is not the case.
Instead of examining the page source code you can use Ad Inserter debugging function Label blocks to mark inserted blocks:
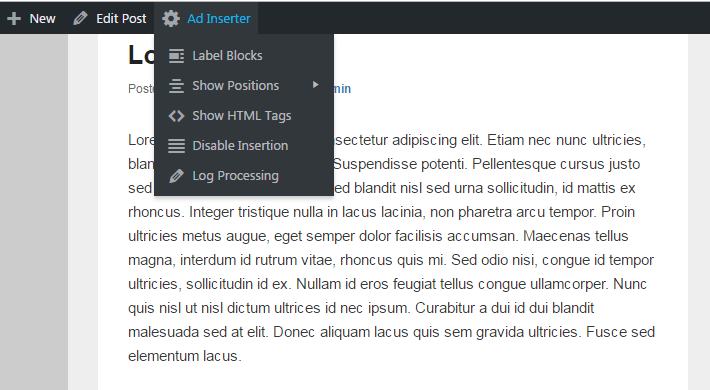
This will help you to diagnose insertion issues when you don’t see ads at expected positions. This function is especially helpful when your ad code for some reason doesn’t display anything or it displays a blank ad block.
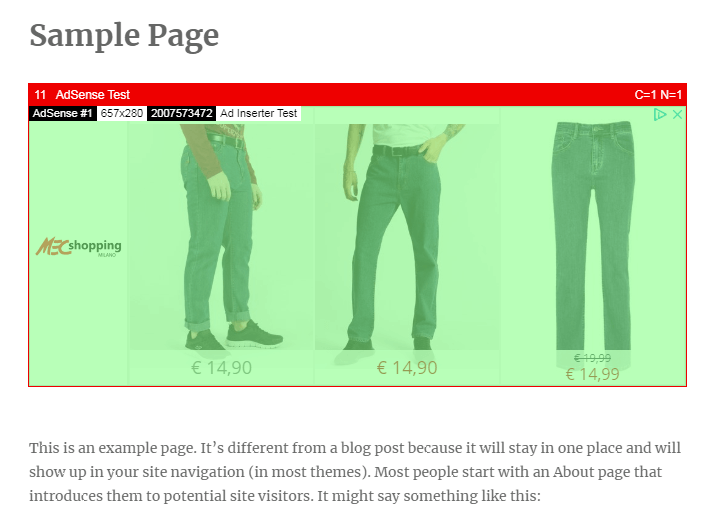
To see if the code was inserted you need to check the source code of the page or enable Label blocks debugging function to mark blocks with the inserted codes.
Therefore, if the code is inserted, the plugin has done its job. If the code is inserted but does not display anything then this has nothing to do with the plugin as it only inserts your codes. You need to check the code and possible errors in the Javascript console in the browser (F12 in Chrome and Firefox).
Displaying ads
It is essential to understand that Ad Inserter itself does not display ads! At least not directly. You may use it to show ads on your website, however, Ad Inserter as other similar plugins only inserts code for ads that may (directly or indirectly) display ads in the browser.
In case of simple banners that are saved on your website this is pretty straightforward.
<a href="http://target-domain.com/">
  <img src="https://example.com/wp-content/uploads/banner-300x250.png">
</a>
The banner code contains link to an image saved on your website and when the page is loaded in the browser it show this image.
In case of Javascript ad codes (e.g. AdSense, Media.net, Infolinks, etc.) the process of showing ads is more complex and it works in few stages. For example, this is a typical AdSense code for AdSense ad unit:
<script async src="https://pagead2.googlesyndication.com/pagead/js/adsbygoogle.js"></script> <!-- Register Plus Sidebar --> <ins class="adsbygoogle" style="display:block" data-ad-client="ca-pub-3659027452835622" data-ad-slot="2355343322" data-ad-format="auto" data-full-width-responsive="true"></ins> <script>(adsbygoogle = window.adsbygoogle || []).push({});</script>
However, this code that you insert on your pages only loads additional Javascript code which then generates basic HTML elements for ad blocks which then load the final HTML code that contains actual ads. Therefore, with such ad code the process of displaying ads is pretty complex. In some cases the ad network (e.g. AdSense) does not serve ads and you may get blank ad blocks. But the original ad code for the ad unit is still properly inserted and works – you can check page source code to see the inserted code there – only for some reason ads are not displayed.
It is also essential to understand that the code you are inserting may load additional code and show various elements or ads anywhere on the page – not just where it is inserted. A typical example of such code is code for AdSense Auto ads. The code itself is located in the header (betveen <head> and </head> tags), however, this code automatically displays ads at various positions on the page. In such case you can use debugging functions to label blocks in order to see what code is actually inserted by Ad Inserter.
Inserting code for ads – Automatic insertion
When the plugin is activated it installs various actions so it gets called when WordPress needs to generate a specific page. Automatic insertion positions depend on WordPress hooks (special functions) that WordPress or the theme used must call:
the_content– used for positions Before/After content, Before/After paragraphs, Before/After imagesthe_excerpt– used for positions Before/After excerptloop_start– used for position Before postloop_end– used for position After postthe_post– used for position Between postswp_head– used for Header code (plugin settings, tab)
wp_footer– used for position Footer and Footer code (plugin settings, tab)
comments_array, wp_list_comments_args– used for positions Before/Between/After comments
When the active theme calls a hook, this hook then calls plugins like Ad Inserter which have installed a function to be called for this hook. This function can then insert code or ads at some position – where the hook was called. If the theme does not use some hook, then automatic insertion which depends on this hook will not be available.
When the plugin is deactivated it is not called and can’t insert anything. So if you still see some code after you have deactivated Ad Inserter you either see some cached page (that was generated when Ad Inserter was activated) or the code is inserted somewhere else (other plugins, theme settings, hardcoded in theme files, etc.).
Before making any conclusions you should clear all the caches (caching and optimizing plugins, CDN, browser) and reload the page with Ctrl F5. When the plugin is activated you can use debugging functions to mark inserted blocks to easily indetify the code inserted by Ad Inserter.
Available positions for automatic insertion
Most positions for automatic insertion depend on the theme used (and hooks it uses). Ad Inserter has a simple tool that checks your theme for available positions for automatic insertion.

When you click on this button you get a table showing all positions for automatic insertion and all page types.
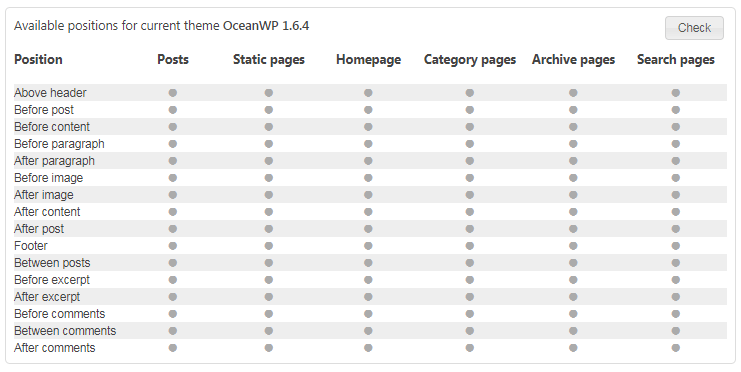
When you click on the Check button Ad Inserter will check each page type for available positions for automatic insertion. Gray dot means that the position has not been checked yet, green dot means that position is available, while empty space means that position for automatic insertion is not available.
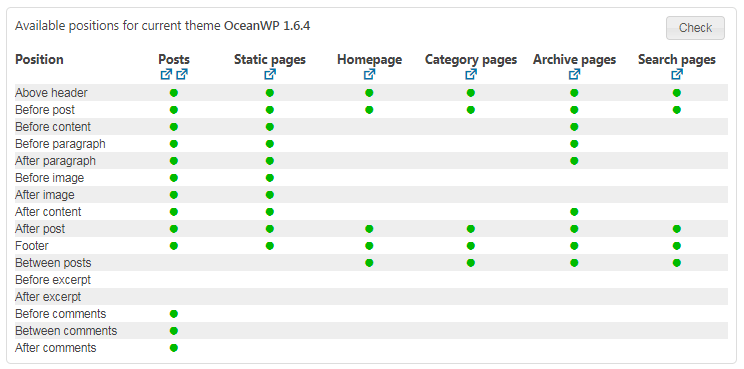
After the check is finished you’ll see small icons below each page type. Click on the icon will open a page that was used to check for positions with labeled positions for automatic insertion.
If some page is not available on your website then it can not be checked – column for this page type will have gray icons.
If output buffering is not enabled then position Above header is not available and can not be checked – row for this insertion position will have gray icons.
You can also use Show positions function to see available positions for automatic insertion on any WordPress page (Ad Inserter menu item in the WordPress admin toolbar on the top of every post/page when logged in as admin).
Before and After content, paragraph or image
These positions rely on the_content filter hook which is normally called before the post or static page is generated in order to process the content by the plugins. This hook is normally called only on posts and static pages and therefore insertions Before/After content and Before/After paragraph are available ONLY on posts and static pages. It is up to the theme to call this filter hook also on other page types. Some themes create special blog pages that show post excerpts which are processed through the_content filter. In such case you will be able to use those insertions, however, excerpts are usually very short and HTML tags are usually stripped off.
the_content filter hook provides the content (text) of the post or page. Ad Inserter then analyzes this content, determines paragraphs and insertion positions. Then it inserts blocks at configured paragraph positions (or before/after content) and returns processed content back to the theme/WordPress.
Insertion order
You may use also other plugins that like Ad Inserter insert some code (content elements) to posts and pages. By default Ad Inserter is called as one of the last plugins to process content and it sees the content already processed by other plugins. However, it may happen that, for example, position After content will not be where you would expect. You can change the order when Ad Inserter is called by modifying plugin priority. Lower numbers correspond with earlier execution and this will change insertion position Before content and After content in relation to other plugins that also insert to posts and pages.
Multiple insertions
Some themes or in relation with other plugins may call the_content filter more than once. In such case you may get multiple insertions. Usually only the last call is the call for wanted insertion. To eliminate unwanted insertions and to have accurate counter for block insertions in such cases you need to eliminate insertion in unwanted calls of the_content hook. Try one of the following options:
- check Insert only in the loop (button Misc / tab Insertion)
- set Filter for Content processing to the wanted call of
the_contenthook (button Misc / tab Filter)
Use debugging function Log processing to see how many times the content hook is called and how many times the blocks are inserted. You can also see content and block counter when the blocks are labeled. In the following example Block 1 was configured to insert before paragraphs 2 and 4. However, because the content hook was called 3 times (C=3) the actual inserted blocks have block counters N=5 and N=6. In this case there are no multiple insertions – only block counters are affected.
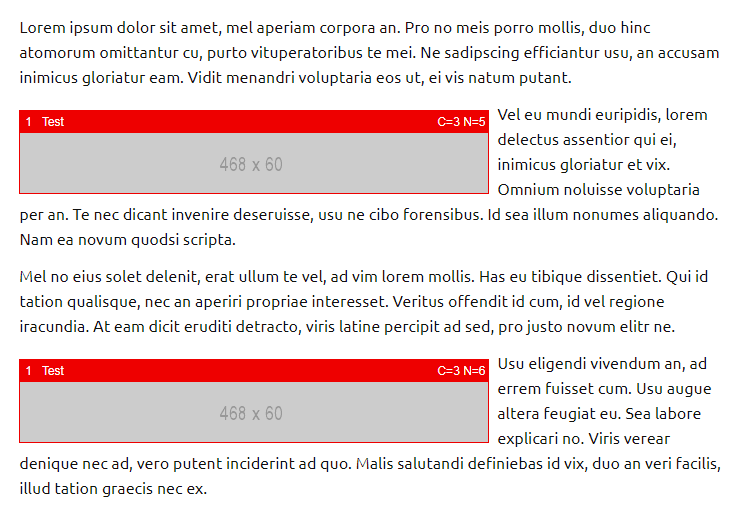
However, if you see block inserted more than once at the same position with different content counters then simply set filter to the wanted call and filter counter to Content processing. Please note that the content processing counters may change when you change theme.
Infinite scroll (Ajax requests)
When you scroll down the post some themes or plugins load additional posts via Ajax calls to provide infinite scroll. If this content is processed via the_content filter then Ad Inserter will be able to insert there. The insertion for Ajax calls is enabled by default (button Misc / tab Insertion). Therefore, if you need to insert also in the content in infinite scroll, make sure the theme (or plugin for infinite scroll) calls the_content filter to process content sent via Ajax calls. Otherwise Ad Inserter will not be able to insert anything into content for infinite scroll.
Your theme/plugin for infinite scroll may load normal subpages asynchronously – such pages are not treated as WP Ajax requests, they are normal subpages of posts or static pages.
You can use debugging function Label blocks to see if they are inserted into the content loaded with ajax requests (infinite scroll).
- call
the_contentWP filter for ajax requests (asynchronously loaded subpages); - not remove inserted Ad Inserter blocks or javascript code (
<script>tags) from the loaded (sub)pages. Ad Inserter may insert blocks as configured, but some themes seem to extract only specific HTML tags like<article>from the asynchronously loaded subpages and insert them into the page.
Please note that some ad codes that use old JavaScript method document.write can’t be used this way – asynchronously (after the page is loaded and created).
If the blocks inserted into the content are using client-side functions then they also need some Javascript code to perform these functions. Normally this code is for all blocks inserted into the footer of the page and executed when the page is loaded. But if the blocks are loaded later via ajax requests this code will not run. To solve this issue Ad Inserter has an option to embed Javascript code with block HTML code (button Misc below the code editor, tab Insertion). When a block has Embed JS code option enabled, the Javascript code for this block will be inserted together with the HTML code for this block so it can be run whenever the block is inserted.
Please note that some themes (or plugins for infinite scroll) remove all the Javascript code from the content loaded via ajax requests. In such case the ads may not display anything or the code may not be inserted properly.
Before post, After post
These positions rely on two action hooks:
loop_start– used for position Before postloop_end– used for position After post
If the theme does not use these hooks then positions Before/After post will not be available. Check your theme for available positions for automatic insertion as described above.
In cases when the theme does not use loop_start or loop_end action hooks you can still try to insert there using insertion Before or After HTML element.
Before excerpt, After excerpt
WordPress provides post excerpts that can be shown on blog pages like homepage, category pages, archive pages, etc. Ad Inserter can insert before or after excerpt provided that the theme uses standard WordPress excerpts which call the_excerpt action hook.
If the theme does not use standard WordPress excerpts and does not call the_excerpt action hook then positions Before/After excerpt will not be available. Check your theme for available positions for automatic insertion as described above.
In cases when the theme does not use standard WordPress excerpts you can still try to insert there using insertion Before or After HTML element.
Between posts
This position relies on the_post action hook. If the theme does not use standard WordPress approach for posts on blog pages and does not call the_post action hook for each post then positions Between posts will not be available. Check your theme for available positions for automatic insertion as described above.
In cases when the theme does not use standard WordPress approach for blog pages you can still try to insert there using insertion Before or After HTML element.
Before, Between and After comments
These positions relies on comments_array, wp_list_comments_args hooks. If the theme does not use standard WordPress approach for comments and does not call comments_array and wp_list_comments_args hooks for comments then positions Before/Between/After comments will not be available. Check your theme for available positions for automatic insertion as described above.
In many cases when the theme does not use standard WordPress comments or you are using a plugin for comments, you can still insert try to there using insertion Before or After HTML element.
Header
This position depends on wp_head action hook. The code will be inserted on all pages (header code, plugin settings, tab 
Footer
This position depends on wp_footer action hook. The code will be inserted on all pages (insertion position Footer and footer code, plugin settings, tab 
Above header
This position is located on the top of the page after <body> tag and is available only when Output buffering is enabled. See below for details.
Before and After HTML element
Client-side insertion
Client-side insertion means the code will be inserted via Javascript code after the page is loaded in visitor’s browser. The insertion position is defined with a CSS selector.
Server-side insertion
Server-side insertion means the code will be inserted when the page is created by the WordPress on your web server. This position is defined with a CSS selector and server-side insertion is available only when Output buffering is enabled.
Output buffering
Output buffering means buffering the page while it is created by WordPress using your theme and plugins. After the buffering ends the buffered page content is processed and code Above header or blocks before/after HTML elements are inserted. To check if your theme supports output buffering, go to plugin settings (tab 
Shortcodes
A shortcode is a WordPress-specific code that lets you do nifty things with very little effort. Ad Inserter provides functions to process [ADINSERTER] shortcodes. However, Ad Inserter must be called to expand the shortcode. When you put this shortcode into post or widget, WordPress, theme or plugin responsible for that content needs to (directly or indirectly) call WordPress function do_shortcode () in order to call plugins for expansion of shortcodes. If the theme does not process shortcodes this way then plugins including Ad Inserter will not be called and will not be able to expand their shortcodes.
Shortcodes Not Working
Possible symptoms:
- Ad Inserter shortcodes like
[adinserter block="N"]are not expanded into block code, you see unprocessed shortcode[adinserter block="N"]. Possible reasons:- Ad Inserter plugin is not activated.
- The theme (or WordPress, or responsible plugin) does not process shortcodes where you have used them.
- Ad Inserter shortcodes like
[adinserter block="N"]are empty.- Shortcode for block N is not enabled. Make sure shortcodes are enabled for this block (button Manual).
- Shortcode inserts block code, but the code doesn’t display anything. Use debugging function Label blocks to check if this is the case.
- Shortcodes from other plugins used in Ad Inserter blocks are not not expanded, you see unprocessed shortcode.
- Plugin that should process your shortcodes is not activated.
If Ad Inserter is not activated then it can’t process [adinserter] and [ADINSERTER] shortcodes.
By default, WordPress does not support shortcodes within Sidebar Widgets until 4.9. It only expands the shortcodes within the content of a Post, Page, or custom post type. To add shortcode support to sidebar widgets, you can install a plugin.
In the case your theme does not process shortcodes where you would need them you can still use other insertions, for example, insertion before or after HTML element to insert code there.
Widgets
Widgets for Ad Inserter blocks are enabled by default. When Ad Inserter widget is placed into sidebar, a call to Ad Inserter widget function will be made which will generate code for the selected block.
PHP function adinserter ()
With PHP function call
<?php if (function_exists ('adinserter')) echo adinserter (BLOCK_NUMBER); ?>you can insert code block BLOCK_NUMBER at any position in any theme file. This function simply returns code for a block.
Custom hooks
Ad Inserter supports automatic insertion at custom positions where hooks are used using the do_action () WordPress function. Hook is a standard WordPress PHP function call to allow themes and other plugins to insert custom code. Instead of using adinserter PHP function call you can use custom hook at any theme position:
<?php do_action ('custom_action_name'); ?>When this code will be executed it will call all plugins that have registered itself for this action hook (in this example the name is custom_action_name). When you configure custom hook in Ad Inserter it will register itself for this action hook and when called it will output code for blocks configured for this hook.


