Plugin Installation
Ad Inserter and Ad Inserter Pro plugin installation is pretty simple. Both plugins can be installed the same way. The only difference is that Ad Inserter Pro is not available inside WordPress plugins dashboard and needs to be installed via file (plugin updates are then available on the Plugins page).
When you activate Ad Inserter Pro it will automatically import existing settings from the free Ad Inserter and deactivate it.
If you are using wordpress.com for hosting you can’t install plugins and code for ads unless you have a business account.
On WordPress multisite installations you can install plugins on the Network Admin / Plugins page.
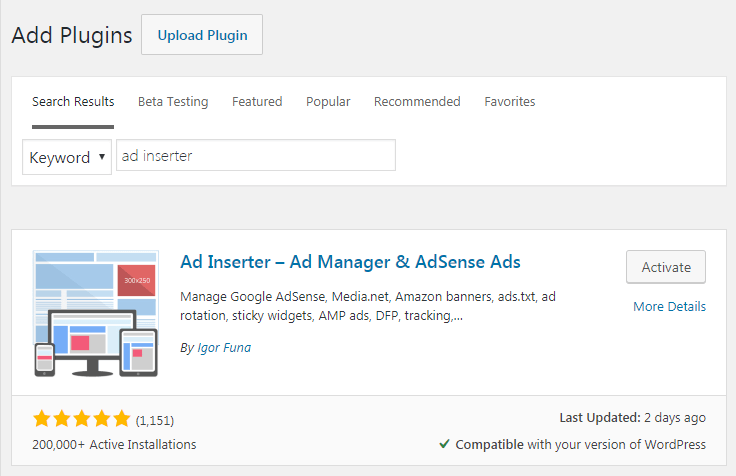
Installing free Ad Inserter from the WordPress
- Go to WordPress Plugins menu, click Add New button
- Search for
ad inserter - Click Install Now
- Activate Ad Inserter on the Plugin dashboard

Installing the plugin from a zip file
Download the latest version of free Ad Inserter
This is a universal method that can be used also to install older versions of Ad Inserter in case you have issues with the latest version.
- Go to WordPress Plugins menu,
- Click Add New button
- Click Upload Plugin
- Select plugin zip file from your computer
- Click Install Now
- Activate Ad Inserter (Pro) on the Plugins dashboard
Installing Ad Inserter Pro
- After you receive email with download link for the Ad Inserter Pro plugin, click on the download link and download the plugin
- Go to WordPress Plugins menu, click Add New button
- Click Upload Plugin
- Select
ad-inserter-pro.zipfile from your computer - Click Install Now
- Activate Ad Inserter Pro on the Plugins dashboard
- Click Enter License Key and enter license key you got in the email
- Update plugin to the latest version
Installing the plugin using FTP (free or Pro)
- You’ll need FTP client, WP File Manager or similar WordPress plugin (you can use also hosting cPanel File Manager)
- Make sure you have deactivated (and deleted) Ad Inserter / Ad Inserter Pro
- Download plugin zip file
- Extract
ad-inserterdirectory to your computer (ad-inserter-profor Ad Inserter Pro) - Make sure
ad-inserterdirectory contains plugin files and not anotherad-inserterdirectory inside - Upload
ad-inserterdirectory to the/wp-content/plugins/directory - Refresh Plugins dashboard and activate the plugin
Uninstall
If you deactivate and delete Ad Inserter (Pro), the settings will stay in the database. To completely remove the plugin and settings do the following:
- Go to Ad Inserter plugin settings (tab ⚙) and click on Reset All Settings
- PRO Go to Ad Inserter Pro plugin settings (tab ⚙) and click on Clear All Statistics Data
- Deactivate Ad Inserter (Pro)
- Delete Ad Inserter (Pro) plugin
Updates
Ad Inserter can be updated on the Plugins page as other plugins. The same applies also to Ad Inserter Pro. Once it is installed from the file it can be updated as other WordPress plugins. In order to check for updates Ad Inserter Pro needs to access update server located at updates.adinserter.pro. For this purpose it checks two addresses:
https://updates.adinserter.pro/check.phphttps://updates.adinserter.pro/?action=get_metadata&server_check=1&slug=ad-inserter-pro
On WordPress multisite installations you can update plugins on the Network Admin / Plugins page. Ad Inserter Pro needs to be network activated in order to access our update server and receive updates. You can newtork deactivate it after the update.
When your web server can’t access these address, Ad Inserter Pro will display a warning notice. In such case you need to contact your hosting company to check and fix access to IP address 51.81.16.59 (address of updates.adinserter.pro). Otherwise you will not be able to get updates for Ad Inserter Pro.
In the case you are confident that the issue is not on your web server or website, then please send us the screenshots of the preview window for both tests below so we can investigate.
TEST 1
When you access https://updates.adinserter.pro/check.php you should get simple page with Ad Inserter Pro logo and text. This means that you can access the plugin update server. When you get message like This site can’t be reached then this means that plugin update server is not accessible.
However, you need to be aware that if you can access update server this does not mean that your web server can access it. Ad Inserter Pro tries to access the update server and when the connection fails it shows warning message Ad Inserter Pro plugin update server is not accessible.
To see what the server sees you can run the following PHP code in the preview window:
<hr /> <p>THIS SERVER:<?php echo isset ($_SERVER ['SERVER_ADDR']) ? $_SERVER ['SERVER_ADDR'] : ''; ?><p> <hr /> <p>CHECKING UPDATE SERVER</p><?php $ai_url = 'https://updates.adinserter.pro/check.php'; $response = wp_remote_head ($ai_url, array ('timeout' => 5)); if (is_wp_error ($response)) { echo 'ERROR: ', $response->get_error_message (); wp_die (); } else { echo 'RESPONSE: ', wp_remote_retrieve_response_code ($response), ''; echo "<hr />"; $page = download_url ($ai_url); echo file_get_contents ($page); unlink ($page); } ?><hr />
Paste this code into an empty block, enable PHP processing and click on the Preview button. You should see something like this:
THIS SERVER: 93.173.45.15
CHECKING UPDATE SERVER
RESPONSE: 200

Update Server
Timestamp: 2020-11-10 15:38:39
Access from: 93.173.45.15
In case you see an error message or you don’t see the response from the update server you need to check what is preventing the access to the update server.
You (or your hosting company) can also download the check page from your web server:
wget -O ad-inserter-pro.txt https://updates.adinserter.pro/check.phpTEST 2
When you access
https://updates.adinserter.pro/?action=get_metadata&server_check=1&slug=ad-inserter-pro
you should get a short JSON file. This means that you can access the plugin update server and you can receive the data from the server.
{
  name: "Ad Inserter Pro",
  request_time_elapsed: "0.003"
}
To see what the server gets you can run the following PHP code in the preview window:
<hr /><p>CHECKING UPDATE SERVER DATA</p><?php $ai_url = 'https://updates.adinserter.pro/?action=get_metadata&server_check=1&slug=ad-inserter-pro'; $response = wp_remote_head ($ai_url, array ('timeout' => 5)); if (is_wp_error ($response)) { echo 'ERROR: ', $response->get_error_message (); wp_die (); } else { echo 'RESPONSE: ', wp_remote_retrieve_response_code ($response), ''; echo "<hr />"; $page = download_url ($ai_url); echo file_get_contents ($page); unlink ($page); } ?><hr />
Paste this code into an empty block, enable PHP processing and click on the Preview button. You should see something like this:
CHECKING UPDATE SERVER DATA
RESPONSE: 200
{ "name": "Ad Inserter Pro", "request_time_elapsed": "0.001" }
In case you see an error message or you don’t see the response from the update server you need to check what is preventing the access to the update server data.
You (or your hosting company) can also download the data from your web server:
wget -O ad-inserter-pro-data.txt "https://updates.adinserter.pro/?action=get_metadata&server_check=1&slug=ad-inserter-pro"The code on the Plugins page to check the access to updates.adinserter.pro server uses Javascript ajax call to download a test file. Make sure you have no Javascript errors on the Plugins page.
Troubleshooting
Fatal error
You may get this error while trying to activate Ad Inserter Pro:
Fatal error: Cannot redeclare nnn (previously declared in /wp-content/plugins/ad-inserter/ad-inserter.php:xxx) in /wp-content/plugins/ad-inserter-pro/ad-inserter.php on line xxxFollow the instructions above and deactivate and uninstall free Ad Inserter before activating Ad Inserter Pro (settings will remain in the database).
Plugin upload fails
Ad Inserter Pro must be installed from the file. You get the download link when you purchase the license. In some cases WordPress will not allow you to upload the plugin. This is very likely because your web hosting has set limitations on upload file size. In such case you can do the one following suggestions:
- Upload the plugin manually with FTP as described above
- Contact your hosting company to install the plugin for you.
- Contact us and provide WordPress admin access and we’ll install the plugin for you.
- Increase the upload file size limit – In the folder
/wp-admin/create filephp.iniwith the following content:
upload_max_filesize = 64M
post_max_size = 64M


