Sticky Ads
PRO Ad Inserter Pro supports also various types of sticky ads – ads that stick to the screen or page content and stay fixed when the page is scrolled. It is also possible to configure sidebar ads that scroll with the content. There are also additional options like close button, delayed display and animations. Pop-up ads and background ads are a special mode of sticky ads. Top and bottom sticky ads are also know as anchor ads.
Available sticky modes:
- Sticky widgets – When the page scrolls and a sticky widget is scrolled up in the sidebar, it sticks to the top and stays there until it is pushed up by the widgets or sidebar end below. Normally, you set only one widget sticky, the last one or one of the last widgets in the sidebar. Available also in the free Ad Inserter, you only need to mark Ad Inserter widget in the sidebar as Sticky and set Sticky widget mode to CSS or JavaScript.
- Sticky widgets (Push mode) – This mode will create some space below a sticky widget. When the page is scrolled, this mode will stick the widget to the top of the page while there is space in the sidebar below the widget. After that the widget will be pushed up as other widgets. Please check demo sticky block as a widget in the sidebar. Available also in the free Ad Inserter, you only need to mark Ad Inserter widget in the sidebar as Sticky and set Sticky widget mode to CSS Push.
- Sticky blocks in the static page/post content (Push mode) – Any block can be made sticky. When this option is enabled (Button Misc / tab Display), it will add some space below the block – you also need to define the height of this space. When the page is scrolled, sticky block will stick to the top of the page while there is space below the block. After that the block will move up as the other content below. This works like CSS Push mode for sticky widgets. An example of content sticky ad is displayed on the demo page.
- PRO Fixed sticky ads over the page – sticky ads are displayed in a layer above the page content and overlap any page element below and stick to the screen or page content and stay fixed when the page is scrolled. Various animations and trigger positions can be configured. An example of fixed sticky ads is displayed on the demo page – settings for this mode are described on this page below.
Fixed sticky ads over the page
Sticky ads are displayed in a layer above the page content so they will overlap any page element below. This applies also to the background ads which can be configured to look like a clickable page background. This layer is independent of the page content below. When you configure horizontal or vertical position of a block to stick to the content, the plugin will set its position according to the position of the page content below.
If you are using responsive ad code (e.g. responsive AdSense code) you need to define ad width (and height) otherwise the code can’t resize as the width of the parent container for sticky ads is not known. You can do this by specifying ad width and height (for AdSense you can use the built in code generator) or define block width and height.
Sticky ads as supported by Ad Inserter Pro and described below can’t be used on AMP pages as they use CSS property position: fixed; or Javascript code which is not allowed on AMP pages. Check sticky AMP ads for details on code for sticky ads on AMP pages.
Please note that Ad Inserter supports another type of sticky ad: sticky (fixed) widgets. Sticky widget is a widget that you place in the sidebar and when the page is scrolled down and sticky widget reaches top of the page, sticky widget and all the widgets below stay fixed – they don’t move when the page is scrolled down. Sticky widgets are available also in the free Ad Inserter and are not considered sticky ads as described on this page.
Check demo page for sticky ads – scroll the page down to see all the ads.
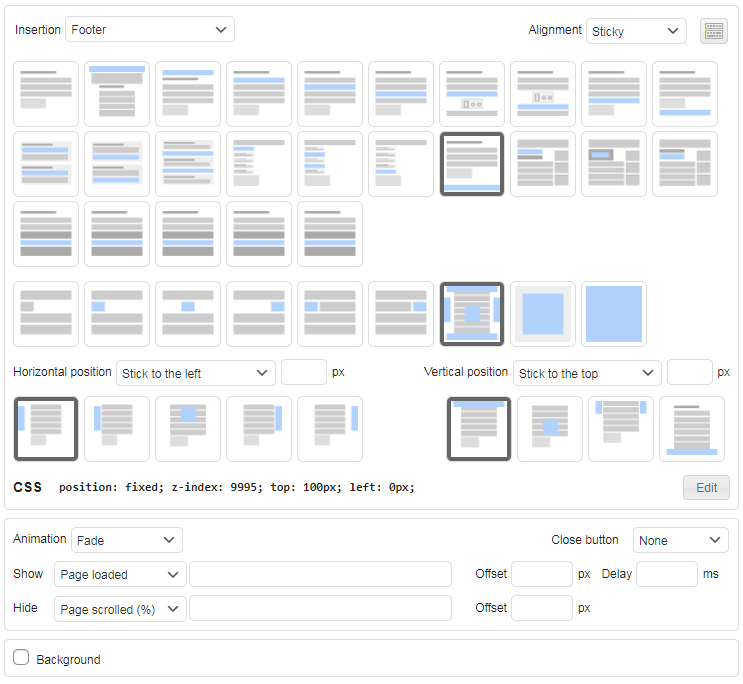
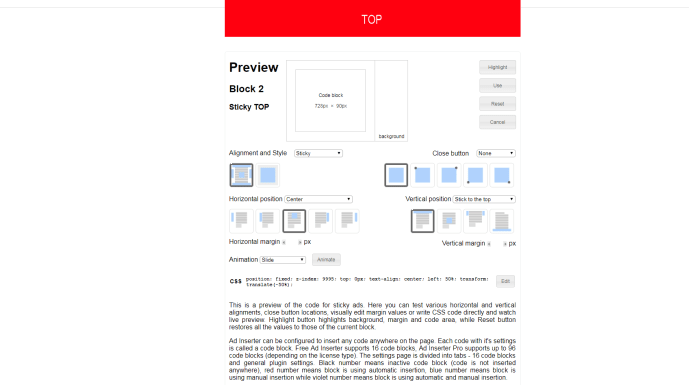
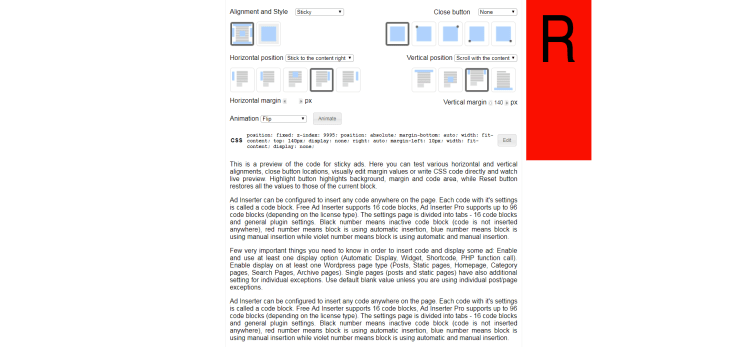
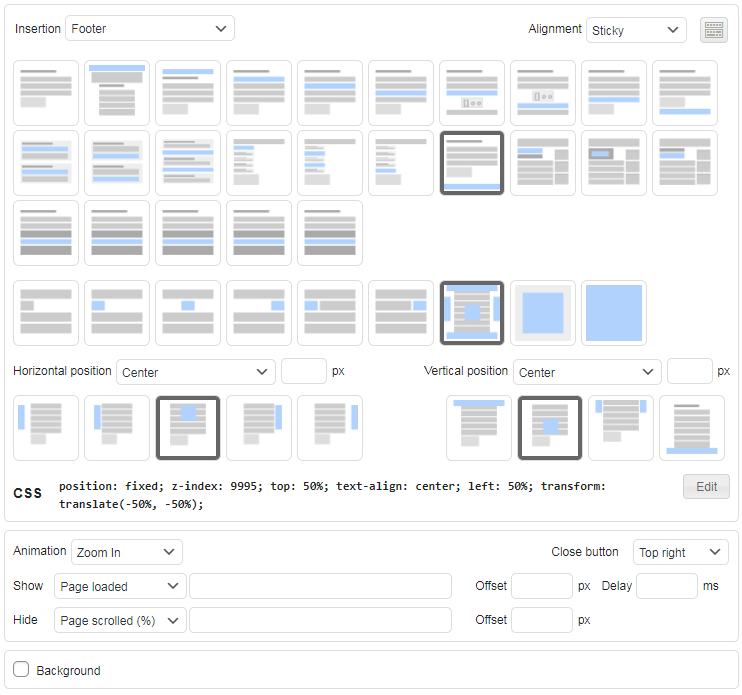
To configure sticky ad select Sticky as Alignment. This will open settings for sticky ads:
All sticky ads will be displayed according to the settings, however, the ad code should normally be inserted in the page footer. Therefore, you should select Footer Automatic Insertion unless instructed otherwise. If your theme doesn’t have Footer insertion position (and the sticky ads are not displayed) you can try to use any other suitable position (Before post or After post).
Sticky settings are divided into three sections:
- Horizontal position
- Vertical position
- Animation
- Trigger condition to show sticky ad
- Trigger condition to hide sticky ad (optional)
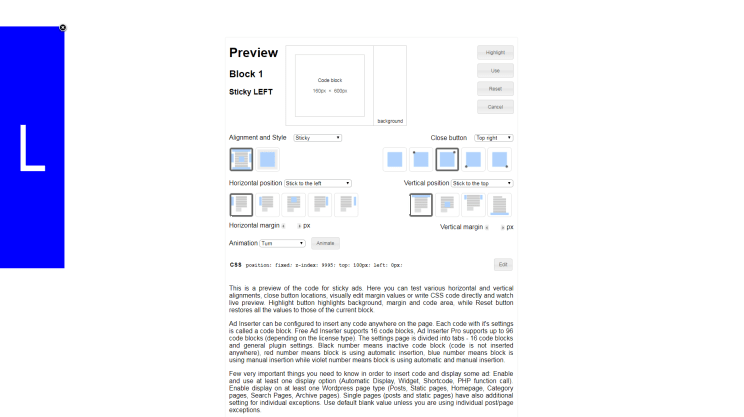
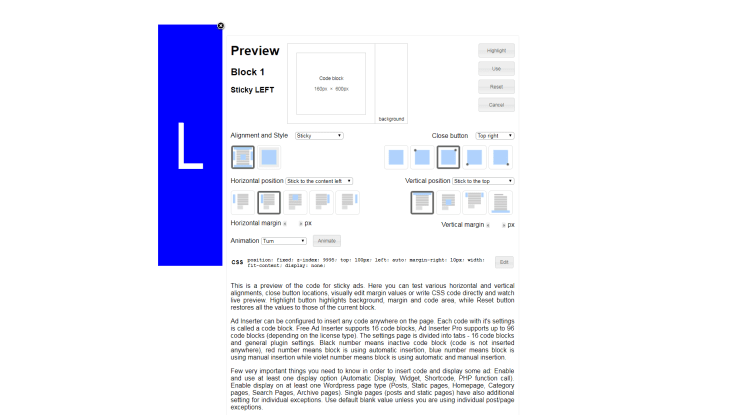
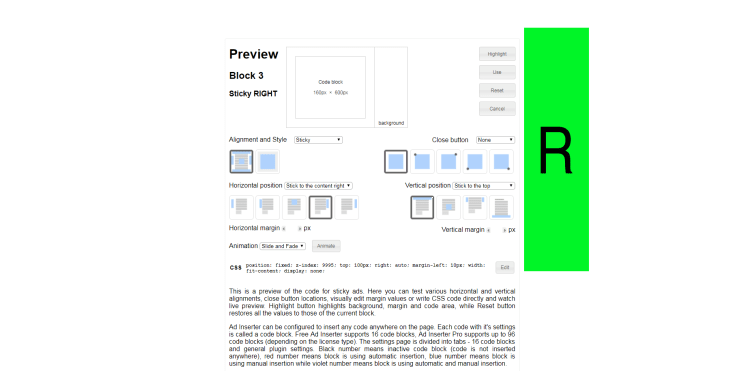
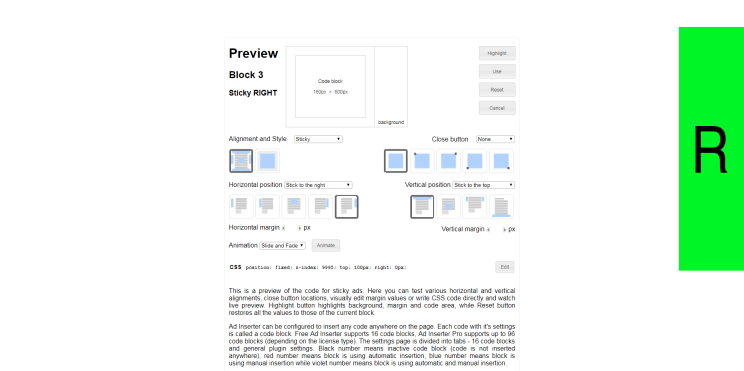
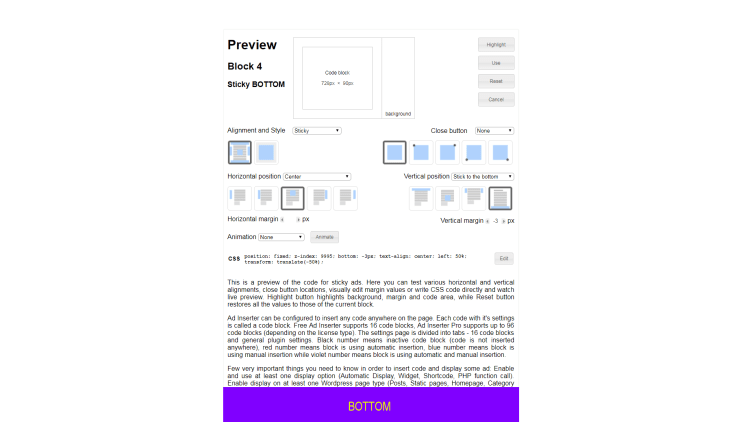
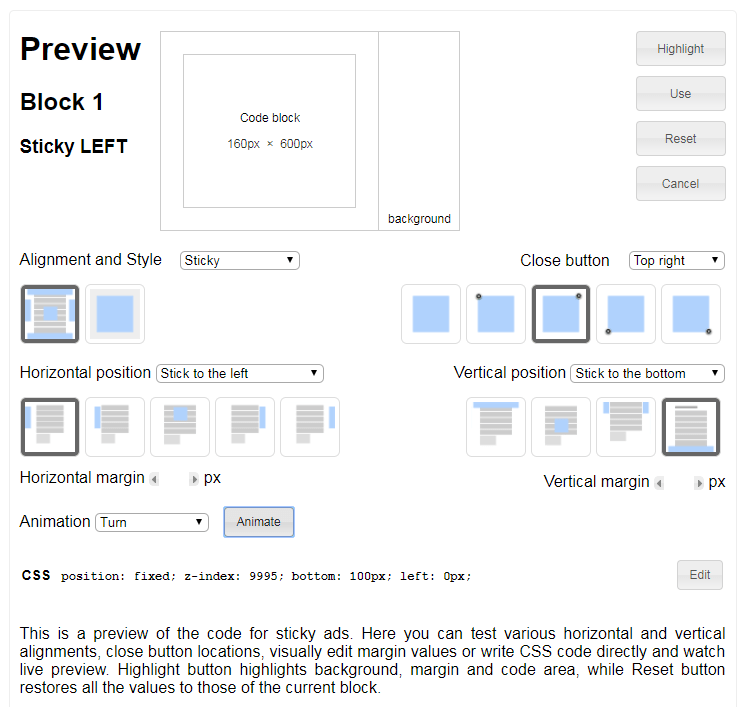
While you can configure all the settings for sticky ads here, it is much easier to configure and test settings in the Preview window where you can also test all the alignments and animations. Click on the Preview button below the code editor to open preview window.
![]()
Horizontal position
Horizontal position defines how sticky ad is positioned horizontally. Available options are:
- Stick to the left
- Stick to the content left
- Center
- Stick to the content right
- Stick to the right
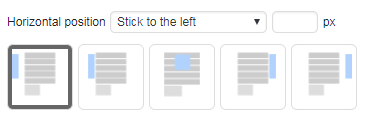
Stick to the left
This alignment displays ad next to the left screen edge – it overlaps any content there. Next to the alignment selection you can optionally enter horizontal margin in pixels.
Stick to the content left
This alignment displays ad next to the left edge of page content (as sidebar) – it also overlaps any content there. Next to the alignment selection you can optionally enter horizontal margin in pixels. Page content width is in most cases automatically calculated and it is assumed that the content is centered horizontally. In the case the page width is not properly calculated you can manually define main content element with CSS selector or width in pixels (tab ⚙ / tab General).
When using Stick to the content alignment the plugin needs to know the content width. To automatically determine the width, a few content markers – span elements with ai-content class are inserted:
<span class="ai-content"></span>Normally this code is invisible. However, with some page layouts it may cause undesired effects. In such case you can disable insertion of the span tags. Put this PHP code in the Header and enable PHP processing and Header code (if it is not enabled yet):
<?php
define ('AI_CONTENT_MARKER_NO_LOOP_START', true);
define ('AI_CONTENT_MARKER_NO_LOOP_END', true);
define ('AI_CONTENT_MARKER_NO_GET_SIDEBAR', true);
?>
You can disable individual content marker with a short PHP code:
loop_starthook:<?php define ('AI_CONTENT_MARKER_NO_LOOP_START', true); ?>loop_endhook:<?php define ('AI_CONTENT_MARKER_NO_LOOP_END', true); ?>get_sidebarhook:<?php define ('AI_CONTENT_MARKER_NO_GET_SIDEBAR', true); ?>
You can also disable content markers by defining main content element (CSS selector or width in pixels, tab ⚙ / tab General).
When there are no content markers and you are using Stick to the content alignment, you need to manually define main content element with CSS selector or width in pixels (tab ⚙ / tab General).
Center
This alignment displays ad centered horizontally – it overlaps any content there.
Stick to the content right
This alignment displays ad next to the right edge of page content (as sidebar) – it also overlaps any content there. Next to the alignment selection you can optionally enter horizontal margin in pixels. Page content width is automatically calculated and it is assumed that the content is centered horizontally. In the case the page width is not properly calculated you can manually define main content element with CSS selector or width in pixels (tab ⚙ / tab General).
Stick to the right
This alignment displays ad next to the right screen edge – it overlaps any content there. Next to the alignment selection you can optionally enter horizontal margin in pixels.
Vertical position
Vertical position defines how sticky ad is positioned vertically. Available options are:
- Stick to the top
- Center
- Scroll with the content
- Stick to the bottom
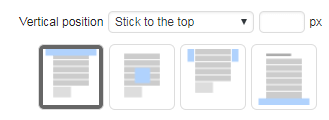
Stick to the top
This alignment displays ad next to the top screen edge – it overlaps any content there. Next to the alignment selection you can optionally enter vertical margin in pixels. The ad stays fixed there – it doesn’t move when the page is scrolled.
Center
This alignment displays ad centered vertically – it overlaps any content there.

Scroll with the content
This alignment scrolls ad with the page. It stays fixed relative to the page (you can optionally define vertical margin in pixels) and when the page is scrolled the ad is scrolled with it.
Please note that this vertical position requires code insertion above any other content just below the <body> tag – automatic insertion Above header. This position for automatic insertion is available when you enable Output buffering (tab ⚙ / tab General). Check Automatic Insertion for details.
Stick to the bottom
This alignment displays ad next to the bottom screen edge – it overlaps any content there. Next to the alignment selection you can optionally enter vertical margin in pixels. The ad stays fixed there – it doesn’t move when the page is scrolled.
Stick to the content
Stick to the content horizontal position displays ads next to the left or right edge of page content (as sidebar). In most cases the plugin will automatically calculate page content width (assuming that the content is centered horizontally) and position ads automatically. However, some themes may require to define main content element manually. For this go to tab ⚙ / tab General and define Main content element. You can enter either CSS selector (#id or .class) of the main (outermost) page element or content width in pixels (numerical value only).
To automatically calculate page content width Ad Inserter inserts few short invisible HTML content markers <span class="ai-content"></span>. With some themes this may cause undesired element shifts. In such case you can disable individual marker with a short PHP code:
loop_starthook:<?php define ('AI_CONTENT_MARKER_NO_LOOP_START', true); ?>loop_endhook:<?php define ('AI_CONTENT_MARKER_NO_LOOP_END', true); ?>get_sidebarhook:<?php define ('AI_CONTENT_MARKER_NO_GET_SIDEBAR', true); ?>
When there are no content markers and you are using Stick to the content alignment, you need to manually define main content element with CSS selector or width in pixels (tab ⚙ / tab General).
The easiest way to configure and test alignment settings is in the preview window where you can test all the alignments and animations. Click on the Preview button below the code editor to open preview window.
![]()
Animation

Sticky ads can be displayed when the page is scrolled to some position, after some delay or when the page is loaded. You can define an effect (animation) to show or hide the ad. Optionally you can also define a trigger condition to hide the ad.
The following animations (effects) are available:
- Fade
- Slide
- Slide and Fade
- Turn
- Flip
- Zoom In
- Zoom out
For each horizontal and vertical alignment the plugin will select optimal animation direction. Some animations are not available with all positions. In such cases the plugin will choose the best alternative.
The easiest way to configure and test alignment settings is in the preview window where you can test all the alignments and animations. Click on the Preview button below the code editor to open preview window.
Each animation has the following additional parameters:
- Trigger condition to show the ad
- Trigger offset
- Trigger delay
- Trigger condition to hide the ad (optional)
- Trigger offset
Animation triggers
The following triggers are available:
To SHOW the ad:
- Page loaded – The animation starts when the page is loaded.
- Page scrolled (%) – The animation to show the ad starts when the page is scrolled for the defined percentage (specify only numerical value from 1 to 100).
- Page scrolled (px) – The animation to show the ad starts when the page is scrolled for the defined number of pixels (specify only numerical value).
- Element scrolls in – The animation to show the ad starts when a specific HTML element scrolls into the wiewport (screen). Specify CSS selector for the element (
#idor.class). - Element scrolls out – The animation to show the ad starts when a specific HTML element scrolls out of the wiewport (screen). Specify CSS selector for the element (
#idor.class).
Trigger offset
This is additional offset in pixels that is taken into account when the animation to show the ad is triggered (positive and negative values are possible). When no value is specified a small offset will be used.
Trigger delay
This value defines delay of animation (in milliseconds) after the trigger event. To simply show sticky ad with a delay set Animation to Fade and define the delay.
Animation delay can be set up to 3000 ms. To show ads with longer delay after the page is loaded use this approach to set additional delay in seconds.
To HIDE the ad:
- Disabled – Once shown, the ad will not be hidden even if the page is scrolled back
- Enabled – The ad will be hidden when the page is scrolled back
- Page scrolled (%) – The animation to hide the ad starts when the page is scrolled for the defined percentage (specify only numerical value from 1 to 100).
- Page scrolled (px) – The animation to hide the ad starts when the page is scrolled for the defined number of pixels (specify only numerical value).
- Element scrolls in – The animation to hide the ad starts when a specific HTML element scrolls into the wiewport (screen). Specify CSS selector for the element (
#idor.class). - Element scrolls out – The animation to hide the ad starts when a specific HTML element scrolls out of the wiewport (screen). Specify CSS selector for the element (
#idor.class).
Trigger offset
This is additional offset in pixels that is taken into account when the animation to hide the ad is triggered (positive and negative values are possible). When no value is specified a small offset will be used.
The plugin uses AOS Animate on Scroll Library for animations. In some cases when the library is used also in other plugins or themes it may be needed to prevent multiple initializations of the library. In such case use this javascript code in the header to instruct Ad Inserter Pro not to initialize AOS library:
<script>ai_no_aos_init = true;</script>
Close button

Each ad can have a close button. You can choose one of the four corners where the button will be displayed. The ad will not be displayed until the page is reloaded. This setting is a mirror of the Close button setting on the Misc / Display tab. It is available also here for convenience.
Close button can be customized
The easiest way to test animations is in the preview window where you can also test alignments. Click on the Preview button below the code editor to open preview window.
Check also demo page for sticky ads – scroll the page down to see all the ads.
Sticky ads on AMP pages
Sticky ads as supported by Ad Inserter Pro and described above can’t be used on AMP pages as they use CSS property position: fixed; or Javascript code which is not allowed on AMP pages. Check sticky AMP ads for details on code for sticky ads on AMP pages.
Background behind a sticky ad
To place a semi-transparent white background behind a top or bottom sticky ad wrap ad code with a div:
<div style="width: 100vw; background-color: hsla(0,0%,100%,.8);">
AD CODE
</div>
Pop-up ads
With sticky ads you can also easily create a pop-up ad. Simply center it horizontally and vertically, add a close button and set animation:
Test it in the preview window:
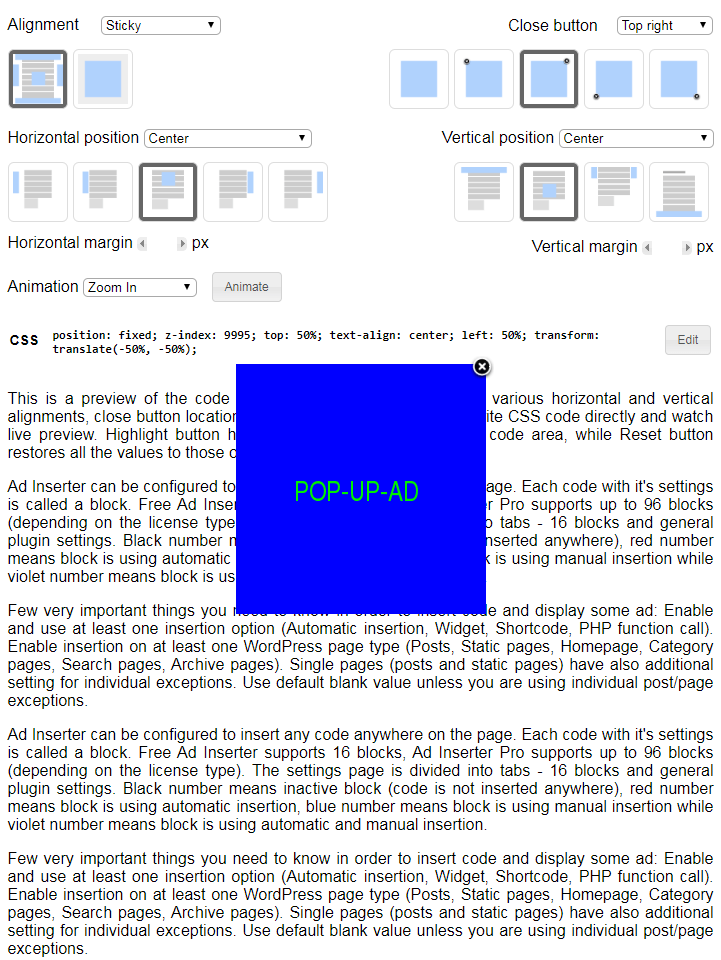
Pop-up ads with background
You can also add a semi-transparent background behind the pop-up ad. Add the following div to the ad code (modify CSS code as required):
AD CODE

<div style="position: fixed; top: -100vh; left: -100vw; width: 200vw; height: 200vh; z-index: -1; user-select: none; background: #000; opacity: 0.85;"></div>
Please note that if you use animation to show the pop-up ad you should select fade as this is the only animation that makes sense with the background.
Check also demo page for sticky ads – scroll the page down to see all the ads.
Background ads
A background ad (also called a skin ad) appears in the background on both sides of the web page and it can be made clickable. In Ad Inserter Pro background ads are implemented as a special mode of sticky ads – ads that are displayed on the top of the page. However, they look like a clickable background on the left and right side of the page. This approach is used because WordPress themes use very different layouts and putting a background image behind the page content may not work well or clicks on the background may not work. Of course, Ad Inserter Pro supports also real background ads (background image behind the content).
Please note the difference between “normal” and background sticky ads:
- Normal sticky ads are expected to be seen in whole – they need to fit into the space left or right of the page content. If they are wider they will overlap the content (or will not be inserted if they are too wide).
- Background ads are usually wider than the space left or right of the content and are “cut” to fill only the empty space so they do not overlap the content – they appear as page background.
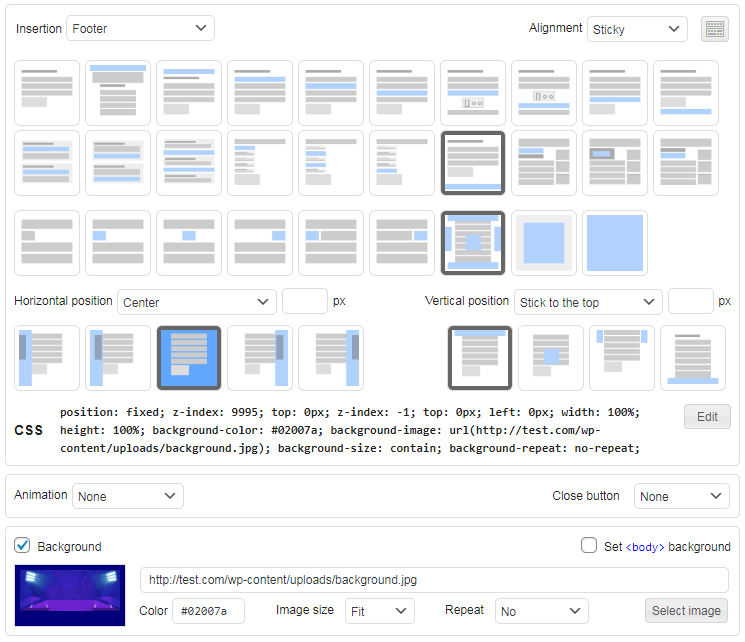
To configure background ad select Sticky as Alignment and check Background checkbox.
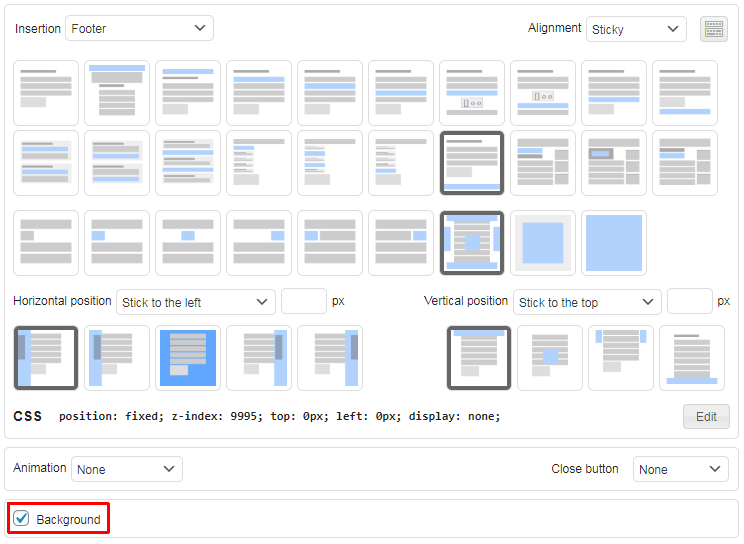
When you check Background checkbox, icons for Horizontal positions slightly change. The behavior of background ads is similar to normal sticky ads with the following differences:
- Stick to the left and Stick to the right: this alignment displays ad next to the left or right screen edge and cuts it where the page content begins. Therefore, the ad is visible as a page background. Use this alignment where your main ad content is near the left side of the ad (for left side of the page) and near the right side of the ad (for the right side of the page). You can use this approach with single background image or separate left and right background images.
- Stick to the content left and Stick to the content right: this alignment displays ad next to the left or right edge of the page content and cuts it at the screen end. Therefore, the ad is visible as a page background. Use this alignment where your main ad content is near the right side of the ad (for left side of the page) and near the left side of the ad (for the right side of the page). For this approach you need separate left and right background images.
Page content width is in most cases automatically calculated and it is assumed that the content is centered horizontally. In the case the page width is not properly calculated you can manually define main content element with CSS selector or width in pixels (tab ⚙ / tab General).
Configure background image (with optional link) as normal sticky ad – use code generator for banners to generarate banner code. While you can configure all the settings for background ads here, it is much easier to configure and test settings in the Preview window where you can also test all the alignments. Click on the Preview button below the code editor to open preview window.
![]()
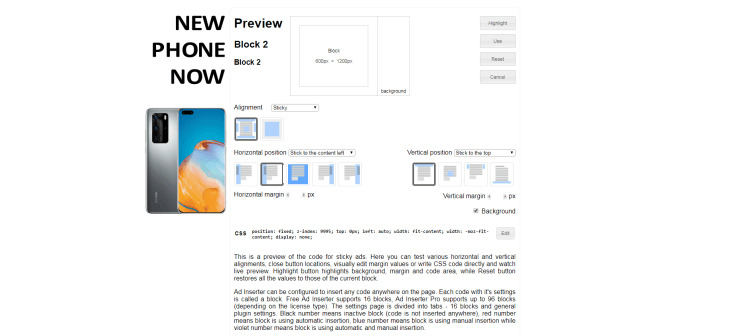
Example of two background images – shown with border to mark image size. They are wider than the space available left or right of the content so they can be used regardless of content or page width:

Since we have two background images and they have ad aligned toward the page content we need to use two blocks, first with Stick to the content left and second with Stick to the content right alignment. This is how they look in the preview window:
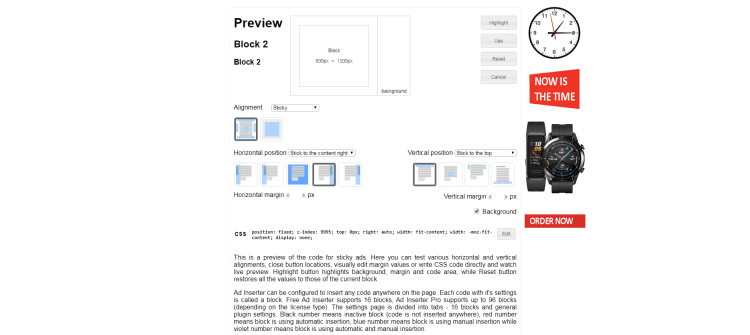
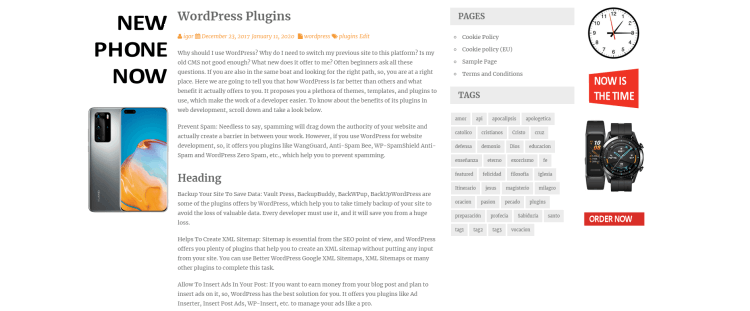
This is how it looks when both blocks with the background are inserted:
Please note the difference between “normal” and background sticky ads:
- Normal sticky ads are expected to be seen in whole – they need to fit into the space left or right of the page content. If they are wider they will overlap the content (or will not be inserted if they are too wide).
- Background ads are usually wider than the space left or right of the content and are “cut” to fill only the empty space so they do not overlap the content – they appear as page background.
Page background
Ad Inserter Pro supports also real background ads (background image behind the content), but for such ad the clickable areas on left and right side (if needed) need to be configured separately to ensure maximum compatibility with most themes. To select this mode select Center as Horizontal position. Now you can configure additional background settings:

This bacground mode will create a real background behid the page content (either a div with z-index property set to - 1 or <body> inline style for background). The background can be either solid color, image (single or repeated) or combination of image and solid color.
Click on the input field Color opens a small pop-up window where you can select background color. You can also enter directly 6-digit hex value of the color (with leading #).
Click on the button Select image selects image for the background. A pop-up window will open where you can select existing or upload a new background image.
Background image has two additional settings: Size and Repeat. Both define how background image is resized and repeated.
Image size:
- Default – the background image is displayed in its original size
- Cover – resizes the background image to cover the entire background, even if the image has to be stretched or cut a little bit off one of the edges (
background-size: cover) - Fit – resizes the background image to make sure the image is fully visible (
background-size: contain) - Fill – resizes the background image horizontally and vertically to make sure the background is fully covered (
background-size: 100% 100%)
Repeat:
- Default – the background image is repeated if it is smaller than the background
- No – the background image is not repeated (
background-repeat: no-repeat) - Yes – the background image is repeated horizontally and vertically (
background-repeat: repeat) - Horizontally – the background image is repeated only horizontally (
background-repeat: repeat-x) - Vertically – the background image is repeated only vertically (
background-repeat: repeat-y) - Space – the background-image is repeated as much as possible without clipping – the first and last images are pinned to either side of the element, and whitespace is distributed evenly between the images (
background-repeat: space) - Round – the background-image is repeated and squished or stretched to fill the space (no gaps,
background-repeat: round)
In this background mode you should not define any block code as only the background needs to be defined with the background settings.
While you can configure all the settings for background here, it is much easier to configure and test settings in the Preview window where you can also test all the background image settings. Click on the Preview button below the code editor to open preview window.
Normally the plugin will create a full-screen div with z-index property set to - 1 which will be displayed as a page background behind the page content. Depending on the page layout for a brief moment the real page background (usually white) will be shown. However, it is also possible to set the background of the <body> element – this will ensure the best user experience. For this you need to enable Output buffering (tab  / tab General) and an additional setting will be shown – Set <body> background:

When this option is checked the plugin will apply background settings to the <body> element (as inline style) and hide div for this block.
When using Set <body> background option select Footer as insertion position. The insertion needs to be done server-side before output buffering is finished and without any client-side options. Nothing will be inserted, only the <body> style attribute will be set according to the configured background.
Clickable areas
When you configure a real background behind the page, the background will not be clickable. Therefore, if you need to define a link (or separate links for left and right side of the background) you need to configure clickable areas. This approach is needed in order to ensure maximum compatibility with most themes as with many themes direct clicks on the page background are not possible.
Creating clickble areas is simple – you only need to configure two blocks, one for the left and one for the right side. Download this transparent image and upload it to your website. Then create left and right background ad with transparent image (use code generator to generate banner code with transparent image and link) and select Stick to the content horizontal position. Each background ad with transparent image will represent a clickable area above the page background.
Example of background image:

Since the image is wide and symmetrical we’ll use image size Fit to resize its width according to the screen size. The remaining space below the image will be filled with a matching blue color:
This is how it looks in the preview window:

With blocks configured as page background you can have different backgrounds for specific pages.
Install Ad Inserter for free
Ad Inserter Pro Affiliate Program
