Ad Impression and Click Limiting
Frequency Capping
PRO Frequency capping is a term in advertising that means restricting (capping) the number of times (frequency) a specific visitor to a website is shown a particular advertisement. It is often cited as a way to avoid banner burnout, the point where visitors are being overexposed and response drops. This may be true for direct-response campaigns whose effectiveness is measured in click-throughs, but it might run counter to campaigns whose goal is brand awareness, as measured by non-click activity.
Ad Inserter Pro Freelancer and higher license types support frequency capping to limit the maximum number of impressions/views a visitor can see a specific ad within a period of time. You can also limit clicks – the maximum number of times a visitor can click on a specific ad within a period of time. This feature uses cookies to remember the impression and click count. There are also general ad limits for each block which do not use cookie as the check is done server-side.
Impressions and click limits
Settings to define impression and click limits are located under additional block settings – click on the Misc button under code window
![]()
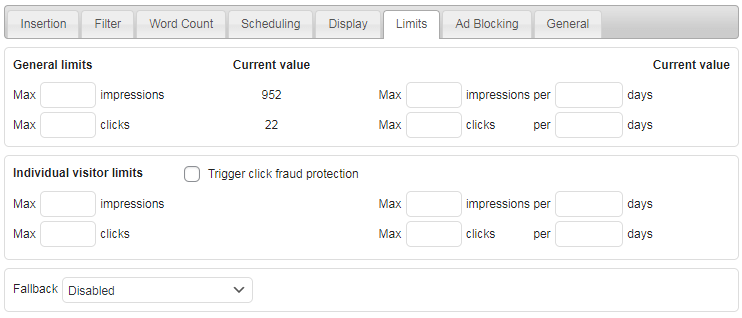
and then click on the Limits tab:

There are two sections of setting – General limits and Individual visitor limits. Both can be used at the same time, however, you need to understand how they work in order to use them properly. And each section has two different limits for impressions and clicks – total limits on the left and limits per time period on the right.
In order for impression and click limits to work, impression and click tracking needs to be enabled – globally in the general plugin settings and for each block where you need to define impression or click limits.
![]()
You can also define a fallback block to be inserted when the limited block is not inserted because some limit is reached.
General limits
General limits apply to the block. You can define maximum number of impressions or clicks for every block. This is server-side check. When the limit is reached the code for this block is not inserted (and ad not shown).

Next to the total block limits the current value of impressions and clicks for this block is shown. When you define a general limit you need to take into account current value as the check will be done against the current value. Fo example, if you need to limit ad to 500 impressions and current value for impressions of this block is 489, you need to set Max impressions to 989. Of course, you can also reset statistics for each block:
![]()
Check impression and click tracking for details. In such case the current value will be 0 and you can simply enter the wanted limit.
Max impression and click limits per time period define limits for the last n days. When time period is set the current value for this time period is displayed. This way you can gradually show some ad in order not to spend all impressions in a very short period.
Time period for these (general) limits is slightly different from similar limits for individual visitors – see below for details.
Block statistics are saved as daily impressions and clicks for each block. Therefore, you can set limits only for whole number of days.
As general limits are checked when the page is generated (server-side), the block (ad) may still be shown when caching is used and visitors load cached pages. For such cases Ad Inserter Pro supports additional client checks on the client side (browser) to precisely limit impressions and clicks even for cached pages. When Dynamic blocks are set to client-side, additional check will be done on the client side in order to stop showing the ad when the general limits are reached.
Individual visitor limits
Individual visitor limits apply to the block and to every individual visitor. You can define maximum number of impressions or clicks per every visitor. This is client-side check – the number of block impressions and clicks is stored in a cookie. When the limit is reached the code for this block is not inserted (and ad not shown). The client-side check is done when the page is loaded. If the limits are reached the code for the block will not be inserted (by client-side Javascript code).

Max impression and click limits per time period define limits for the specified time period in days. You can also use decimal values for shorter perods. For example, 0.5 days means 12 hours.
Time period for these (individual) limits is slightly different from similar general limits – see above for details.
Individual visitor limits for impressions and clicks for each block are saved in a cookie (stored in the browser). This way you can show some ad only few times in the defined period in order to avoid banner burnout – the point where visitors are being overexposed.
Since individual visitor limits are stored in a cookie the ad would not be shown anymore when the limits are reached even if the block is configured with a new ad for a new campaign. To solve this problem Ad Inserter uses some additional mechanisms to prevent hiding ad which has already reached limits sometime in the past:
- When the block code changes individual limits are reset to the defined values and the block is shown again.
- For total limits when they are reached the ad will stay closed for 7 days. After that period the ad will be shown again. You can use General limits to additionally limit impressions and clicks.
Depending on other settings you may see waring icon ⚠ indicating that there is a problem with your settings. Hover the cursor over the icon to see the message.
Click fraud protection
Click fraud is a type of fraud that occurs in pay-per-click (PPC) online advertising. Fraud occurs when a person, automated script or computer program imitates a legitimate user of a web browser, clicking on such an ad without having an actual interest in the target of the ad’s link. To prevent such frauds Ad Inserter Pro Freelancer and higher license types support protection in cases where the number of clicks on some ad reaches a predefined limit.
Please note that click fraud protection can’t work for AdSense Auto ads as AdSense code automatically places ads on the page once Auto ads are enabled. The protection works only for individual ad codes (blocks) inserted by Ad Inserter Pro. Click fraud protection also can’t work on mobile devices if you are using iframe ads (like AdSense) as clicks on such ads on mobile devices can’t be detected.
Click fraud protection like other individual visitor limits uses cookies to store impression and click limits. If the visitor does not use cookies or deletes them, then the limits (and protection) will not be applied. To still be able to use click fraud protection in such cases you should enable Block IP address option (see below for details).
To use click fraud protection you need to:
- Set Dynamic blocks to client-side insert (or client-side show depending on your code and needs)
- enable general tracking, internal tracking and click fraud protection in the general plugin settings (tab ⚙, tab Tracking) and define visitor limits and protection time – see the settings below
- enable IP address blocking and blacklist
cfpas IP address for all protected blocks (optional but strongly suggested) – see the settings below - enable tracking and click fraud protection for every block that you would like to protect
- If you are using CloudFlare then make sure Rocket Loader is not enabled. It may prevent inline tracking scripts from running properly.
Click fraud protection settings for each block that needs to be protected:
![]()

Global Click fraud protection settings (tab ⚙, tab Tracking):
![]()
Enable Click fraud protection, set Global visitor limits (clicks and time period) to define how many times the protected blocks (ads) need to be clicked in order to trigger protection. Set also Protection time. For the time period in days you can also use decimal values for shorter periods. For example 0.042 days means one hour.
When clicks to any of the blocks, for which click fraud protection is enabled, reach Global visitor limits, all the block that have click fraud protection enabled, will be closed (and not inserted) for the visitor for the Protection time period (default value is 24 hours).
Please note that click fraud protection can’t work for AdSense Auto ads as AdSense code automatically places ads on the page once Auto ads are enabled.
Optionally (but strongly advised), you can also block IP address of the visitor when the protection is triggered. This is very helpful in cases when the visitor clicking on your ads does not use cookies (or deletes them). With IP address blocked the visitor will not see ads (regardless of the cookies in the browser) until the protection time expires.
![]()
When this option is enabled you need to blacklist blocks for the blocked IP addresses. For this you need to add cfp as IP address into the IP addresses list:

If you don’t blacklist blocked IP addresses (for the protected blocks) then the blocks will still be inserted (and ads displayed) in cases when the visitor does not use cookies.
When some IP address is blocked, click on the IP addresses blocked text to display (or to refresh) the list of currently blocked IP addresses, country of the IP address (visitor) and time to blocking expiration:
![]()
Each blocked IP address can be deleted by clicking the X button.
Please note that the IP addresses blocked text initially shows the number of IP addresses which were recently blocked – some of them may no longer be blocked. When you click on the text you’ll get the actual number of the currently blocked addresses.
Optionally you can define click limits also for each individual block. However, this makes sense only if the limits for the block are lower than the globally defined protection limits on the Tracking tab. In most cases you should only define global protection limits (as explained above).


