Conditions – limit Insertion with black and white lists
Black lists and white lists are two ways to limit insertion. White list means that insertion will be enabled only for the items on the white list, while black list means that insertion will be disabled for all the items on the black list. Click on the Lists button to show available lists.
![]()
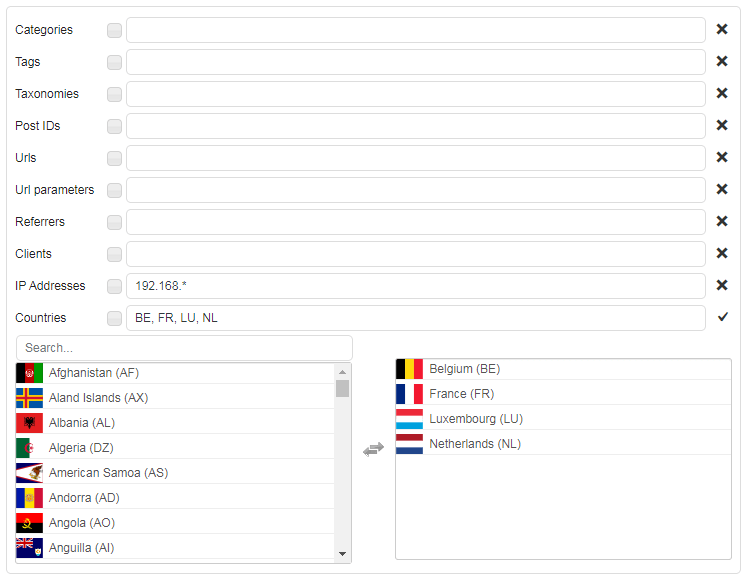
Lists are used to limit insertion on pages or posts that have something in common (category, tag, taxonomy, url pattern) or to limit insertion based on visitor’s data (cookie, referrer, client, IP address, country).
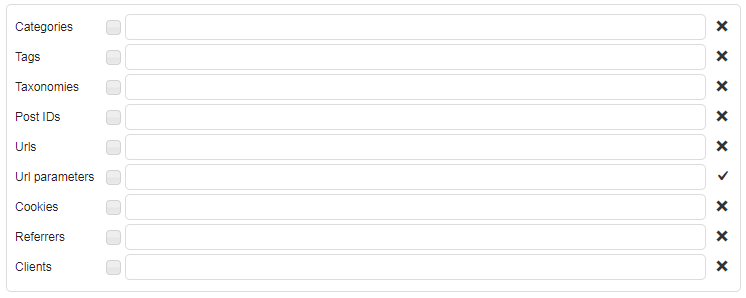
Blacklisting items means disabling insertion when any of the items is present – list is marked with ✖
![]()
Whitelisting items means enabling insertion when any of the items is present – list is marked with ✔
![]()
- Click on the list type icon (✔ or ✖) toggles list type: white list (insertions enabled ✔) or black list (insertions disabled ✖)
- Leave list empty to disable list filtering (default setting).
- If you whitelist items on the list, at least one of the items on the list must be present to enable insertion (item1 OR item2 OR item3…).
- If you blacklist items on the list, at least one of the items on the list must be present to disable insertion (item1 OR item2 OR item3…) i.e. no item on the list should be present to enable insertion.
- List item separator is comma.
- For categories and tags use slugs (name used in the url – web address).
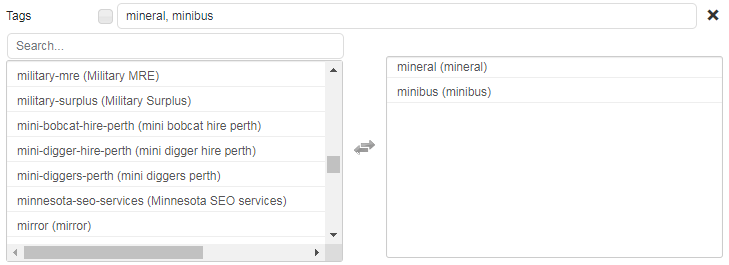
- Click on the small button next to list to open list editor. For categories, tags, taxonomies, post IDs, clients and countries you can select items from the list of the available items. For urls, url parameters, cookies, referrers and IP addresses you can enter one item per line in the editor.
- If there is more than one non-empty list defined for the same code block please note the following: all lists must pass the check for insertion (list1 AND list2 AND list3…).
PRO Ad Inserter Pro supports another very powerful feature to insert part of block code depending on list conditions as described above. check Multiple list checks inside single block for details.
It is also possible to black or whitelist two or more items at the same time.
You can use a shortcode to disable multiple blocks on a post or page. For example, shortcode [adinserter disable="1, 2, 3"] disables insertion of blocks with numbers 1, 2, 3 into post/page content. Use # to disable all blocks.
If you are using lists you don’t need to define individual post/page exceptions – leave Use exceptions unchecked unless you are using individual post/page exceptions:

Wen checking post tags, categories, post IDs and other post data, the plugin uses WP function get_the_ID () to identify the current post and to get the ID of the post. Some themes may use a different approach to generate posts or pages and in such cases the right post ID can be obtained using the WP function get_queried_object (). To instruct the plugin to use this function to get the post ID you need to define PHP constant AI_USE_GET_QUERIED_OBJECT.
<?php

define ('AI_USE_GET_QUERIED_OBJECT', true);

?>
Categories
List categories (category slugs) where you want insertion (white list) or don’t want insertion (black list). The list can be used for posts and category pages. Click on the small button left of the list to open category selection. In case you have children categories you can select them as well:
categorymeans only categorycategory*means category or children categoriescategory+means only children categories
Some plugins like Yoast SEO and Rank Math SEO let you specify the primary category. You can list it in the taxonomy list as primary-category:category-slug.
Tags
List tags (tag slugs) where you want insertion (white list) or don’t want insertion (black list). The list can be used for posts and tag / archive pages. Click on the small button left of the list to open tag selection.
Taxonomies, Users and Post Types
List taxonomies (taxonomy slugs) where you want insertion (white list) or don’t want insertion (black list). You can use the following comma separated taxonomy slugs: taxonomy, term or taxonomy:term. Click on the small button left of the list to open taxonomy selection.
This list works in addition to Categories and Tags lists as categories and tags are default taxonomies. Therefore, it is possible to have categories and tags in one list, for example category:category_slug, post_tag:tag_slug. This way you can list categories and tags at the same time. Of course, if you black-list some category with Categories list or tag with Tags list then even if Taxonomies list is empty those categories or tags would be black-listed.
In case you have children taxonomies you can select them as well:
taxonomy:termmeans onlytaxonomy:termtaxonomy:term*meanstaxonomy:termor children taxonomiestaxonomy:term+means only children taxonomies
Users, User Roles and Authors
You can also use Taxonomies list to filter users with user:username, user roles with user-role:role or authors with author:username. This can be used to not insert ads for certain users or user roles (black list) or to insert ads only for certain users or user roles (white list). For example, to filter all users with Administrator role use user-role:administrator, to filter user with username editor2 use user:editor2.
Additional insertion options allow you to enable insertion for all users (default), logged in users, not logged in users and administrators. In case you need more complex rules for users you can define insertion conditions with the following taxonomies: user:logged-in and user:not-logged-in. For example, to enable ads for not logged in users and administrators you need to whitelist the following taxonomies: user-role:administrator, user:not-logged-in.
User taxonomies work only when caching is not used.
Post Types
In Taxonomies list you can also define post types: post-type:POST_TYPE. For example to black-list portfolio post types you should black-list post-type:portfolio.
Check practical example of disabling ads on custom posts: How to disable ads on WooCommerce product pages
Primary Category
Some plugins like Yoast SEO and Rank Math SEO let you specify the primary category. You can list it in the taxonomy list as primary-category:category-slug.
Metadata
Posts and pages may contain metadata – information about information. In the case of WordPress, it’s information associated with posts, users, comments and terms. You can use taxonomy list to check metadata key and value: meta:meta_key:meta:value. It is also possible to list only metadata key which will check only the presence of the metadata key: meta:meta_key.
Custom fields
For example, you can use metadata taxonomy to check for custom field value meta:custom_field_name:custom_field_value or only presence of some custom filed: meta:custom_field_name.
WPML
You can use taxonomy list to define WMPL languages. For example:
wpml-current-language:en
You can also insert text translated by WPML.
Multisite sites
PRO With multisite installations you can also use multisite:site-id to black/white-list site with specific id. Use multisite:# for the main site.
Post IDs
List post/page IDs where you want insertion (white list) or don’t want insertion (black list). Use this list only if you need to specify post IDs or there are only few posts to include/exclude, otherwise use individual exceptions when there are more posts to filter. Click on the small button left of the list to open post/page ID selection.
In some cases you may need to blacklist or whitelist all posts and only few pages or vice versa. For this purpose the ID selection contains two special IDs for this purpose:
posts– means all postspages– means all static pages
For example, to whitelist all posts and page with ID 3 you should whitelist posts, 3.
You can also list a range of IDs, for example, IDlow - IDhigh means a range of post IDs from IDlow to IDhigh.
To get post ID Ad Inserter uses WordPress function get_the_ID () which retrieves the ID of the current item in the WordPress Loop. In some cases this function may not return the right post ID number. You can see what ID is returned in the processing log:

In most cases where the function get_the_ID () does not return the right post ID you can use function get_queried_object () instead. To instruct Ad Inserter to use this alternative function to get post ID, put the following PHP code in the header (and don’t forget to enable PHP processing):
<?php

define ("AI_USE_GET_QUERIED_OBJECT", true);

?>
Urls
List urls where you want insertion (white list) or don’t want insertion (black list). Url used here is everything starting form the / after the domain name. For example: if web address is http://domain.com/lorem-ipsum, url to white/black-list is /lorem-ipsum You can also use partial urls with *. To filter all urls starting with /url-start use /url-start*, to filter all urls that contain url-pattern use *url-pattern*, to filter all urls ending with url-end use *url-end. Separate urls with commas. Use this list only if you need to include/exclude few urls or when urls are not posts or pages, otherwise if you need to filter posts or pages use post IDs or individual exceptions instead. Click on the small button left of the list to open url editor.
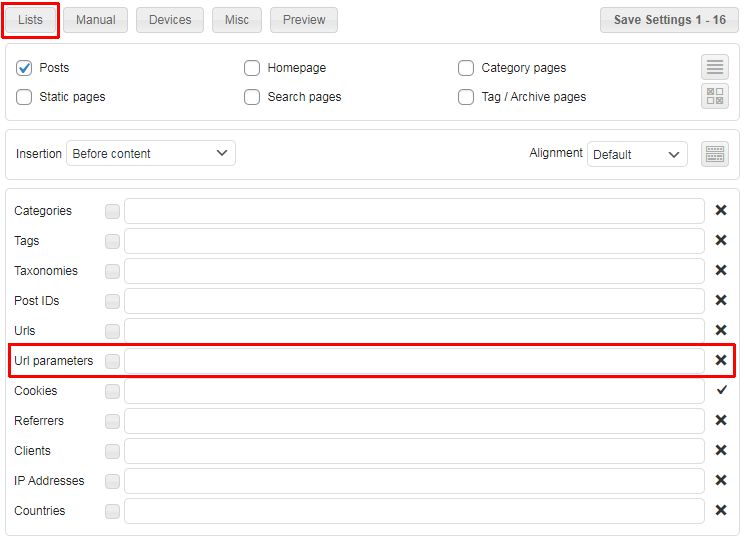
Url Parameters
List url query parameters where you want insertion (white list) or don’t want insertion (black list). You can specify either parameters or parameters with values. For example for url http://example.com?data=2&customer-id=22&device=0 you can define url parameters data, customer-id=22 to insert block (ad) only for urls where there is data parameter or customer-id parameter with value 22.
Character # means no url parameters (no url queries).
If you are using caching (very likely) you also need to set Dynamic blocks to Client-side insert (tab ⚙ / tab General) in order to check url parameters in visitor’s browser and not when the page is generated.
Click on the small button left of the list to open url parameter editor.
This list checks also cookies with the same cookie names as parameters or cookies with values. However, if you only needs to check cookies you are advised to use the Cookies list.
How to remember visitors’ url parameter?
Url parameters in links on external pages (for example, used for different ad campaigns) will normally work only for the first page visited. When the visitor will click any link on your website, the url parameter in the url will be lost. However, the status can easily be remembered with a cookie so you can display ads for this user even when the url parameter is not present anymore.
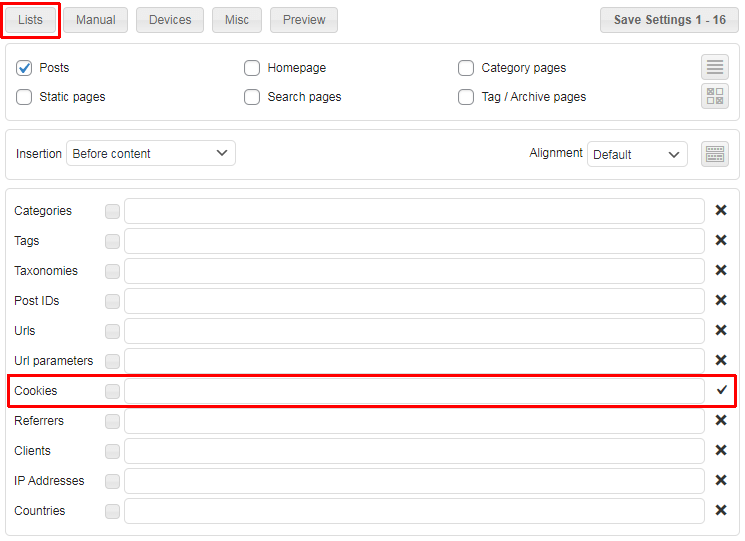
Cookies
List cookies where you want insertion (white list) or don’t want insertion (black list). You can specify either cookie names or cookie names with values. For example, for cookies wp_user_token=100 and customer-id=22 you can list cookies wp_user_token, customer-id=22 to insert block (ad) only for urls where there is wp_user_token cookie present or customer-id cookie with value 22.
If you are using caching (very likely) you also need to set Dynamic blocks to Client-side insert (tab ⚙ / tab General) in order to check cookies in visitor’s browser and not when the page is generated.
Click on the small button left of the list to open cookie editor.
Many cookies store simple strings, however, some may store also JSON encoded complex objects with many properties. In such case it is not possible to simply check for some string, you need to specify the object property you would like to check. Ad Inserter converts the object into array and then you can simply access individual array element. For example, a cookie with name borlabs-cookie may contain string value
%7B%22consents%22%3A%7B%22essential%22%3A%5B%22borlabs-cookie%22%5D%2C%22external-media%22%3A%5B%22facebook%22%2C%22googlemaps%22%2C%22instagram%22%2C%22openstreetmap%22%2C%22twitter%22%2C%22vimeo%22%2C%22youtube%22%5D%7D%2C%22domainPath%22%3A%22test.com%2F%22%2C%22expires%22%3A%22Wed%2C%2019%20May%202021%2017%3A48%3A54%20GMT%22%2C%22uid%22%3A%220n81y8qk-wx3q2hg7-ho3s8inv-ee1cfg3h%22%2C%22version%22%3A%221%22%7D
urldecoded string then looks like
{"consents":{"essential":["borlabs-cookie"],"external-media":["facebook","googlemaps","instagram","openstreetmap","twitter","vimeo","youtube"]},"domainPath":"plugin.dev.adinserter.pro/","expires":"Wed, 19 May 2021 17:48:54 GMT","uid":"0n81y8qk-wx3q2hg7-ho3s8inv-ee1cfg3h","version":"1"}
JSON decoded string finally looks like
{
  "consents":{
    "essential":[
      "borlabs-cookie"
    ],
    "external-media":[
      "facebook",
      "googlemaps",
      "instagram",
      "openstreetmap",
      "twitter",
      "vimeo",
      "youtube"
    ]
  },
  "domainPath":"test.com/",
  "expires":"Wed, 19 May 2021 17:48:54 GMT",
  "uid":"0n81y8qk-wx3q2hg7-ho3s8inv-ee1cfg3h",
  "version":"1"
}
When this object is converted into array it looks like
array (
  'consents' =>
  array (
    'essential' =>
    array (
      0 => 'borlabs-cookie',
    ),
    'external-media' =>
    array (
      0 => 'facebook',
      1 => 'googlemaps',
      2 => 'instagram',
      3 => 'openstreetmap',
      4 => 'twitter',
      5 => 'vimeo',
      6 => 'youtube',
    ),
  ),
  'domainPath' => 'test.com/',
  'expires' => 'Wed, 19 May 2021 17:48:54 GMT',
  'uid' => '0n81y8qk-wx3q2hg7-ho3s8inv-ee1cfg3h',
  'version' => '1',
)
All array elements (object properties) that originally don’t have an index get automatically assigned a numerical index starting form 0.
To check if external-media contains facebook element you need to list borlabs-cookie[consents][external-media][0]=facebook. However, the order of external-media elements may not be fixed or known. In such case you can use * to specify any index. So the list item to check would be borlabs-cookie[consents][external-media][*]=facebook.
To check only presence of some element (regardless of its value) simply specify it without the value. For example, to check for external-media borlabs-cookie[consents][external-media].
If you are using caching (very likely) you also need to set Dynamic blocks to Client-side insert (tab ⚙ / tab General) in order to check cookies in visitor’s browser and not when the page is generated.
For client-side cookie checks you can use operators && (and) and !! (not) to create more complex conditions.
How to show ads based on visitors’ consent?
Ad Inserter supports inserting (showing) ads based on cookies or cookie values. You can define cookie conditions by black/white-listing Cookies.
If you are using caching (very likely) you also need to set Dynamic blocks to Client-side insert (tab ⚙ / tab General) in order to check cookies in visitor’s browser and not when the page is generated.
For example, If you are using one of the following plugins for cookie consent you need to whitelist (✔) the following cookie and value in Cookies list:
| Cookie consent plugin | List value |
| GDPR Cookie Consent | viewed_cookie_policy=yes |
| Cookie Notice for GDPR | cookie_notice_accepted=true |
| Cookie Consent | catAccCookies=1 |
| Complianz Cookie Consent | <span>complianz_consent_status=allow</span> |
| Borlabs Cookie | borlabs-cookie[consents][essential][*]=borlabs-cookie |
For details please check page GDPR compliance, cookies and consent.
Referrers
List referrers (domains) where you want insertion (white list) or don’t want insertion (black list). Use # for no referrer (direct visit). Click on the small button left of the list to open referrer editor. You can also use partial domains with *. To filter all domains starting with domain-start use domain-start*, to filter all domains that contain domain-pattern use *domain-pattern*, to filter all domains ending with domain-end use *domain-end.
If you are using caching (very likely) you also need to set Dynamic blocks to Client-side insert (tab ⚙ / tab General) in order to check referrers in visitor’s browser and not when the page is generated.
How to remember visitors’ referrer?
Referrer will normally work only for the first page visited when coming from another site. When the visitor will click any link on your website, the referrer will become the current page. However, the status of this user can easily be remembered with a cookie so you can display or hide ads for this user even when the referrer is now your website.
Clients
Here you can list clients (operating systems, browsers, device names, bots) where you want insertion (white list) or don’t want insertion (black list). Click on the small button left of the list to open client list selection.
Clients are determined from the HTTP User Agent data – a data sent in the request header that contains a characteristic string that allows the network protocol peers to identify the application type, operating system, software vendor or software version of the requesting software user agent.
For example, desktop Chrome browser version 77.0.3865.90 on Windows 7 platform sends the following User Agent string:
Mozilla/5.0 (Windows NT 6.1; Win64; x64) AppleWebKit/537.36 (KHTML, like Gecko) Chrome/77.0.3865.90 Safari/537.36You can also use partial user agent strings with *. To filter all user agents starting with Mozilla use Mozilla*, to filter all user agents that contain AppleWebKit use *AppleWebKit*, to filter all user agents ending with 537.36 use *537.36.
If you are using caching (very likely) you also need to set Dynamic blocks to Client-side insert (tab ⚙ / tab General) in order to check clients in visitor’s browser and not when the page is generated.
For client-side client checks you can use operators && (and) and !! (not) to create more complex conditions.
Here you can also blacklist bots (web crawlers, web spiders) if you have some content that you would like to hide from them. Of course, this relies on the user agent used by the bot.
Languages
In the Client list you can list browser languages where you want insertion (white list) or don’t want insertion (black list). Use language:LANGUAGE_STRING to specify language. Click on the small button left of the list to open client list selection which includes languages. The language is determined by the browser. The plugin checks either server-side variable $_SERVER ['HTTP_ACCEPT_LANGUAGE'] or client-side navigator.language property.
You can also use partial language strings with *. For example: to filter all clients that use any kind of English use language:en*, to filter all clients that use United States English use language:en-us.
If you are using caching (very likely) you also need to set Dynamic blocks to Client-side insert (tab ⚙ / tab General) in order to check language in the actual visitor’s browser and not when the page is generated.
For client-side client and language checks you can use operators && (and) and !! (not) to create more complex conditions.
PRO IP Addresses
List IP addresses where you want insertion (white list) or don’t want insertion (black list). List should contain comma separated IPv4 or IPv6 addresses. You can also use partial IP addresses (or ranges) with *. To filter all IP addresses starting with ip-address-start use ip-address-start*, to filter all IP addresses that contain ip-pattern use *ip-pattern*, to filter all IP addresses ending with ip-end use *ip-end. Click on the small button left of the list to open IP address editor.
If you are using caching (very likely) you also need to set Dynamic blocks to Client-side insert (tab ⚙ / tab General) in order to check IP addresses in visitor’s browser and not when the page is generated.
PRO Countries – Geo targeting and Geo location
Geolocation means determining the location (country or city) of the visitor. Geotargeting means targeting ads to specific countries. Ad Inserter Pro uses IP address of the visitor and a mapping database to determine visitor’s country. All license types support internal lightweight database for basic IP address to country mapping. Business and higher license types provide also an interface for MaxMind databses. Please check also Geolocation settings.
Default Internal database is lightweight (around 7 MB) but slightly less accurate than MaxMind.
Configuring geotargeting for blocks
Black lists and white lists are two ways to limit insertion. White list means that insertion will be enabled only for the items on the white list, while black list means that insertion will be disabled for all the items on the black list. Click on the Lists button to show available lists:
![]()
In the Countries list you can list countries where you want insertion (white list) or don’t want insertion (black list). Country list should contain comma separated country ISO Alpha-2 codes. You can also use country groups which you can define on the Ad Inserter plugin settings page (tab ⚙ / tab Geolocation). Click on the small button left of the list to open country selection.
If you have Business or Corporate Pro license you can choose between Internal (default) and MaxMind geolocation database (Ad Inserter Pro will download and use GeoLite2 data created by MaxMind). If you are using MaxMind GeoLite2 database, the plugin can (when enabled) update the database automatically each month.
Ad Inserter Pro supports also CloudFlare geolocation.
Ad Inserter Pro supports also a filter hook to add support for any other IP address/country database or service you would like to use.
Country code EU means non-specific European Union location – use individual country codes to target EU countries (use GB for United Kingdom) and AP means non-specific Asia-Pacific location – use individual country codes to target this region.
If you are using caching (very likely) you also need to set Dynamic blocks to Client-side insert (tab ⚙ / tab General) in order to check countries in visitor’s browser and not when the page is generated.
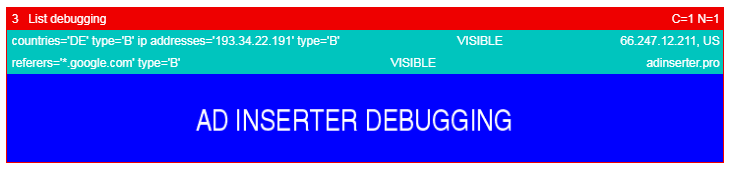
Use Debugging tools widget to show and debug referrers, IP addresses or countries. When you are using client-side dynamic blocks, debugging function Label blocks also shows referrer, IP address or country data for each block that has Referrers, IP addresses or Countries list set.
PRO Country subdivisions and cities
If you have Business or Corporate Pro license and you have selected MaxMind geolocation database, you can refine country list with country subdivisions (states, regions, provinces, municipalities) and cities.
In addition to country code you can add optional subdivision or city to any list item using the following format: CC:subdivision:city. The following list item formats are possible:
CC– selects country with country code CCCC:subdivision:city– selects country with subdivision and cityCC:subdivision– selects country with subdivisionCC::city– selects country with city
Of course, you can also select available subdivisions and cities from list. Click on the Countries label left of the list to toggle Countries / Cities list selection.

The list label changes to Cities and when you click on the small button left of list subdivision:city selection opens:
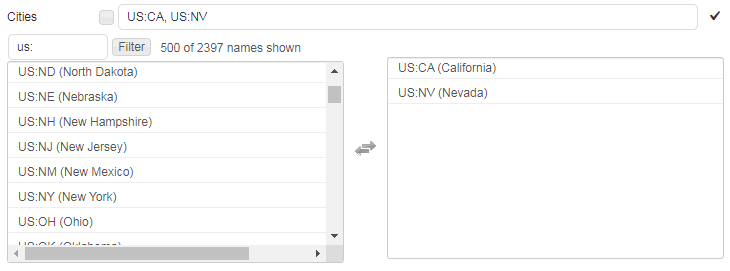
This selection contains all subdivisions and cities for which IP address data was found to be reliable. For some countries like US the list contains all states and major cities, for other countries only major cities are included. Since the complete list is huge and you normally need only items from one country, the selection on the left lists up to 500 items. To limit selection use filter. For example, enter country code with colon to list items from that country (us: will filter items for US). For each country subdivisions are listed first so in this case you get all US states on the top. Of course, you can narrow the filter with subdivisions (us:ca will filter items for California in US). You can also use more than one filter term.
When you click on the item in the left list the item is selected, transferred to the right selection and also included in the Cities list above. You can also click on the Cities list label to go back to country selection, although, you will rarely need a list with city items from more than one country.
Please note that when you include country or country:subdivision in the list, it makes no sense to include also cities. For example, list US, US:CA:, US:CA:los angeles makes no sense as when you select US as country you also select all subdivisions and cities in that country. So if you need to target Los Angeles you should select only US:CA:los angeles.
PRO Multiple list checks inside single block
Ad Inserter Pro supports another very powerful feature to insert part of block code depending on list conditions as described above. For example, the following code
[ADINSERTER CHECK countries="US"]
<img src="https://via.placeholder.com/728x150/ff000f/00ffd1.png?text=US">

[ADINSERTER CHECK countries="^US"]
<img src="https://via.placeholder.com/728x150/0000ff/00ffd1.png?text=WORLD">
would insert banner according to the country: for US the first one, for the rest of the world the second one. This can be very handy when you need to insert at some position a code that depends on some parameter. Normally you would use multiple blocks with different list settings and the same insertions settings. However, with the [ADINSERTER CHECK] separator you can list multiple codes with different conditions.
Normally the check attribute condition="value1, value2" means white list. To blacklist values add ^ character in front of the first value: condition="^value1, value2" – this means blacklisting value1, value2.
The following CHECK conditions (lists) are available:
- categories
- tags
- taxonomies
- ids
- urls
- url-parameters
- cookies
- referrers
- clients
- ip-addresses
- countries
- scheduling (between or outside dates)
- viewport
You can use the same values as described above for lists. Each CHECK separator can have more than one condition but only one condition type per check. Please check also shortcode processing order.
[ADINSERTER CHECK countries="US" url-parameters="ref=affiliate"]
<img src="https://via.placeholder.com/728x150/ff000f/00ffd1.png?text=US affiliate">

[ADINSERTER CHECK countries="^US"]
<img src="https://via.placeholder.com/728x150/0000ff/00ffd1.png?text=WORLD">
For scheduling between or outside dates you need to specify the scheduling attribute in the form yyyy-mm-dd hh:ii:ss, yyyy-mm-dd hh:ii:ss, 0123456 (start date and time, end date and time, days in week (0 for Monday, etc.) and optional fallback block number). If you omit hours it means 00:00:00. You can also omit dates – it means everyday according to hours and days in week. Check scheduling for details. Use ^ to specify scheduling outside dates.
CHECK shortcode separators have the highest processing priority so you need to use other separators (e. g. rotation code) for each CHECK option.
The code above the first CHECK option will be always inserted (no CHECK conditions).
You can also preview each code option, preview window supports separator selection for such cases (CHECK, COUNT and ROTATE code separators).
For impression and click tracking purposes CHECK options can be treated like rotation options where statistics for each option can be displayed. Add statistics value to the CHECK attribute. For example: [ADINSERTER CHECK="statistics" country="US" name="USA" index="5"]
Viewport checks
Use the same names for viewports as they are defined on the Viewports tab (general plugin settings, tab  ). For example, you can show one code for desktop devices and another code for other devices:
[ADINSERTER CHECK viewport="Desktop"]
<img src="https://via.placeholder.com/728x150/ff000f/00ffd1.png?text=Desktop">

[ADINSERTER CHECK viewport="^Desktop"]
<img src="https://via.placeholder.com/728x150/0000ff/00ffd1.png?text=MOBILE">
The ^ character in front of the check parameter values means inverse condition (like blacklisting).
You can list more than one viewport name for each check. The code for each viewport will be inserted according to the setting for Dynamic blocks. When Client-side insert mode is selected, the code will be inserted with Javascript code and shown/hidden with CSS for other settings.
You can also use [ADINSERTER VIEWPORT] separators to have different codes for different devices inside one block.
Install Ad Inserter for free
Ad Inserter Pro Affiliate Program
