HTML Element Selection with CSS Selectors
One of the strongest features of the plugin is insertion before or after arbitrary HTML element. This means that when you can’t use standard WordPress positions for insertion you can use automatic insertion before, after or inside any HTML element on any page. If you can create CSS selector for that element then Ad Inserter can insert there. This means that you can insert any code anywhere on the page. To be able to use this feature you need to know a little about HTML and CSS selectors – patterns used to select the elements.
CSS selectors are used not only for insertion before/after HTML elements, they are used also to define ad elements to check for ad blocking detection and to define main page element for sticky ads that stick to the content (PRO only).
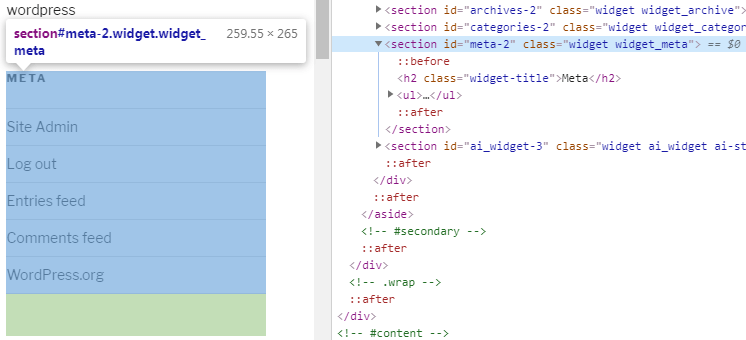
To get the right CSS selector for the target element you can either use web inspector in the browser (right mouse click on the element + Inspect):
or built-in HTML Element Selection tool. Each field where you need to enter CSS selector(s) to define HTML element has a small button before or after the field. For example, for insertion Before/Inside/After HTML element you have the following settings:

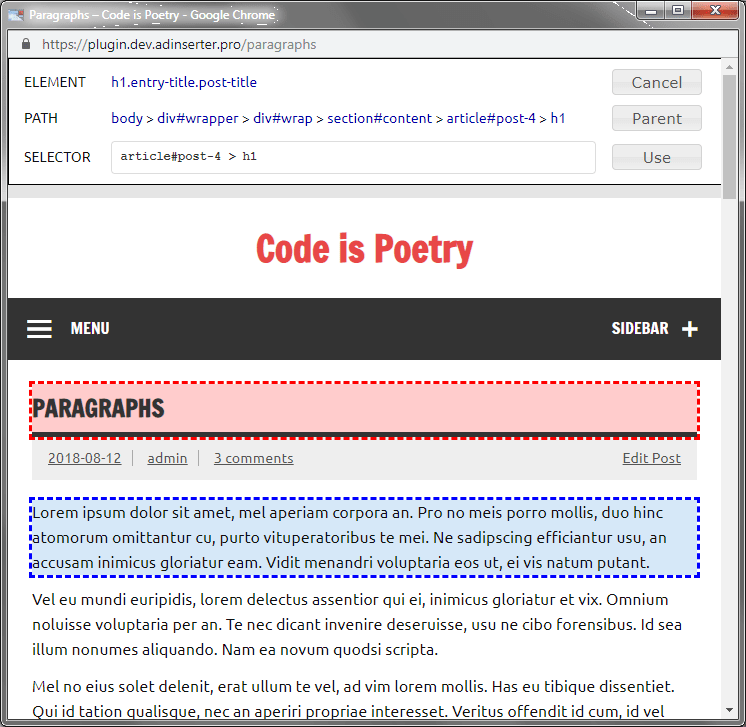
When you click on this button a popup window opens with homepage of your website and element data window on the top.
When you hover cursor over any element on the page the element will be colored blue with dashed border. When you click on the element it will be selected and colored red – it’s data will be shown in the top element data window.
You can also browse the website. Simply click on any link to go to a different page – the text in the SELECTOR field will be preserved. To select link element hold CTRL key while clicking on the link.
When you click on the element to select it, the element is colored red and it’s data is displayed in the top window:
- ELEMENT shows element tag with optional id and classes.
- PATH shows the complete element selector – the path in the DOM tree. You can click on individual elements in the path to select that element.
- SELECTOR field shows the shortest selector for the selected element. This is either the complete path or partial path with the last element with id. You can also manually edit selector or enter text and the elements will be selected as you type.
Buttons have the following function:
- CANCEL closes element selection window.
- PARENT selects parent element in the DOM tree (as shown in the PATH).
- USE copies selector in the SELECTOR field into the field on the settings page and closes element selection window. To select multiple selectors hold CTRL key and the button will change to ADD to add selector to the existing comma separated list of selectors.
In most cases the initial selector of most elements will be the complete path of that element which will be valid only on the page where you have selected that element.
This is because most posts or pages contain element IDs (#id) that are unique to this post or page. You need to edit the selector to be universal and valid for all wanted posts or pages. In the example above the initial selector is article#post-4 > h1. It contains post id (#post-4) which is valid only for this post. To make the selector universal (for all posts) you need to remove the id: article > h1. The selector will now on all posts select h1 header that has article element as parent.
Of course, not all IDs are wrong or unwanted – you need to know what ID means and where it is used. To check your selector on different pages simply navigate the website to see if the right element is selected on all wanted posts or pages.
CSS selector can describe (select) more than one element. In such case the block will be inserted before/after all selected elements.
Some examples of CSS selectors are described on page How to insert ads at specific position.
Related Pages
Install Ad Inserter for free
Ad Inserter Pro Affiliate Program
