Ads on AMP pages
Before you can put ads on AMP pages you need to know what AMP is. The AMP Project is an open-source initiative aiming to make the web better for all. The project enables the creation of websites and ads that are consistently fast, beautiful and high-performing across devices and distribution platforms. Web pages and ads published in the AMP open-source format load near instantly, giving users a smooth, more engaging experience on mobile and desktop.
Of course, this comes at a price. You can use most of CSS, but some parts are just not allowed to be used. Then JavaScript is basically not allowed at all. You have to use an off-the-shelf JavaScript library that they provide you with.
This means that client-side features that use Javascript code like ad rotation, ad tracking, ad impression and click limiting, click fraud protection, client-side cookie checks, client-side dynamic blocks, insert method for device detection, client-side insertion before/after HTML element, etc. can’t be used on AMP pages. Use server-side insertion whenever possible.
If you need dynamic features like ad rotation, country checks, IP address checks, referrer checks or scheduling on AMP pages, then you should consider using W3 Total Cache caching plugin which supports server-side dynamic features using fragment caching – in such case Dynamic blocks setting in Ad Inserter needs to be set to Server-side using W3 Total Cache.
Therefore, for AMP pages you need different ad codes. Ad Inserter supports insertion of ads on AMP pages, just make sure you are using ad codes for AMP and you have properly configured the plugin for ads on AMP pages as described below.
Use AMP validator to check if your AMP pages are valid.
AMP plugins
The following AMP plugins have been tested with Ad Inserter:
- AMP for WP – Accelerated Mobile Pages (free, please check the warning below)
- AMP (free, you may need to set Plugin priority to 10 in order to be able to insert into post/page content)
- WP AMP Ninja (free)
- Better AMP – WordPress Complete AMP (free)
- WP AMP – Accelerated Mobile Pages for WordPress (paid – you need to uncheck Remove third-party the_content hooks for better compatibility)
- PenCi Soledad AMP plugin (paid, together with Soledad WordPress Theme)
AMP for WP – Accelerated Mobile Pages
Ad Inserter can insert ads also on AMP pages. However, if you configure the plugin to insert wrong codes that are not designed for AMP pages, such codes may cause AMP validation errors. To prevent such errors AMP for WP – Accelerated Mobile Pages plugin provides extension AMPforWP Plugin Manager which can disable specific WordPress plugins on AMP pages in order to prevent validation errors. However, for Ad Inserter this is not required as you only need to configure it properly so on AMP pages only valid AMP code will be inserted. Please read this page and make sure you are inserting only valid AMP codes on AMP pages.
When you see warning notice AMPforWP Plugin Manager disabled Ad Inserter on AMP pages this only means that on AMP pages Ad Inserter will not be called to insert codes. You need to make sure that Ad Inserter is configured to insert only AMP codes on AMP pages and then you can go to AMPforWP Plugin Manager settings, uncheck Ad Inserter and click on Save Changes.
Ads on AMP pages
Ad Inserter is compatible with AMP pages and most AMP plugins and can insert ads also on AMP pages. However, AMP pages require different code for AMP ads. Read this page and make sure you are inserting only valid AMP codes on AMP pages.
Normally the code will not be inserted on AMP pages. There are two settings that can be used to insert code on AMP pages:
1. AMP pages checkbox (button Misc / tab Insertion) – If checked it enables insertion also on AMP pages.
Use this approach only if you need to insert the same code on normal and AMP pages. To insert different codes on AMP pages (e.g. for AdSense) leave AMP pages unchecked and use [ADINSERTER AMP] separator as described below.

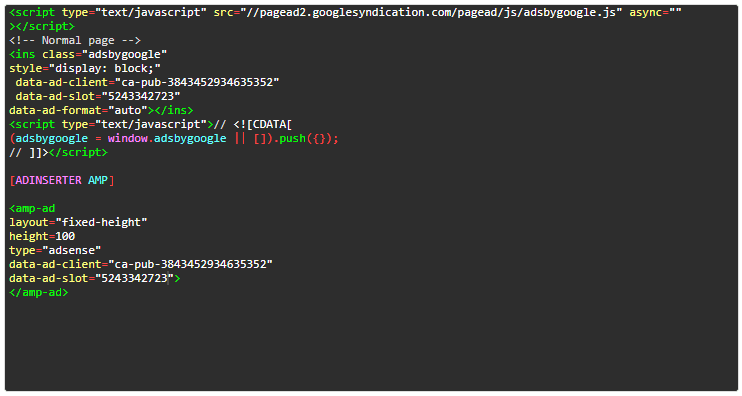
2. Separate the codes with [ADINSERTER AMP] separator – the code above the separator will be inserted on normal pages, the code below the separator will be inserted on AMP pages. This separator can be used also for Header and Footer code.
You can use AdSense code generator to generate AdSense AMP code described below. Check also AdSense guide to creating AMP-compatible ad code
Example for AdSense ads on AMP pages:

Generating AdSense code for AMP pages
Ad Inserter has a simple code generator for AdSense ads which can be used also to generate AdSense code for AMP pages. Check AdSense impementation guide for details.
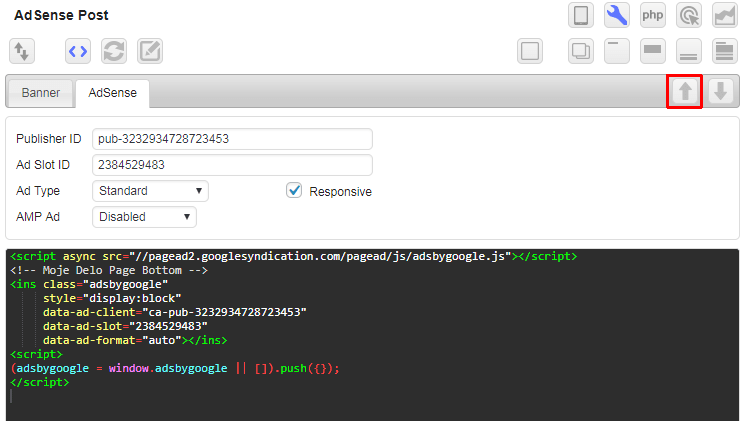
Paste normal AdSense code into the code window, click on Code tools button, then on Code generator button and then click on the Import code button to import the AdSense data from it.

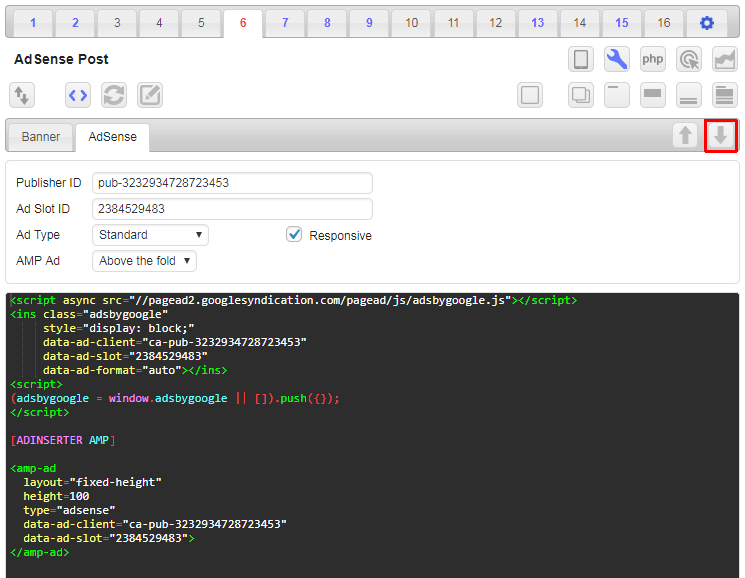
Once you have the Publisher ID and Ad Slot ID imported select ad type for AMP pages. Then click on the generate button and the plugin will generate Javascript code for the AdSense ad in the code window of the current block.

AdSense AMP ads need also a script in the header
<script async custom-element="amp-ad" src="https://cdn.ampproject.org/v0/amp-ad-0.1.js"></script>Put AMP head script in the Header code block, use [ADINSERTER AMP] separator (the code above the separator will be inserted on normal pages, the code below the separator will be inserted on AMP pages), and enable header code (button with green dot next to PHP button).

Sticky AMP Ads
Normal code for sticky ads can’t be used on AMP pages as they use CSS property position: fixed; or Javascript code which is not allowed on AMP pages. However, there is a way to fix an ad to the bottom of an AMP page. You need to put additional script in the Header and use code for sticky AMP ad.
Required script for sticky AMP ad:
<script async custom-element="amp-sticky-ad" src="https://cdn.ampproject.org/v0/amp-sticky-ad-1.0.js"></script>Example of header code with scripts for sticky AMP ads:

Ad code for sticky AdSense AMP ad:
<amp-sticky-ad layout="nodisplay">
  <amp-ad
    width="320"
    height="50"
    type="adsense"
    data-ad-client="ca-pub-xxxxxxxxxxxxxxxxxx"
    data-slot="xxxxxxxx">
  </amp-ad>
</amp-sticky-ad>
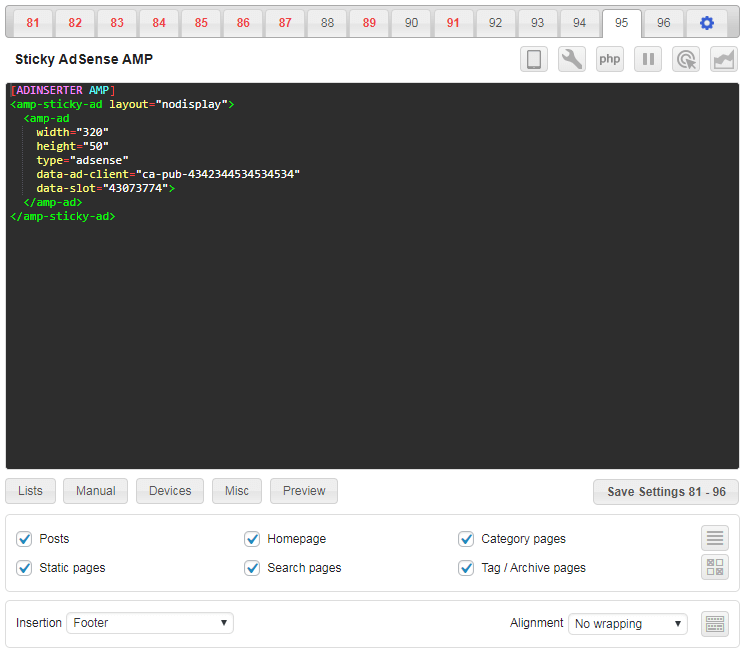
Example of ad code for AdSense sticky ad on AMP pages:

- Use your own IDs for data-ad-client and data-slot
- Use insertion position Footer – if Footer is not available on your AMP pages you can use any other insertion position inside
<body>– the sticky ad will always stick to the bottom of the page - Use No wrapping alignment
You can use the same code for sticky ads also for other ad networks – you only need to use appropriate IDs. The following rules apply to the code for AMP sticky ads:
- There can be only one <amp-sticky-ad> in an AMP document. The
<amp-sticky-ad>should only have one direct child:<amp-ad>. Note: Make sure you include any required scripts for the<amp-ad>component. - The sticky ad appears at the bottom of a page.
- The sticky ad introduces a full-width blank container and then fills the sticky ad based on the width and height of the
<amp-ad>. - The height of the sticky-ad is whatever its child needs up to its max-height.
- The max-height of the sticky-ad is 100px, if the height exceeds 100px then the height would be 100px and overflow content will be hidden.
- The width of the sticky-ad is set to 100% using CSS and cannot be overridden.
- The opacity of the sticky-ad is set to 1 using CSS and cannot be overridden.
- The background color of the sticky-ad can be customized to match the page style. However, any semi-transparent or transparent background will not be allowed and will be changed to a non-transparent color.
- When scrolled to the bottom of the page, the viewport is automatically padded with the additional height of the sticky ad, so that no content is ever hidden.
- When in landscape mode, the sticky ad is center-aligned.
- The sticky ad can be dismissed and removed by a close button.
- If no ad is filled, the sticky ad container will collapse and will no longer be visible.
Media.net code for AMP pages
Media net provides two codes for their ads on normal pages. One code goes into the header and contains customer identifier (in our case 8CU5NCA3L):
<script type="text/javascript">window._mNHandle = window._mNHandle || {}; window._mNHandle.queue = window._mNHandle.queue || []; medianet_versionId = "3121199";</script> <script src="https://contextual.media.net/dmedianet.js?cid=8CU5NCA3L" async="async"></script>
The other code goes where ads should appear – this is the code that goes into the block code window:
<div id="754216422"> <script type="text/javascript">try { window._mNHandle.queue.push(function (){ window._mNDetails.loadTag("754216422", "300x250", "754216422"); }); } catch (error) {}</script> </div>
Please note that this code contains an id (in our case 754216422) that should be unique on the page. Check Media.net ads fro details.
For AMP pages you need to use the following Media.net AMP code:
<amp-ad
  width="300"
  height="250"
  type="medianet"
  data-tagtype="cm"
  data-cid="8CU5NCA3L"
  data-crid="754216422"
>
</amp-ad>
data-cid is the customer identifier (from the header code) and data-crid is the id from the body code. The final code for the block is then:
<div id="754216422"> <script type="text/javascript">try { window._mNHandle.queue.push(function (){ window._mNDetails.loadTag("754216422", "300x250", "754216422"); }); } catch (error) {}</script> </div> [ADINSERTER AMP] <amp-ad width="300" height="250" type="medianet" data-tagtype="cm" data-cid="8CU5NCA3L" data-crid="754216422" > </amp-ad>


