Global custom fields
Ad Inserter settings are accessible only to administrators or users who have the manage_options WP capability. Normally you would need to grant admin access to anybody who needs to update ad codes or the text that is inserted via Ad Inserter. Global custom fields are a simple solution to this problem. They allow other users without admin access to edit custom fields with the code or text that is used in Ad Inserter blocks or elsewhere in the site. With custom pages and fields you can create new, customized sub-admin pages to edit global fields.
Ad Inserter global custom fields are universal pieces of data (ad codes, HTML code, text, or anything that can be inserted) that appear across the entire site (globally) and are managed in one central location. The site administrator can define page title, menu position and access level. They are a kind of option pages with sets of custom fields that are available globally throughout the website and don’t belong to any particular post. The data from the global custom fields can be accessed via shortcode or PHP function and can easily be used in Ad Inserter blocks. This way administrators can keep restricted access to plugin settings while allow other users like editors or authors to edit common data or codes that are used elsewhere on the site.
To use global custom fields you need to define pages and fields and then use shortcodes or PHP functions to access field data.
Please note that WordPress (and Ad Inserter) also supports custom fields that can be defined for each post. Those custom fields are not global, i.e. they can be used only inside the post where they are defined. This page describes how to configure and use global custom fields that can be used globally – in Ad Inserter and on any WordPress post or page.
Pages for custom fields
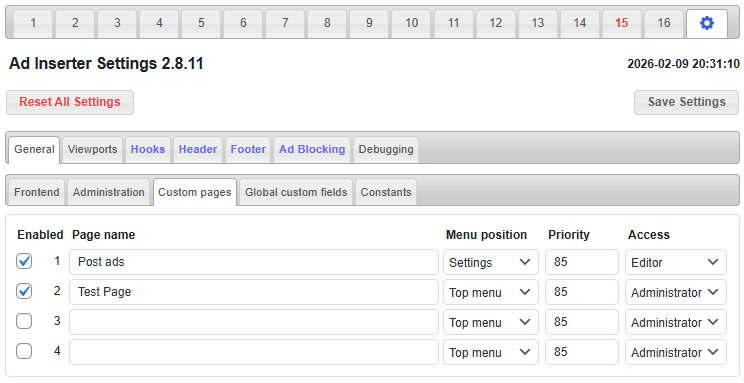
With custom admin pages (sometimes named also options pages) you define custom settings pages where the users will be able to edit custom fields. Go to general plugin settings ( tab  / tab General / tab Custom pages ).
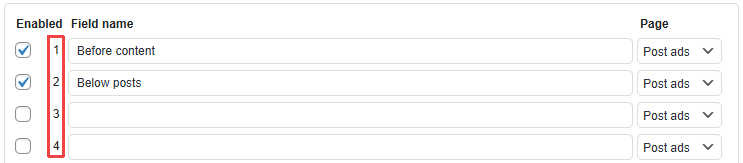
For each page you need to define a name for the page. The same name will also be used for the menu item so make it short. Then you need to define the menu position where the link to this page will be placed. You can choose either Top menu (link to the page will be displayed as top menu item in the left menu bar) or submenu on any of the existing top menu items. You also need to define priority for the menu item – menu items with lower number will appear before menu items with higher number. Finally, you need to define the access level for the page. Choose one of the available user roles (Editor, Author, Subscriber, etc.) or individual user capability. Each page you would like to use needs to be enabled with the checkbox in front of the page name. Disabled pages will not appear in the menu and can not be accessed.
Global custom fields
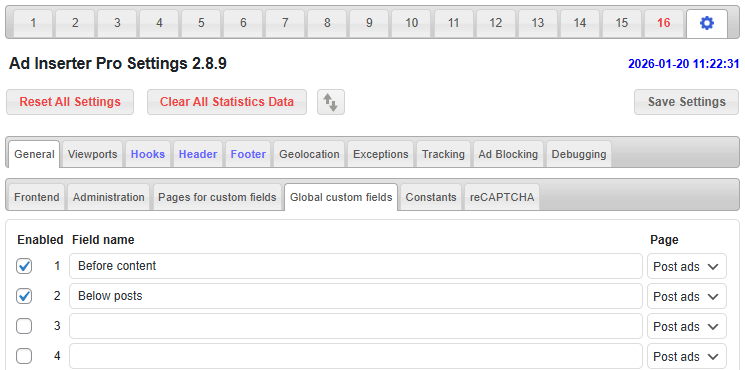
On the tab Global custom fields you define the fields that the users will be able to edit. You need to set a name for the field and select the page where this field will be edited. The name of the field will be displayed above each field on the page. Each global custom field you would like to use needs to be enabled with the checkbox in front of the field name. Disabled fields will not appear on the pages.
After you are done save settings and reload the page so the created pages will be available for custom fields.
Editing global custom fields
Now when the page with custom fields is created you can define/edit custom fields.
Please note that after you save settings for custom fields you need to reload the admin dashboard so that the new settings are loaded and the new menu is created.
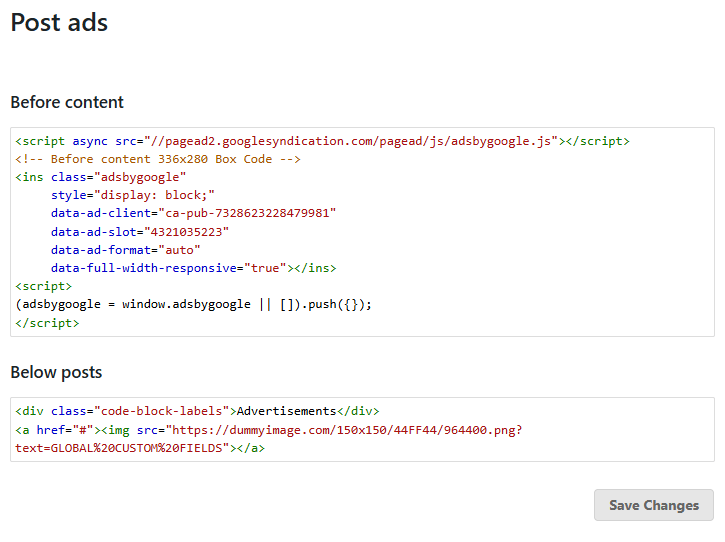
For the example above you should now get a new submenu Post ads in the Settings WP menu. Clicking on the Post ads menu should open a page with custom fields like the one below. Enter the codes and save settings.
PRO Types of global custom fields
Basic custom fields use a code editor where you can put some ad code or text. Ad Inserter Pro supports additional field types:
- Code editor
- Image
- Checkboxes
- Selection
- Checkbox
Field types and settings can be accessed by clicking the small button right of field data:
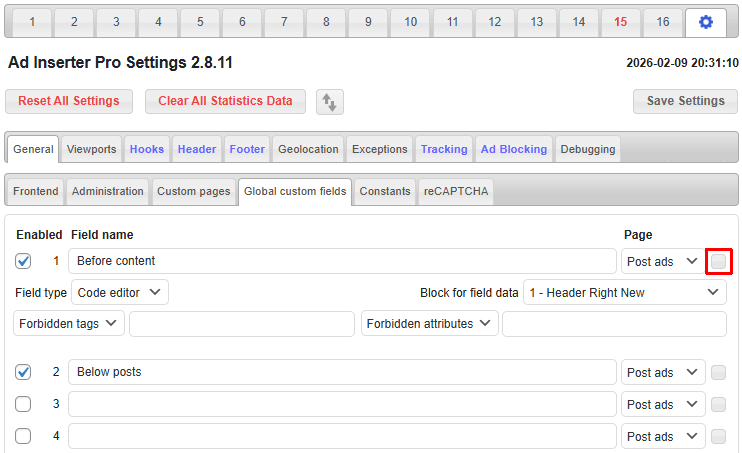
For field types Checkboxes and Selection you need to select also a block with rotation code which will be used for the selection options. You don’t need to insert this block anywhere, option name and option code will be used for the options. For Code editor field type there are two additional settings for code sanitization – forbidden or allowed tags and tag attributes.
Code editor
For field type Code editor selecting a block is optional. If selected, then this field will edit the specified block code. Otherwise (if selected None), this will be an independent code that can be used anywhere. There are also additional options to either forbid or to allow tags or tag attributes. When the default options are used (no forbidden tag and no forbidden attribute) no sanitization is performed on the code. However, when you define tags or attributes, before the custom fields are submitted for saving, the plugin will sanitize the entered code according to the settings. In this process the plugin will parse the code, apply settings and generate new sanitized code so some longer tags might lose line formatting. To forbid or to allow HTML comments use tag comment. An example of Code editor field:
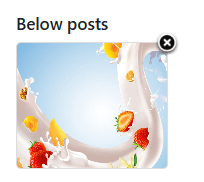
Image
When the field type is set to Image you can select any uploaded image (or upload a new one). A click on the image icon will open an image selection dialog where you can select the image and optionally set a link url and select whether the link should be opened in a new tab. The shortcode for this field will generate the complete HTML code including link tag for the banner. A click on the top right close button on the image icon removes the selected image.
In the image selection dialog there are also checkboxes for every viewport defined. By default all viewports are checked so the image will be inserted for all viewports. However, you can define a different image (e.g. with different dimensions) for each viewport. In such case when not all viewports are checked for the first image, additional images will appear for the field and under each image there will be listed viewports enabled for the image.
It is also possible to get raw image and link data via PHP function – see below for details.
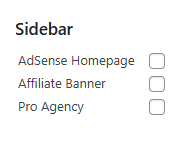
Checkboxes
Checkboxes are one way to select multiple choices. For each option there is a checkbox which can be checked or not. For this type you need to select a block with rotation code which will be used for the options, for example:
[ADINSERTER ROTATE name="Pro Agency" index="3"]
<div class="code-block-labels">Advertisements</div>
<a href="#"><img src="https://dummyimage.com/468x60/44FF44/969697.png?text=Pro%20Agency"></a>

[ADINSERTER ROTATE name="AdSense Homepage" share="90" index="1"]
<div class="code-block-labels">Advertisements</div>
<a href="#"><img src="https://dummyimage.com/468x60/0044FF/969697.png?text=AdSense%20Homepage"></a>

[ADINSERTER ROTATE name="Affiliate Banner" index="2"]
<div class="code-block-labels">Advertisements</div>
<a href="#"><img src="https://dummyimage.com/468x60/0044FF/969697.png?text=Affiliate%20Banner"></a>
Each rotation option must have a name attribute. This name will appear as the checkbox name. The index attribute is optional and defines the order of options. Index can be any number betwwen 1 and 99. Each option can have some code. The output of the shortcode is the rotation code which contains only the enabled options. This way the administrator can prepare a block with many options and the ad manager can then enable or disable each of them.
The code above will display the following checkboxes:
It is also possible to use rotation code only to name options and get raw selection data via PHP function – see below for details.
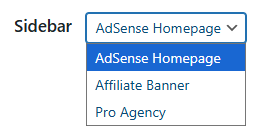
Selection
Selection field type allows you to select only one option from the list. For this type you need to select a block with rotation code which will be used for the options. The output of the shortcode is the code for the selected option. The code for the example above will generate the following selection field:
It is also possible to use rotation code only to name options and get raw selection data via PHP function – see below for details.
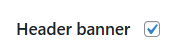
Checkbox
Checkbox field type allows you to enable (check) or disable (uncheck) some option. The output of the shortcode is either 1 or 0. In most cases you will use Checkbox field type with PHP function. Example of the Checkbox field:
Accessing global custom fields
Ad Inserter global custom fields can be accessed via shortcode or PHP function.
Via shortcode the field (defined end enabled on Custom pages and Global custom fields) can be accesses via field number of field name. For example:
[ADINSERTER global-custom-field="1"]

[ADINSERTER global-custom-field="Before content"]
The shortcode when expaned will return the code or text saved for the custom field 1 named Before content. This is the easiest way to use global fields in Ad Inserter blocks
To access custom field from PHP code you should use PHP function adinserter_global_custom_field () with field number or field name as the parameter:
<?php if (function_exists ('adinserter_global_custom_field')) echo adinserter_global_custom_field (1); ?>

<?php if (function_exists ('adinserter_global_custom_field')) echo adinserter_global_custom_field ("Before content"); ?>
Of course, global fields defined in Ad Inserter can be used anywhere on the website, in the theme or in other plugins.
You can easily get field shortcode copied to the clipboard by clicking on the field number:
PRO Accesing raw data from global custom fields
For some field types you can get raw field data via PHP function with additional second parameter set to true. For example:
<?php $raw_data = function_exists ('adinserter_global_custom_field') ? adinserter_global_custom_field (1, true) : array (); ?>
Image
For Image field types the function will return an array with the following fields: id with WordPress attachment/image ID, link with link url and new-tab with 0 or 1 to indicate if the link should open in a new tab.
Checkboxes
For Checkboxes field types the function will return an array of options where each option is an array with the following fields: name with option name, code with option code and selected with 0 or 1 to indicate if the option is selected or not.
Selection
For Selection field types the function will return an array of options where each option is an array with the following fields: name with option name, code with option code and selected with 0 or 1 to indicate if the option is selected or not. Of course, only one option can be selected.
PRO Remote management of global custom fields
Remote management means managing Ad Inserter Pro settings on other websites without logging into these websites. This feature is available only with the Corporate license type.
In addition to plugin settings which can only be managed by administrators, you can also allow other user roles (or users with specific user capability) to manage global custom fields on remote websites. They will be able to edit fields the same way as on the local website with some minor limitations as described below.
To configure remote global custom fields you need to first configure websites for remote management. Once the remote websites are configured, go to general plugin settings ( tab / tab General / tab Custom pages ) where you’ll see additional settings below the local pages for custom fields:
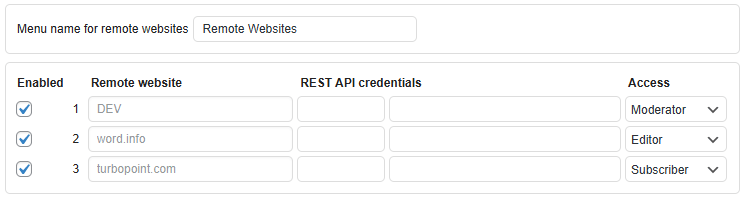
Here you can define top menu item name where all remote websites with custom fields will be listed. All global custom fields for specified user role (or user capability) will be listed on a single page for specific remote website. This is slightly different as for local custom fields you can define multiple pages for the same user role.
Then you need to enable remote management of custom fields for each website, define user role or user capability for access (in most cases you will configure the same user role as it is configured for custom pages on the remote site) and optionally enter REST API credentials.
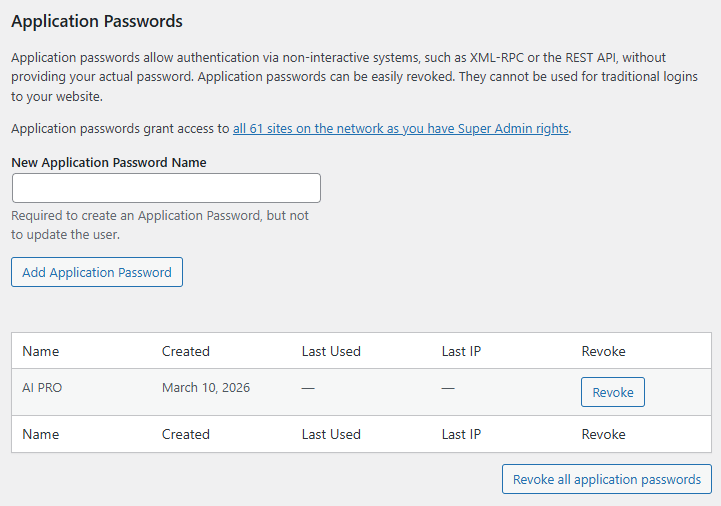
REST API credentials are different form WordPress login credentials and are needed only if you would like to upload missing images to remote websites. They can be generated on the user profile page on the remote website where you can create Application passwords.
Managing images on remote websites
When user edits image field on the remote website and saves the fields, the plugin checks if the image is present on the remote website (by checking the file name). There are 3 possible cases:
- If the image is present on the remote website then the shortcode for this custom field on the remote website will generate HTML code for the image on the remote website.
- If the image is not present on the remote website and REST API credentials for the remote website are entered, the plugin will try to upload this image to the remote website. If the upload is successful, the shortcode for this custom field on the remote website will generate HTML code for the (now) present image on the remote website.
- If the image is not present on the remote website and REST API credentials for the remote website are not entered, the shortcode for this custom field on the remote website will generate HTML code for the image present on the website where custom fields are edited.
Install Ad Inserter for free
Ad Inserter Pro Affiliate Program
